We all know iPhones can take great photos and it’s fun to share them online. But even the largest mobile devices have screens that are only a few inches across, meaning that detail can easily be lost. So how do you ensure your iPhone photos get noticed when you share them? The key is to craft your images specifically for the small-screen format of the iPhone, creating bold and striking compositions. In this tutorial, you’ll discover 11 tips for composing stunning iPhone photos that will stand out even on the smallest of screens.

With more than 70 million photos posted to Instagram each day, you have to do everything you can to make your images stand out from the crowd and jump out at the viewer on their small screen. Mobile photo sharing begs for a special aesthetic, and the best photos will get noticed because of their bold simplicity.

Do you sometimes find that your photos don’t look as good as the way you remember the scene? That’s because our eyes and brains are great at focusing on what’s important in a scene, whereas a camera captures every detail, even the unimportant ones.
As photographers, we need to make it clear to viewers what they should be looking at through choices we make about composition, lighting and color. This is especially true for photos shared via iPhone apps like Instagram and VSCO Cam because the screens on the mobile devices we view them through are small.
So, let’s take a look at eleven techniques to help you compose stunning photos that will have maximum impact on the small screen of an iPhone.
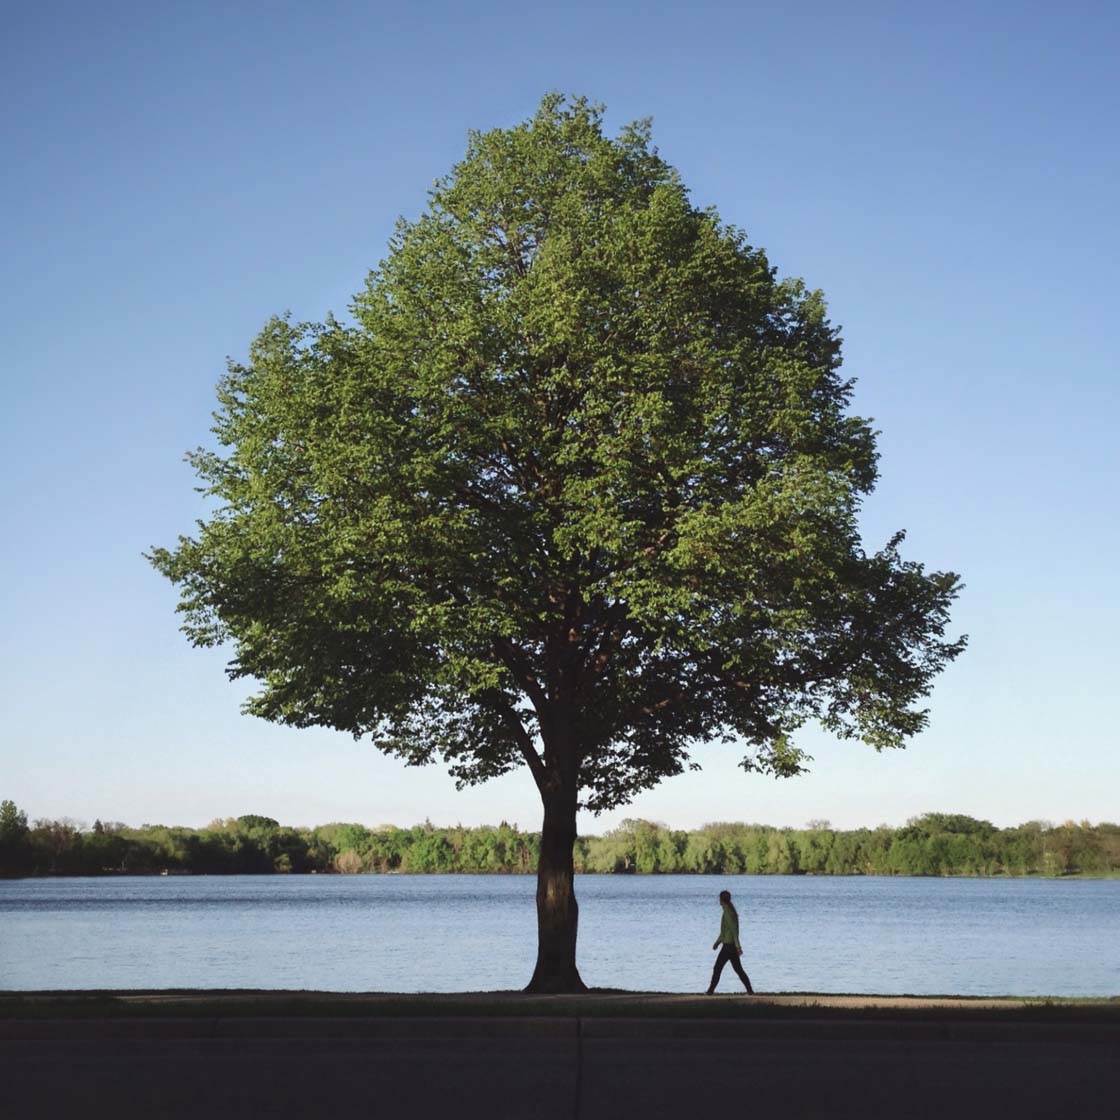
1. Use Minimal Compositions
It can be tempting to pack our images full of all kinds of interesting things, but having a minimal composition is a sure way to get your iPhone photos noticed on a small screen.
Because we all see so many images every day, simple ones that use minimal compositions will usually get a lot of likes because they have a place for our eyes and brains to rest, and focus on a single subject.

A photo of a single person or tree makes it very clear what the subject is about, and can create a very strong composition when there’s nothing else to distract the viewer. Because there’s so little in the frame, everything in it becomes more important, even if the subject is small.
2. Isolate Your Main Subject
For visually striking photos that will get people to stop scrolling and take notice, it’s usually best to simplify the image so that you can emphasize your main subject. Separating your main subject from the background is one of the best tricks to good photography.

Before you take a photo, look at your subject and see if there’s anything behind it, like a distracting branch or pattern that will interfere with the shape of the subject.

If there is, try changing your perspective by shooting from a higher or lower angle to help isolate the subject from the distracting background. Shooting from a low angle is a useful way to get more sky behind your subject.

Light and dark are also great ways to separate your subject. If your subject is dark, try to compose your shot so that there’s a light area behind it, or vice versa. Remember, you want the composition to be very clear and clean so that it will be easily seen, even when it’s on a small screen.
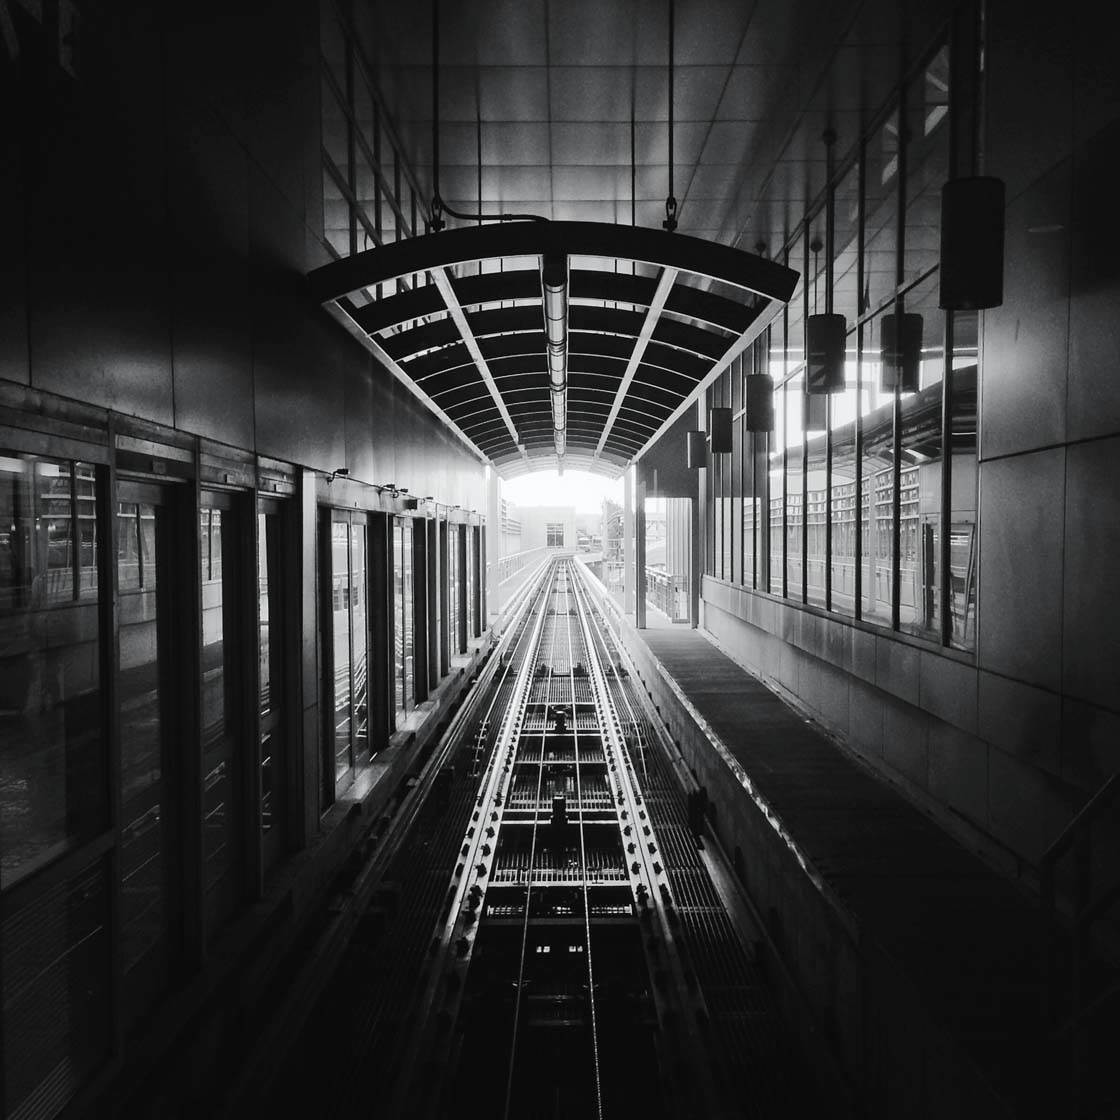
3. Incorporate Leading Lines
Leading lines are an excellent way add visual interest to your photos, and this is especially true when it comes to small-screen images. Lines are one of the most powerful ways to create a striking composition.
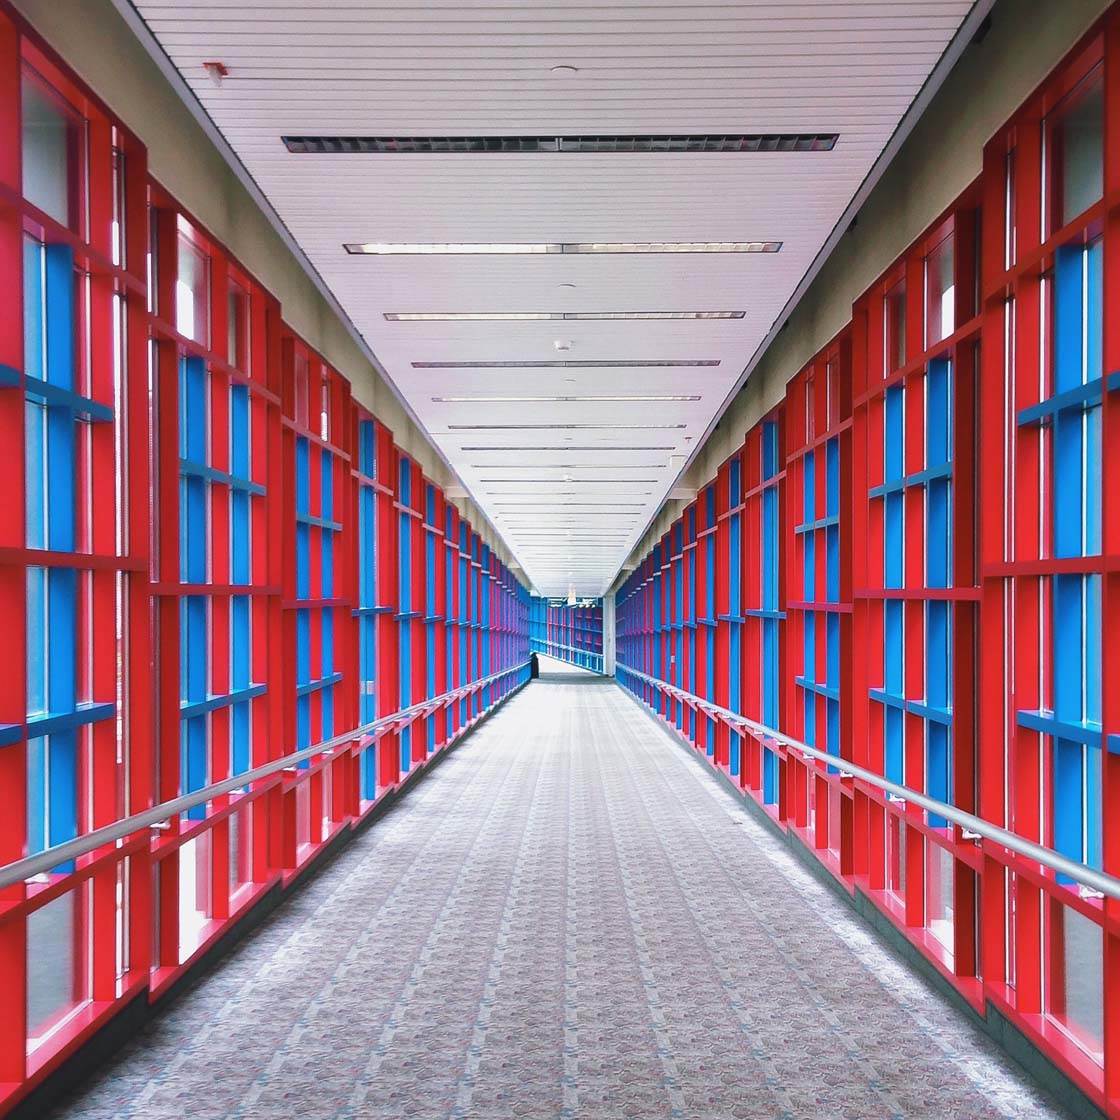
Leading lines help draw the viewer’s eye to the main subject or point of interest, and create a sense of depth in the image. Your eye can’t help but follow the lines from the foreground into the distance, especially if you use parallel lines to create a symmetrical composition like the one above.

Lines also add boldness and clarity to a photo which will help get your photos noticed on a small screen. It’s usually best to have your lines starting at the bottom corners of the image so that the eye is drawn from the foreground into the distance.
Standing at the bottom of a building and looking straight up often gives you a great opportunity to incorporate leading lines into your composition.
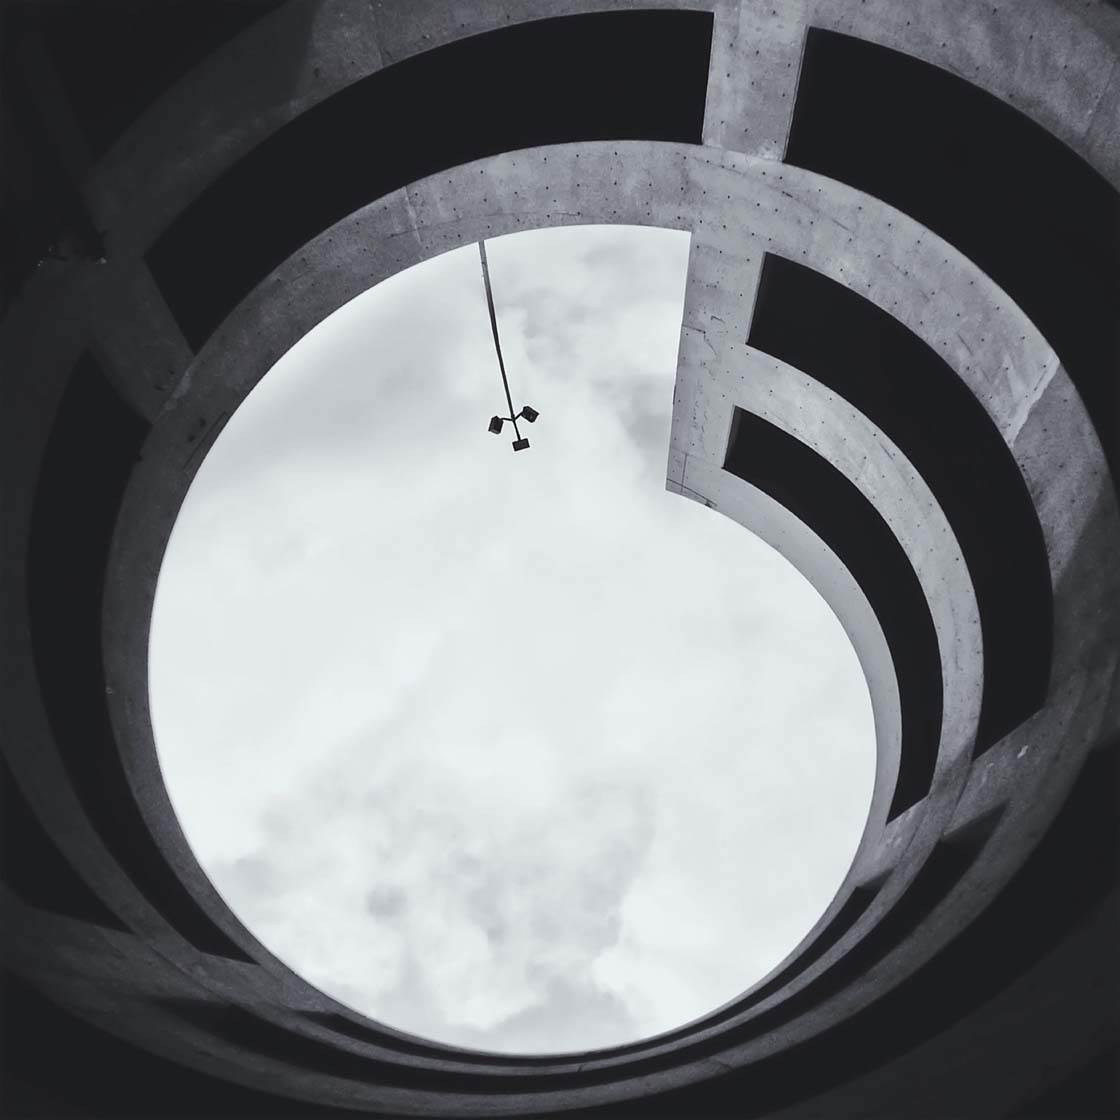
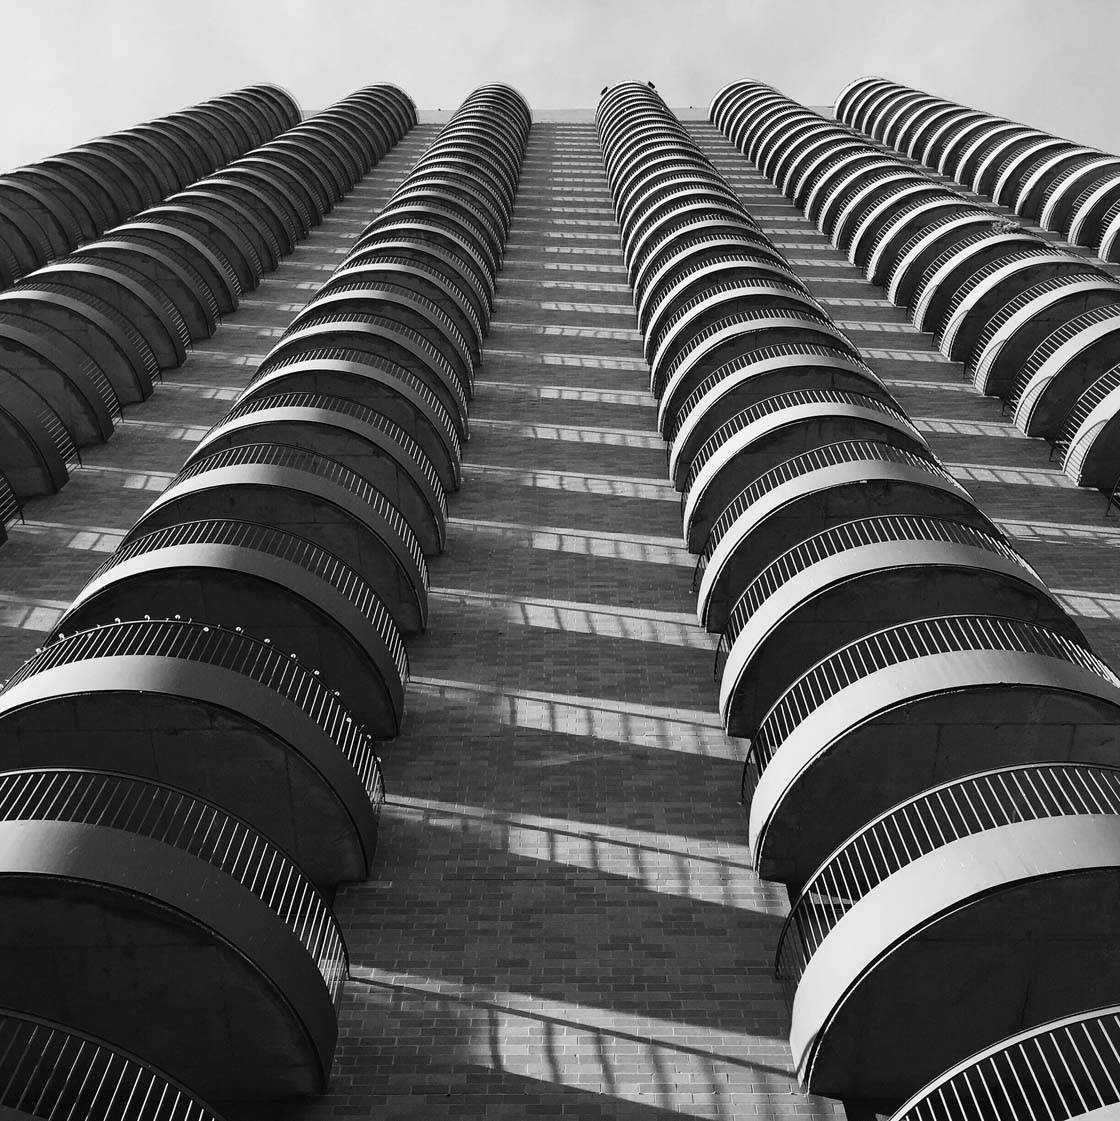
4. Look For Strong Shapes
Strong shapes instantly catch our eye because of their boldness. A photo that has a strong graphic composition is especially well suited to small-screen photography because the clarity of the shape works at any size.

Circle, triangles or squares are great choices for eye-catching photography. Once you start looking for them you’ll see them everywhere!

The more space the shape takes up in the frame, the bigger the visual impact will be, so don’t be afraid to get up close and fill the frame with strong shapes.
5. Use Patterns For Visual Interest
Similar to the last tip, patterns can also give your photos a strong graphic quality. Our brains naturally notice patterns and repetition, so using them will help bring attention to your images.

Buildings are great for finding patterns because of their regularity. Look out for shadows too as they can often create interesting patterns. You can also find plenty of patterns in nature, such as pebbles on the beach, a pile of chopped logs or the veins of a leaf.

Look for any man-made or natural patterns, then experiment with the composition until you find the angle that works best. Don’t be afraid to get close and fill the entire frame with the pattern.
6. Create Symmetry
Symmetry creates powerful compositions that catch the eye and intrigue the viewer. Look out for symmetry in architecture and nature, and compose your shot so that one side mirrors the other. Keep the line of symmetry perfectly central for the most impact.

At first you may find it difficult to spot symmetrical compositions, but once you start looking you’ll notice them more often. Buildings are good places to find symmetry, but a straight road leading into the distance also works well.

Don’t forget to look up as you might be missing out on an interesting symmetrical subject right above you. You can also create your own symmetry by placing your phone up against a reflective surface and shooting the scene and its reflection.

Glass is perfect for reflections, but all kinds of shiny surfaces will allow you to create symmetry wherever you are. And of course, you can also create symmetry using reflections in water.
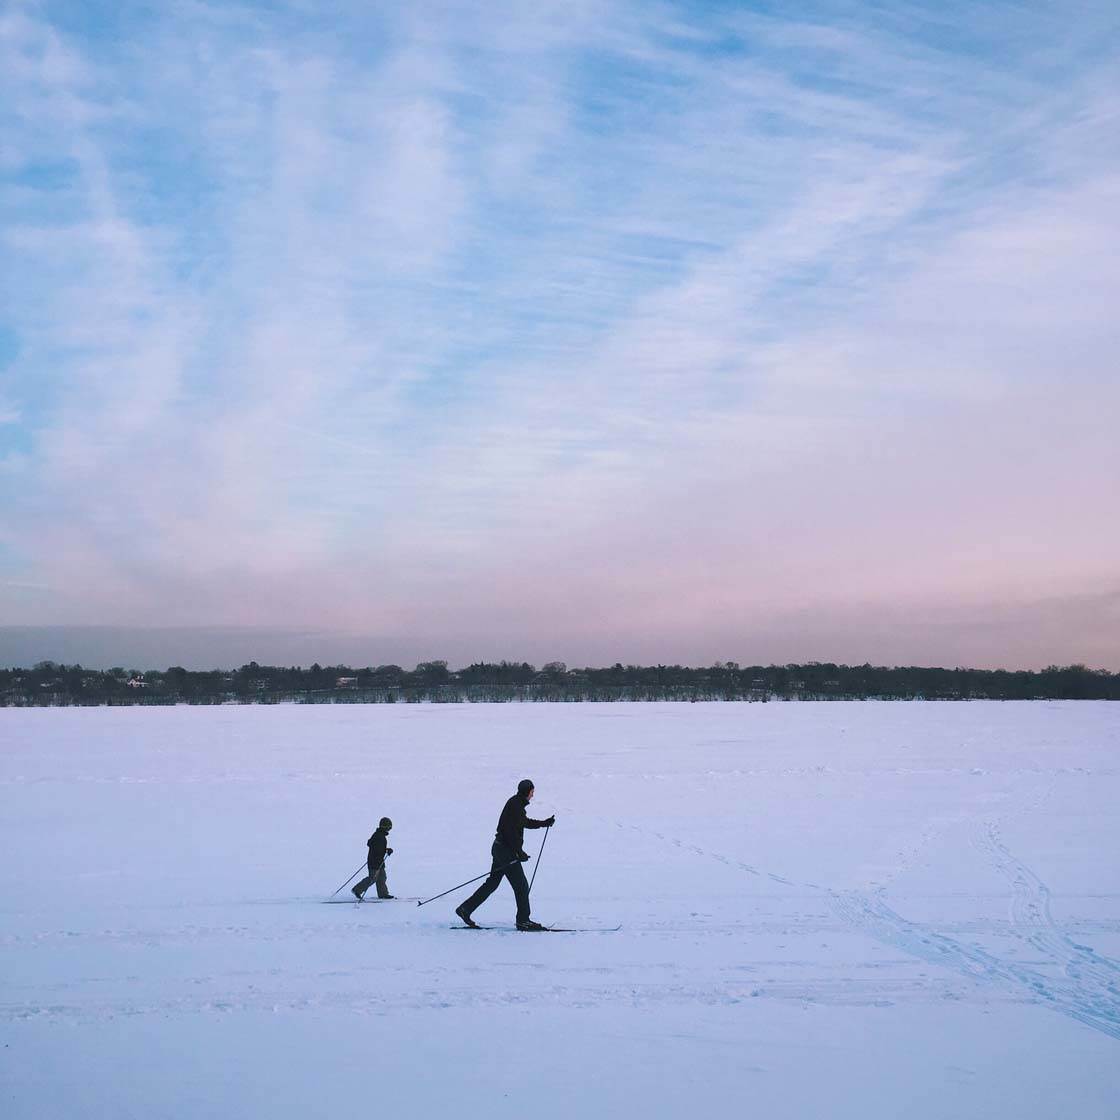
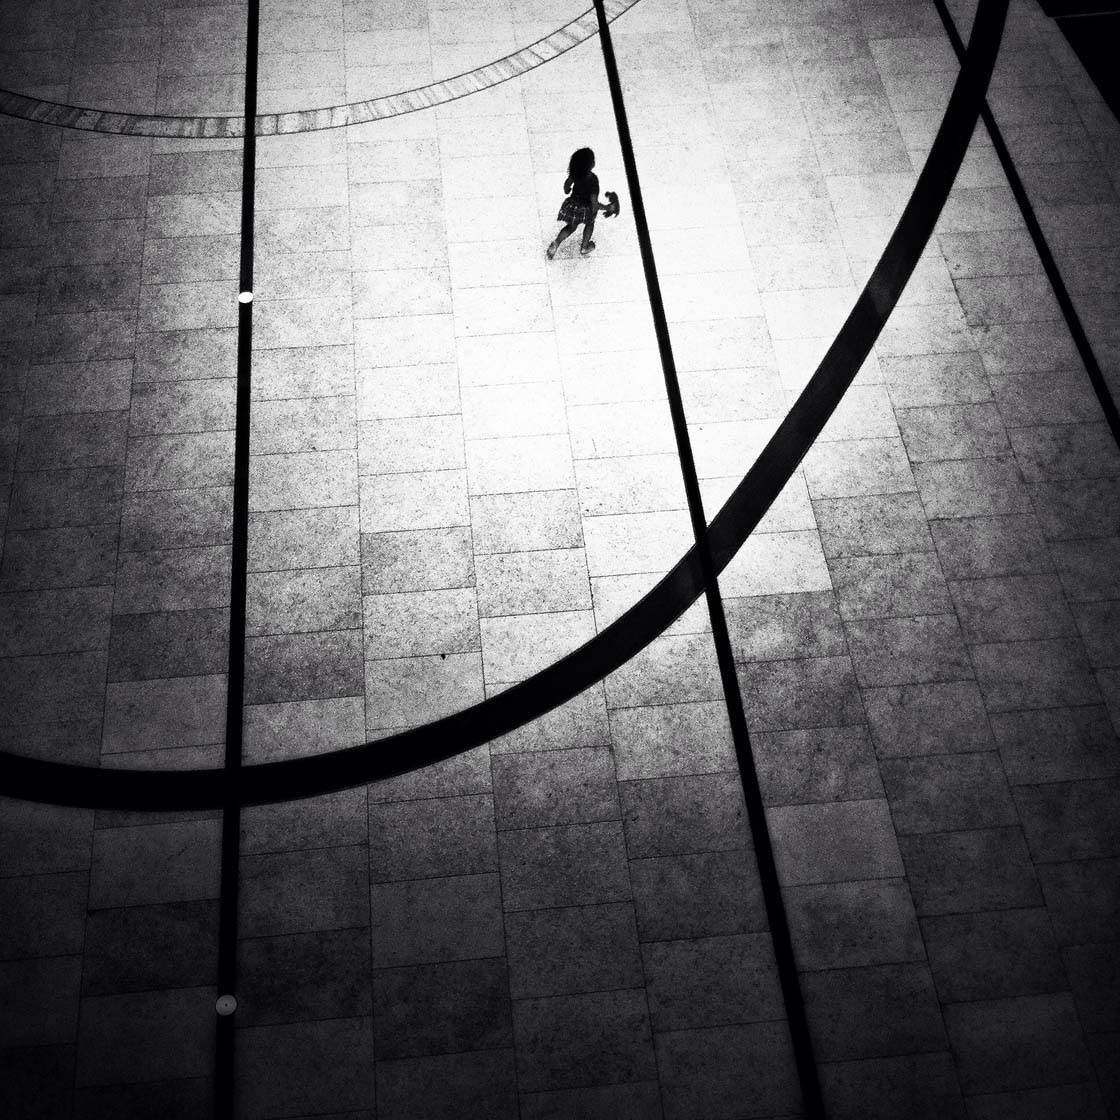
7. Use Lots Of Negative Space
Another way to get attention is to use unconventional framing in your photos. Instead of the normal rule of thirds, try placing your horizon line very low in the frame or position your subject in one corner of the frame, which will make the space seem much larger.

A large section of emptiness in a frame is called negative space, and it’s a great choice for mobile photography because it can help create a simple, strong composition.

The space actually draws attention to your main subject as there’s nothing else in the frame competing for attention. Don’t be afraid to leave a lot of empty space in your photos.
8. Shoot High Contrast Scenes
High contrast scenes are also a great choice for small screens. The contrast between the dark and bright areas will usually help define the subject clearly and add some drama to the scene.
Try shooting in harsh light where you’re likely to get strong shadows, and use the shadows as part of your composition.
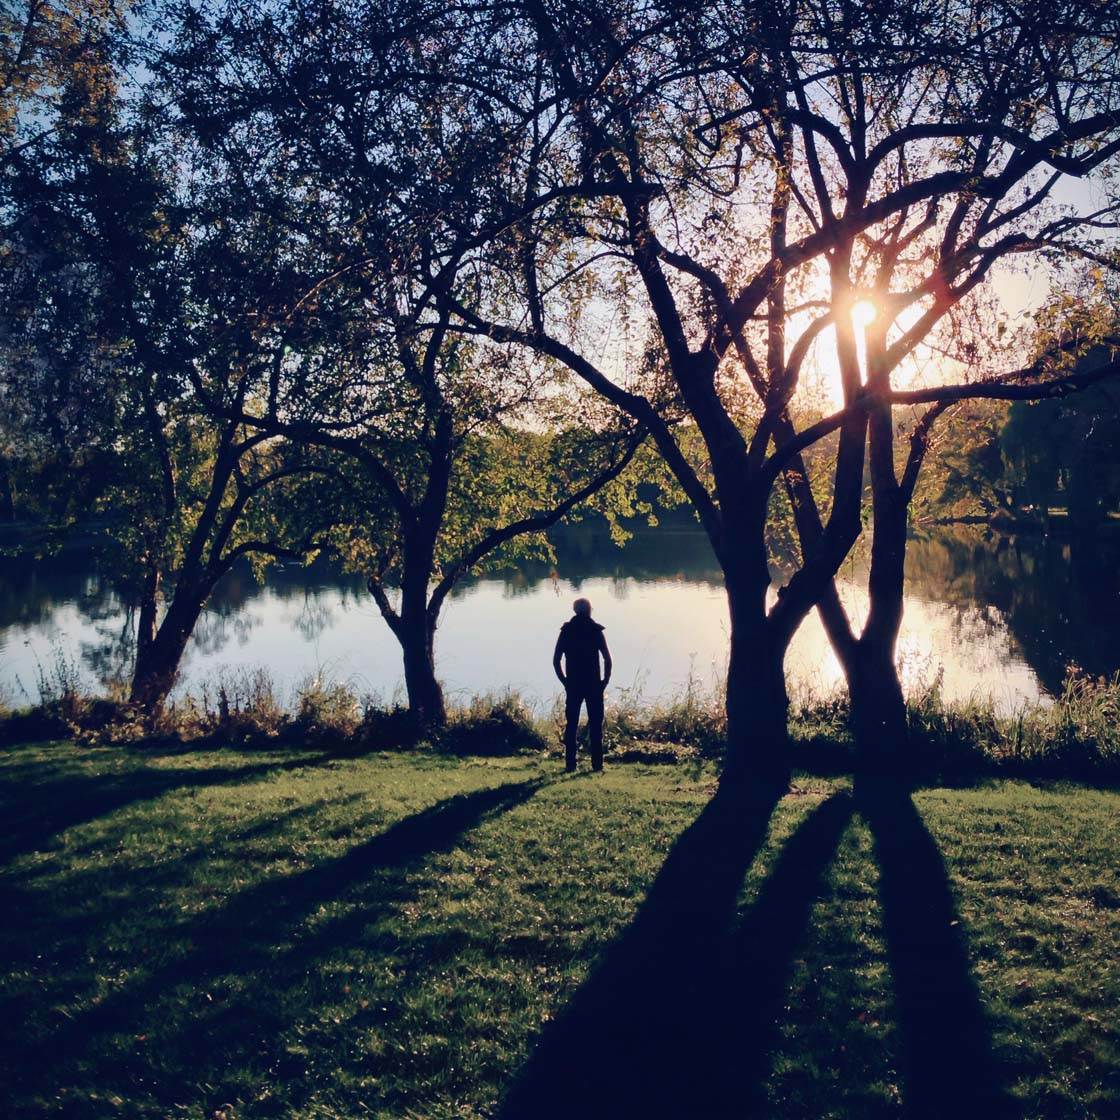
Backlighting is also a great choice for high contrast images. If the sun or light source is behind the subject, they will appear as a dark silhouette against the bright background. Instead of being a recognizable person, they become a universal person that’s easy for the viewer to relate to.

Using artificial light can also work well to create high contrast images. Just ensure you set exposure for the highlights (bright areas of the scene) so that the shadows stay nice and dark. Remember, we’re aiming for strong, simple images.
9. Use Color Wisely
Color is a very strong way to get someone’s attention. By using a single spot of color in an otherwise neutral background you’ll make the viewer zero in on the burst of color. It’s a great way to isolate your main subject in a way that we haven’t discussed yet.
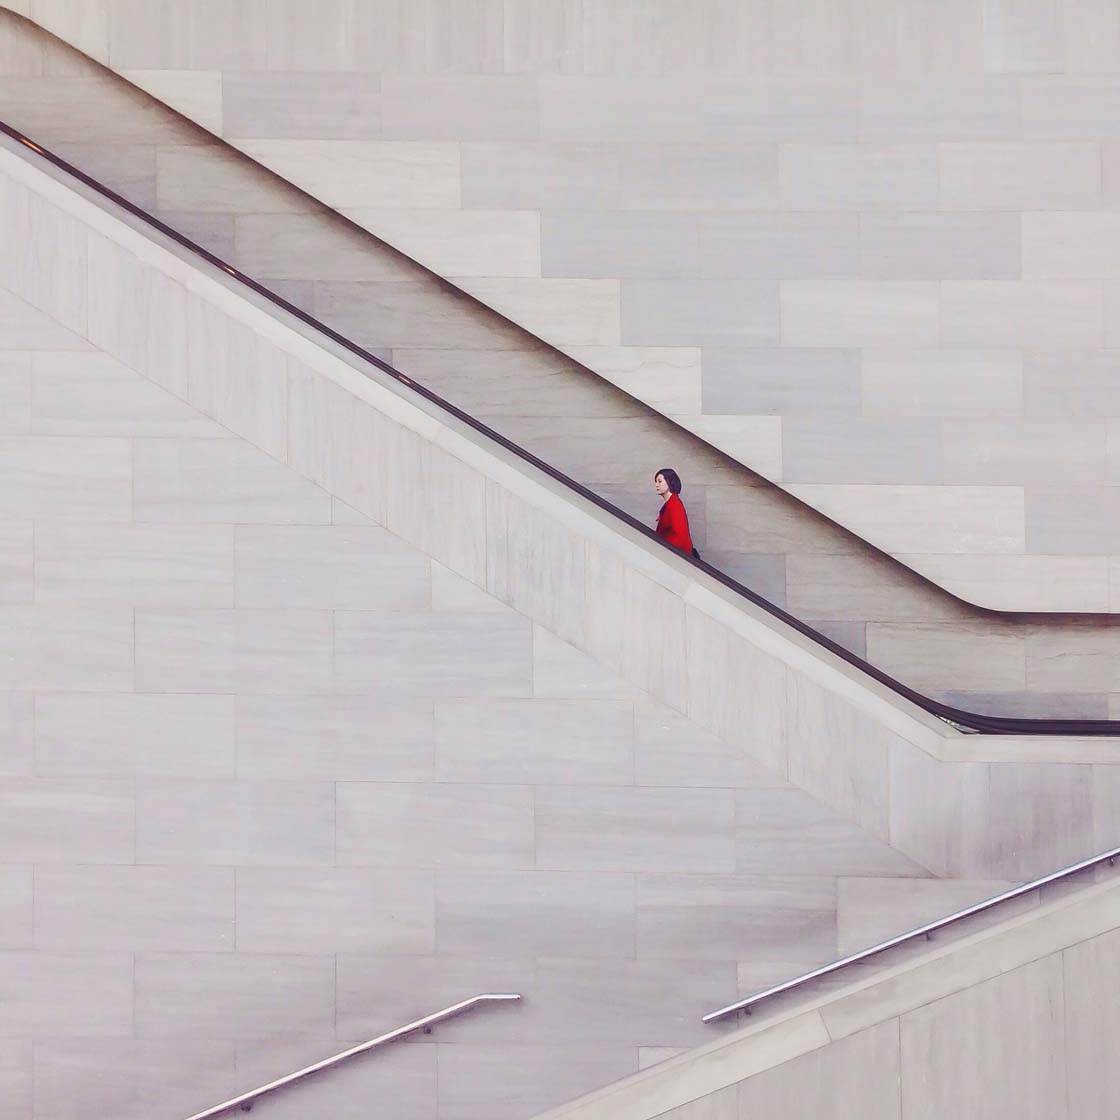
Red is especially powerful. A person wearing red clothing will stand out really well against a neutral background or landscape, even if they’re very small in the frame.

Conversely, you can use a single dominant color as a method for making your photo noticeable even when it’s small. A field of color will make your neutral-colored subject stand out in an unexpected way.
10. Eliminate Clutter
Sometimes we can’t help but include some unwanted elements in the scene. But you can easily eliminate clutter from your iPhone photos in post-processing. TouchRetouch is a great app for this, allowing you to quickly clean up your image in under a minute.
Get rid of any extraneous details that aren’t important to the final image, like leaves on the ground, wires in the sky or distracting reflections on buildings. This will bring more attention to your main subject and give the image more impact on a small screen.

The shadows and silhouettes in this photo have a strong visual impact, but the parking meter in front of the people is an unnecessary distraction that doesn’t add anything to the composition.
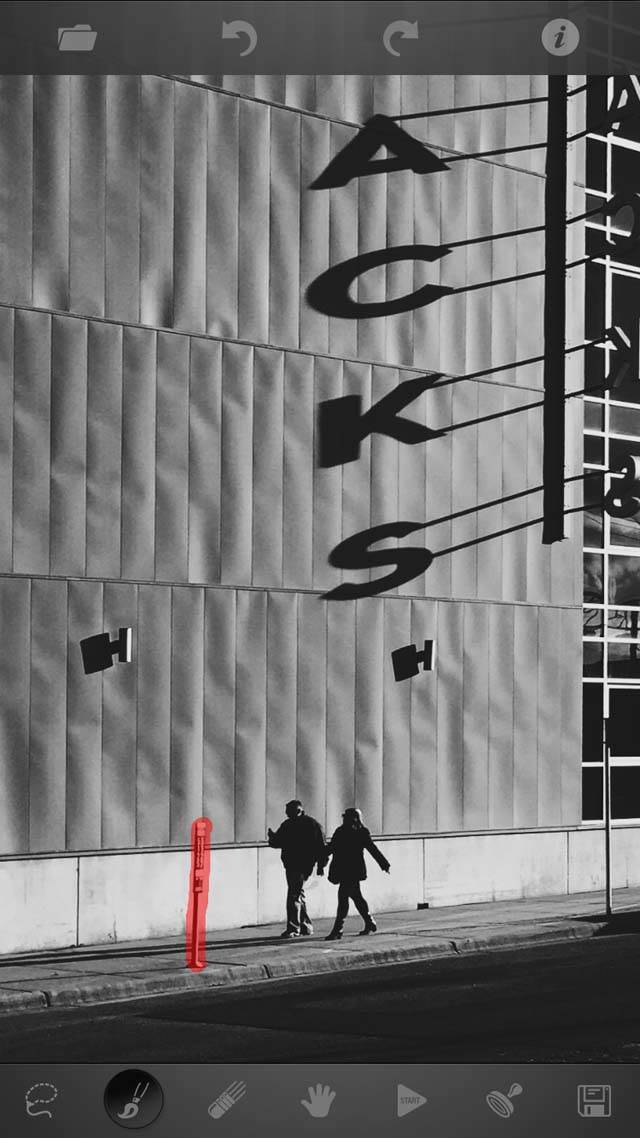
Using the Brush tool in TouchRetouch, I simply “painted” over the parking meter to select it, then pressed Start to remove the object. Below is the processed image with the distraction removed.

Removing unnecessary elements will make your images stronger and your main subject stand out. It might not seem that important, but this small step can make the difference between a good image and a great one.
11. Look At Your Thumbnail
When you think you’re done editing, make sure you look at your photo as a small thumbnail in your camera roll. Does it work even when it’s tiny? Does it catch your eye? If you’ve used any of the steps above, it probably will!
Having a strong thumbnail is a great way to get new people to notice your photography when it appears on the Explore page in Instagram. It’ll be a little jewel that shines, catching people’s eyes and making them take notice.

Hopefully you now have a better understanding of why it’s important to have strong images with clear subjects, minimal compositions and a graphic quality that will stand out even when it’s just a tiny thumbnail.
With a little practice, your photos will get noticed and you’ll be appreciating that well known maxim, “Less is More!”


Great great tips !
Thanks! Hope you find them useful.
Thanks for this excellent tutorial Eric! These tips are so helpful 🙂
I think these tips work well when taking commercial shots or scenic shots. However, as a mom, I find this frustrating. It’s hard to make pictures of everyday activities like homework, dishes, folding laundry, and mopping floors seem this interesting.
I’d love to have someone do a tutorial on how to take the average, everyday mom routine and shoot is well. NOT outdoor shots with kids playing in awesome woods even I would love to play in, but everyday shots. Kids playing on the floor of their room; kids doing chores; household activities being completed.
All of the shots above seem very clean and practically staged. They’re great; really! I love looking at them. However, that just not what most of us see on a daily basis.
Hi, thank you for your comments. That sounds like a good topic for a future tutorial 🙂
While we don’t currently have a tutorial that covers exactly what you want, below are a couple of articles that you might find interesting:
http://iphonephotographyschool.com/children/
http://iphonephotographyschool.com/home-photography/
Hi, and thanks for your comments. You might enjoy following @ayanah on Instagram, who has 4 kids and incorporates her family life into her photos in an effective and interesting way. It’s not exactly everything you mentioned, but I find her feed inspiring and I hope you will too. Thanks!
I’m not sure how helpful, or reasonable, this suggestion may be to you, and others have said it before, but try to change the perspective from which the shot is taken. My daughter is excellent at this. Me? i get a photo of a bug on a deck of cards on the picnic table. Her? The most excellent interpretation of a chubby, cute caterpillar reading the brand name on the deck of cards to verify they’ll suit the poker game slated for later that night … all because she took a different approach to the same subject. I sincerely commend you for trying to capture these every-day moments so many take for granted; good luck!!!!
Hi I have a question I love all the tips givin above however you didn’t explain how to exactly resize a photo (mine being taken on iPhone 6) into the standard square size instagram limits you on, especially without loosing any strong detail. If there’s any app I could use to resize large great resolution photos into instagrams standard square size please let me know here’s my Insta- : vnovusonclouds <– feel free to follow respond etc. thanks!
Here’s some articles that can help you in getting the best square photos for Instagram:
http://iphonephotographyschool.com/not-crop-instagram/
http://iphonephotographyschool.com/cropping-for-instagram/
Hope this helps 🙂
I usually crop my photos using Snapseed and upload them that size to Instagram. I know some people advocate for making the photo smaller, so that it’s the exact size that Instagram posts, but I’ve never done that, and never noticed any loss in quality.
Go download app called Whitagram from applestore. It will help you resize your photos perfectly. Go to instagram and view references…. Chinozblue
I find these lessons very helpful. Thank you for providing them
Thank you for the positive feedback Edwin – really pleased that you find our tutorials helpful 🙂
Emil you are my hero. Not just for the great and simple iPhone tips that have made my photos 100% better instantly, but also the way you make your expertise available. Your videos are simple, yet very packed with real hard knowledge. Your marketing I find among the best I have ever met. Pure, simple and clear message of the value that you provide. I am learning marketing from you as much as photography. Thanks!
Thank you for your tips. They are helpful.
Thanks Emil; another great post from you!