Vacations are a time of relaxation and fun, and also a great time to practice your iPhone photography! Whether you’re traveling the world, going on a family vacation or just taking a short weekend break, documenting your trip with photographs is a great way to record your vacation memories forever. In this tutorial, you’ll discover 8 travel photography techniques for taking memorable and varied vacation photos with your iPhone.

1. Make Use Of Establishing Shots
The term “establishing shot” is well known in the movie industry. In almost every movie that you’ve watched, you will have seen the opening visuals showcasing wide angle, recognizable locations.
If it’s not a recognizable location, then it’s often substituted for a recognizable object or situation that gives the viewer a sense of where they are. Using establishing shots in your vacation photography gives the viewer an idea of where you went.
When on vacation, ask the locals where the city-wide lookouts are, the rooftop viewing platforms or the centre of community life. Then go and take some photos of these typical scenes particular to that location.
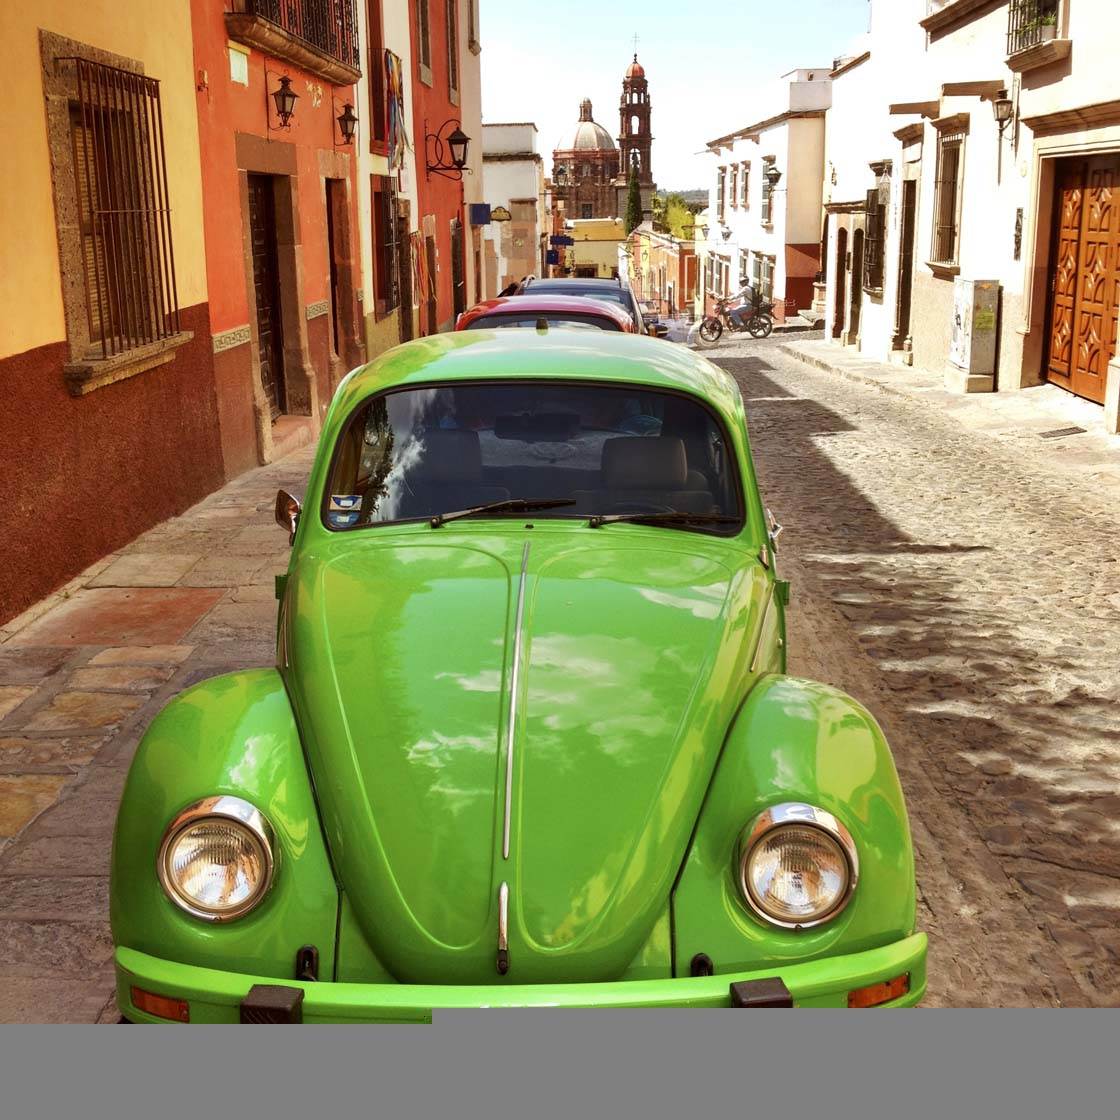
In my example of the green VW Beetle we can consider this an adequate establishing shot as it gives the viewer generous hints that the photo was taken in Mexico.
This type of image works well for magazine covers if you ever plan to sell your photos to publications. The cover shot usually gives the reader a sense of place, and the photos on the inside of the magazine can be more varied.
2. Include People In Your Photos
I love to make use of people in my iPhone photographs. Sometimes it’s beneficial to take two photographs of the same scene – one with a person in the frame and one without. Take a look at this photo of a woman on a balcony.
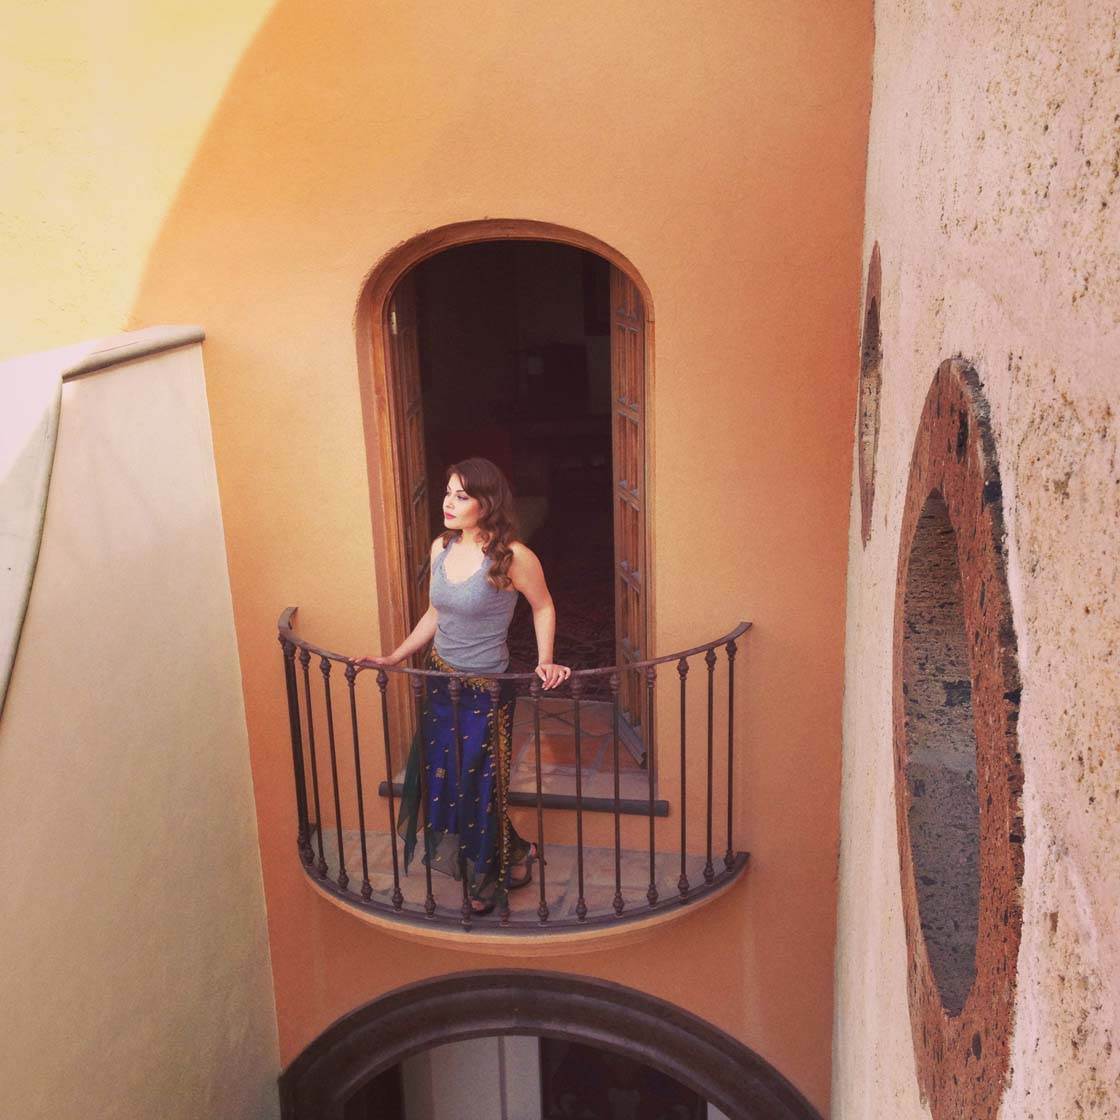
I first took the photo without her in the shot, and it was a very nice architectural photograph that could stand on its own. When I asked my friend to walk into the photograph to get a second image, I realized that both images have value.
One is for a study on architecture, and the other a lifestyle or fashion type image. Asking people to be in your iPhone photographs also has the benefit of giving the image a sense of scale, and possibly context.
3. Make Use Of Shadows
To make adequate use of shadows you usually need a good sunny day. As our lessons here are based on vacation iPhone photography, it’s possible that you chose a vacation spot with lots of sun.
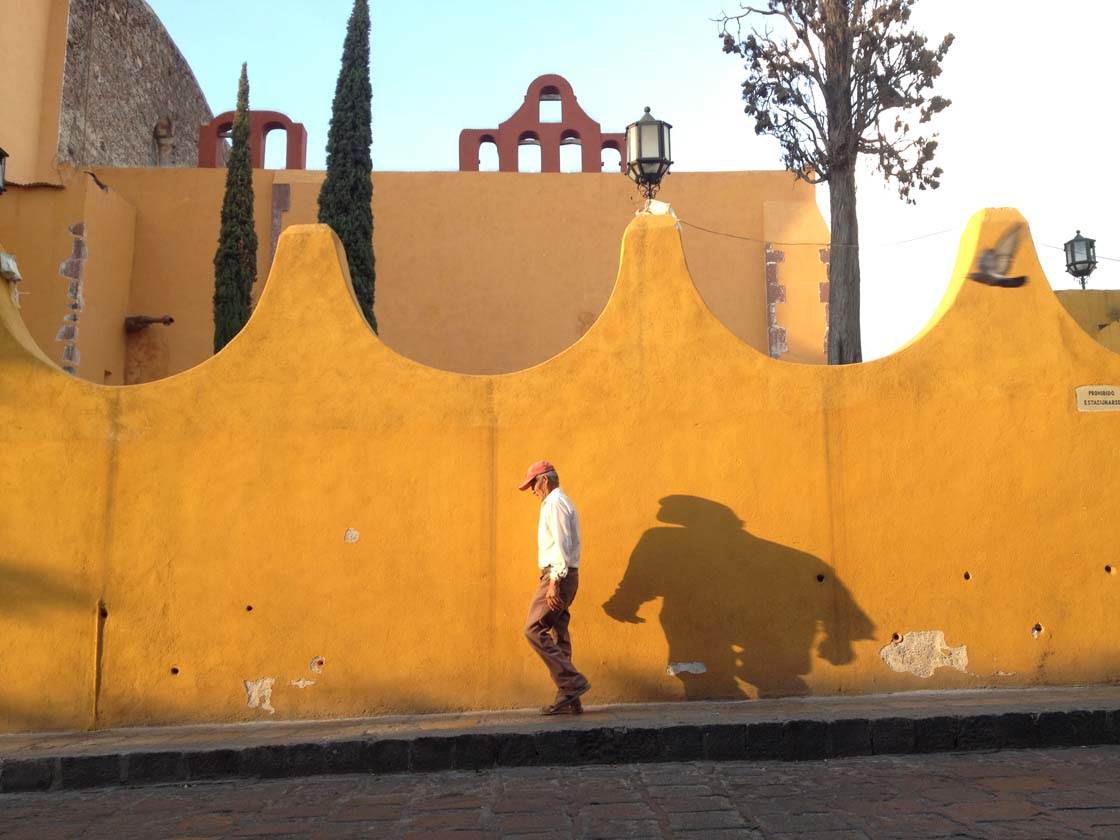
Take a look at this iPhone photo that I took with my workshop students in San Miguel de Allende. My goal for this lesson was to show each student how sharply angled, low, and direct light can produce some wildly distorted shadows.
All of us sat on the curb on the other side of the street waiting for people to walk by this wall. Each person that walked by would cast a very different shadow, which was both visually interesting and funny.
The shadow that this man cast could be spun into an interesting metaphor, as his shadow (inner self) was massive and gorilla-like, but his outward frame was very much average.
The use of shadows is not limited to low sunset light – you can use this technique with any form of direct sunlight. If you are shooting in the day, try to find a higher vantage point and wait for people to walk below you. They will cast a shadow, and it may turn out to be quite interesting!
4. Create Interesting Abstracts
Creating abstract images that are interesting and dynamic are within the reach of everyone. While in Mexico I was walking down a street in a quiet village and I came across a car body shop. They had a lot of old cars that were in queue for restoration, and many of them had quite interesting multi-layered paint jobs that would have spanned many years and even decades.
With few exceptions we all walk past faded scenes like this as our mind doesn’t register them as visually relevant. If we train our mind to look for color patterns and textures on old metal, concrete, wood, and any other surface, we could open up a new door of creative expression.

When you find a scene that has interesting texture or patina, take your iPhone in close so that the viewer can’t recognize what the object is. Using the above image as an example, remember that we’re creating abstract images, so we don’t want to immediately recognize that the object is a car.
Whatever your desired scene is, bring the camera close enough to avoid any recognizable features. When you’re back home showing your photos to friends or family, if they ask “what is this?” then you’ve done your job well!
5. Frame Your Subjects With Color
Composing your iPhone photographs with color is a fun and dynamic process. If your vacation is in a location which has a lot of color, you can make use of many different background scenes to frame your subject matter.
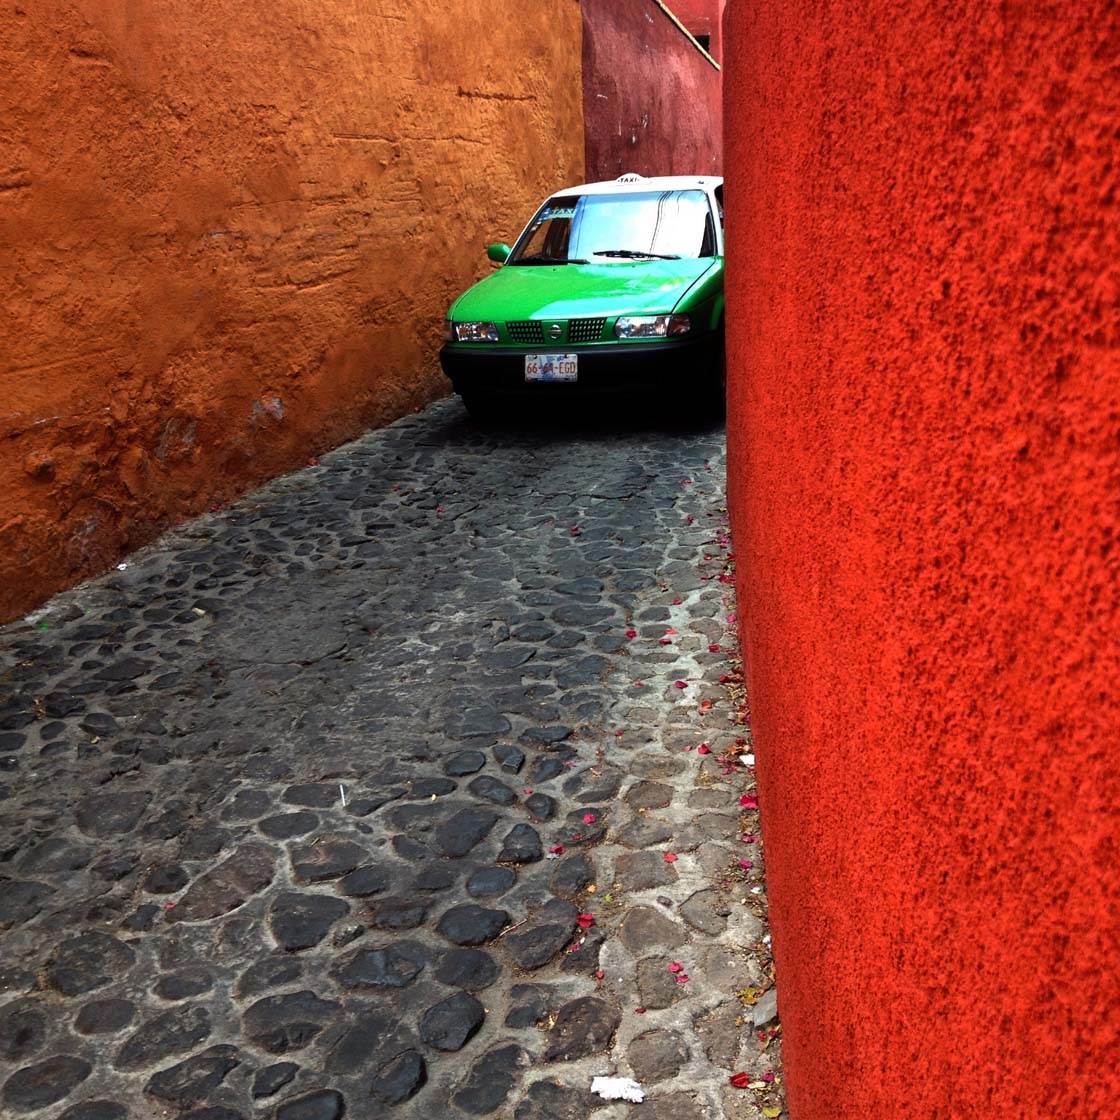
In this example, the taxi is the subject, and the colored walls are considered framing devices. A framing device is a visual element within a picture space that supports the main subject matter by enclosing the subject. Common framing devices are trees, telephone poles, windows, and buildings or walls on each side of a street.
For vibrant vacation shots, look for framing devices that have color. You will find that your subject matter (whatever the subject may be) will pop out more when it is supported by colorful framing.
6. Create Sun-Flares
“How do you successfully create iPhone photos with sun-flares?” is a common question my workshop students ask me. The answer is that it’s very much hit and miss.
This lesson is the only one where it’s hard to give a definite answer, because sun-flares are very unpredictable and can look absolutely great, or absolutely terrible!
One thing that we can mention however is that (in my own experience) sun-flares work best when the sunlight is streaming through only a small opening. Take a look at this photo that I took with my iPhone 4s.

I purposefully angled myself so that the sun would be shining into the camera through the archway. I had to re-compose a few times to get the light just right, but when I felt that I was getting the best possible direct line of sun into the lens, I took the final photo.
If you have a newer iPhone you’ll find that the lens flares look a little better than mine from the above example. Have fun trying out this technique, but remember to wear sunglasses or just keep your eyes on the screen instead of looking directly into the sun.
7. Use HDR For Tricky Exposure Situations
What does HDR mean? And when should you use it for taking iPhone photos? HDR is short for High Dynamic Range.
A camera that has a HDR option usually takes three photos in quick succession, each photo at a different exposure. The camera processor then takes those three images and mixes them together to create an evenly exposed frame.
In locations like this one in Mexico there are often fairly narrow streets with houses and shops lining both sides of the road. This means that except for overhead noon-day sun, one side of the street will be illuminated and the other side will be in shadow.

Using the HDR process allows us to take a street scene photograph that gives us adequate exposure detail on both the sunny and the shadow side of the street. I advise the use of HDR when your street scene is too contrasty to show details on the dark side of the street.

If you’re using the native camera app, look at the top of the screen and you’ll probably see the words “HDR Off.” Tap on those words and you’ll then have the option of choosing AUTO or ON. I suggest that you choose ON, as AUTO may have some undesired multiple exposure side effects on scenes that really shouldn’t have HDR treatments.
8. Fix Over-Exposed Images
While iPhones are great tools for photography, they lack the ability to capture a great amount of detail in the highlights at the same time as the shadows. This is sometimes referred to as a camera’s latitude.
While we can practice proper exposure techniques to avoid “blown-out” highlights, sometimes we just need to get the shot quickly and hope that the camera captured the exposure sufficiently in its auto mode.
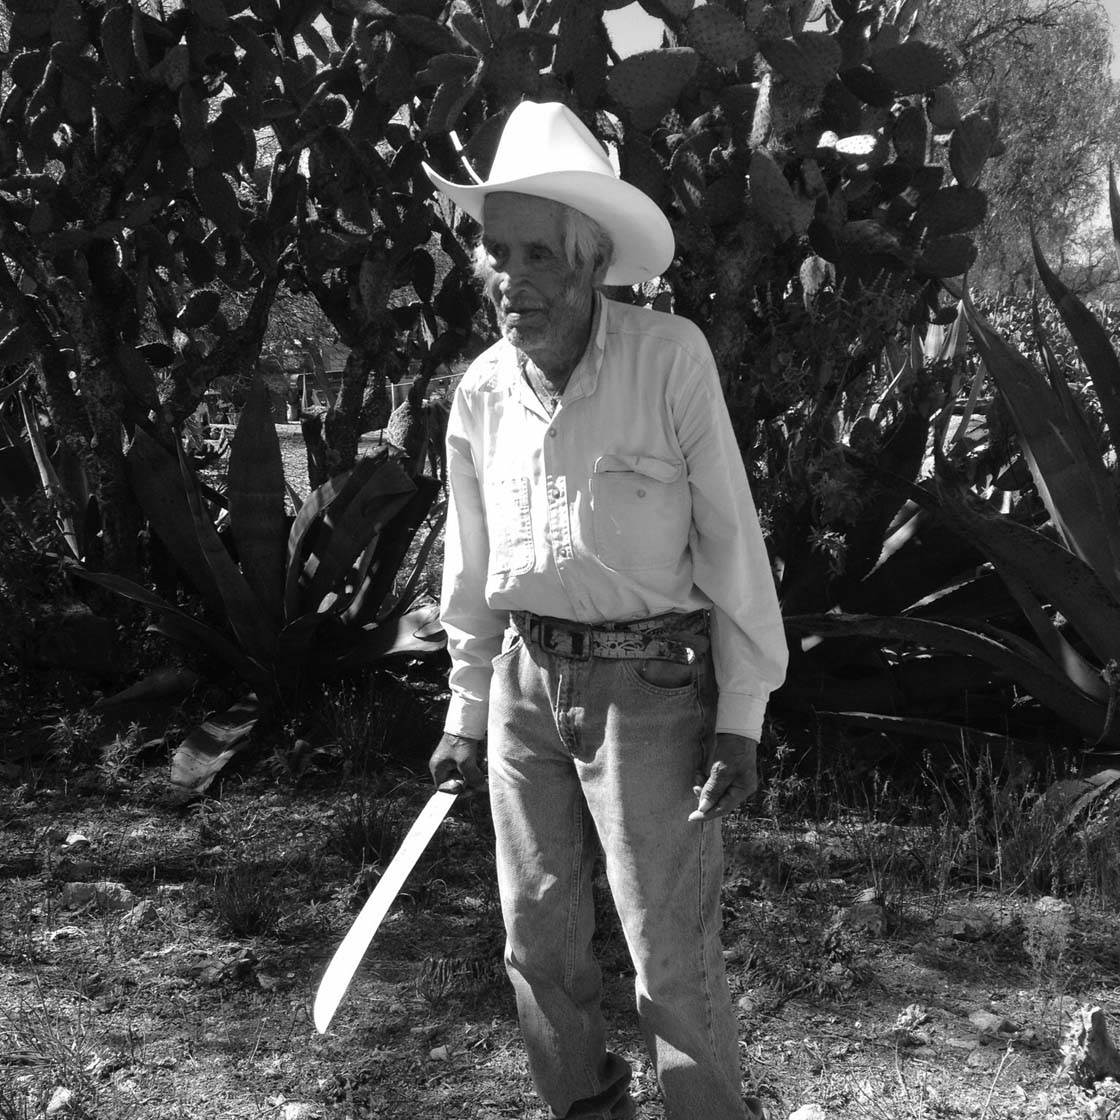
This picture of a Mexican farmer was taken quite quickly, as I wanted to get my own shot and then go around to my other workshop students and see how they were doing.
When we finished the shoot and we paid the farmer for his time working as a model, I realized that the combination of the white shirt and the bright sun created an unacceptable exposure. If I had more time I would have reduced the exposure at the time of shooting, but there is a solution that almost makes up for it.
If you turn your photo into a black and white image using any photo editing app, then the blown out highlights become less visible as an exposure error. The poor exposure still exists – its just that it’s not so obvious when the black and white conversion takes place.
While it’s always best to try and get the exposure right at the time of shooting, this technique is great for improving over-exposed images that you’ve already taken. Give this a try on the next sunny day, and I think you’ll find that many of your photos can be rescued prior to being sent to the trash can.
I hope that your vacation turns out to be a time of rest and inspiration, and that you come home with some truly excellent iPhone photographs!


Thanks for the great tips Mark. Looking forward to my next vacation now! 🙂
Great lesson! Thanks, Mark
Thanks for commenting Becky! It is so great that SMA never fails regards great images 🙂
can photos be backed up from i5 to picture keepers
Hi Wally, I am not sure what Picture Keeper is, but I back up with the normal iCloud built in software, or with DropBox
You have workshops? How do I find out about those?
Love the tips Mark and absolutely love your colourful shots! I’m partial to beautiful rich colours in photography. ?
tnx 🙂
Am on holiday at the moment so your timing is perfect! Thank you. I will try to remember all your points.
Glad you enjoyed the tips, Phillipa! Have a wonderful holiday! 🙂
Is there a way to manually set exposure on my iphone 5S? The camera seems to really struggle even when i tap and hold exposure
When you tap on the screen and swipe your finger up or down, you should be able to control the exposure manually. 🙂
I had no idea and I have had this phone for years! And i take tons of pictures! Thanks! I think i may need some formal training to learn all the basics
Very helpful tips! Good samples too!
Not knew about this good to be part of it
Terrific tips and many thanks!
Glad you found them helpful Judy! 🙂
Thanks, I find this tips very usefull, I am very happy to join this iPhone School. Best Regards.