Camera+ is one of the best camera apps for iPhone. While the iPhone’s native camera app is great, sometimes you need to use manual iPhone camera controls to get the perfect shot. Camera+ gives you control of manual focus, shutter speed, exposure, white balance and more. Not only that, but it’s also a photo editor app for enhancing images. In this tutorial, you’ll discover how to use the brilliant Camera+ app to shoot and edit fantastic iPhone photos.
1. Navigate The Camera+ App
The Camera+ interface is easy to use, and in this short section, you’ll discover where all the camera controls are.
Firstly, along the top of the screen is a row of icons representing the main camera controls – flash, macro mode, portrait mode, aspect ratio and selfie-camera. Next, there’s a zoom control on the right and a big round shutter button at the bottom.
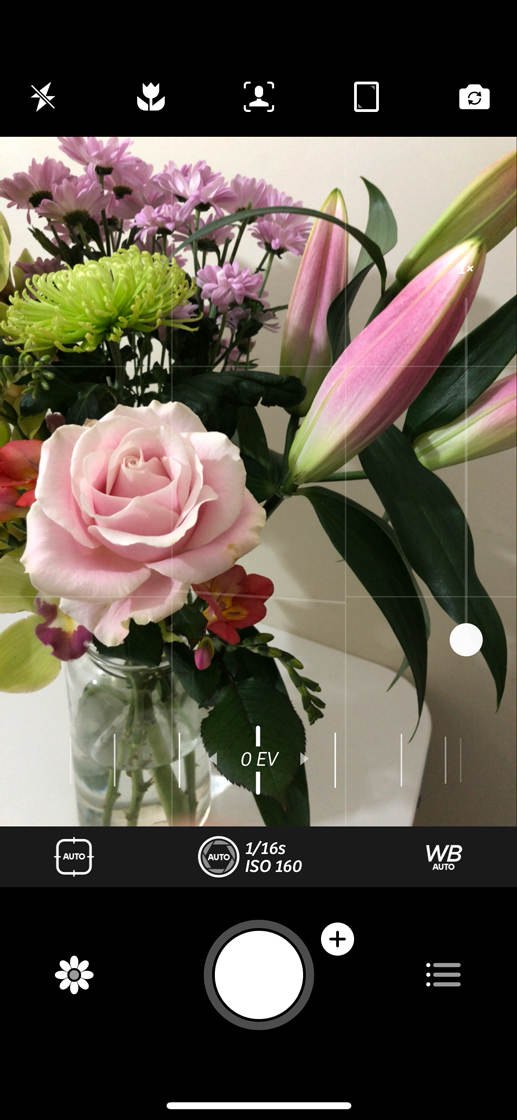
Above the shutter button are the advanced camera controls including exposure compensation, focus control, shutter speed, ISO and white balance.
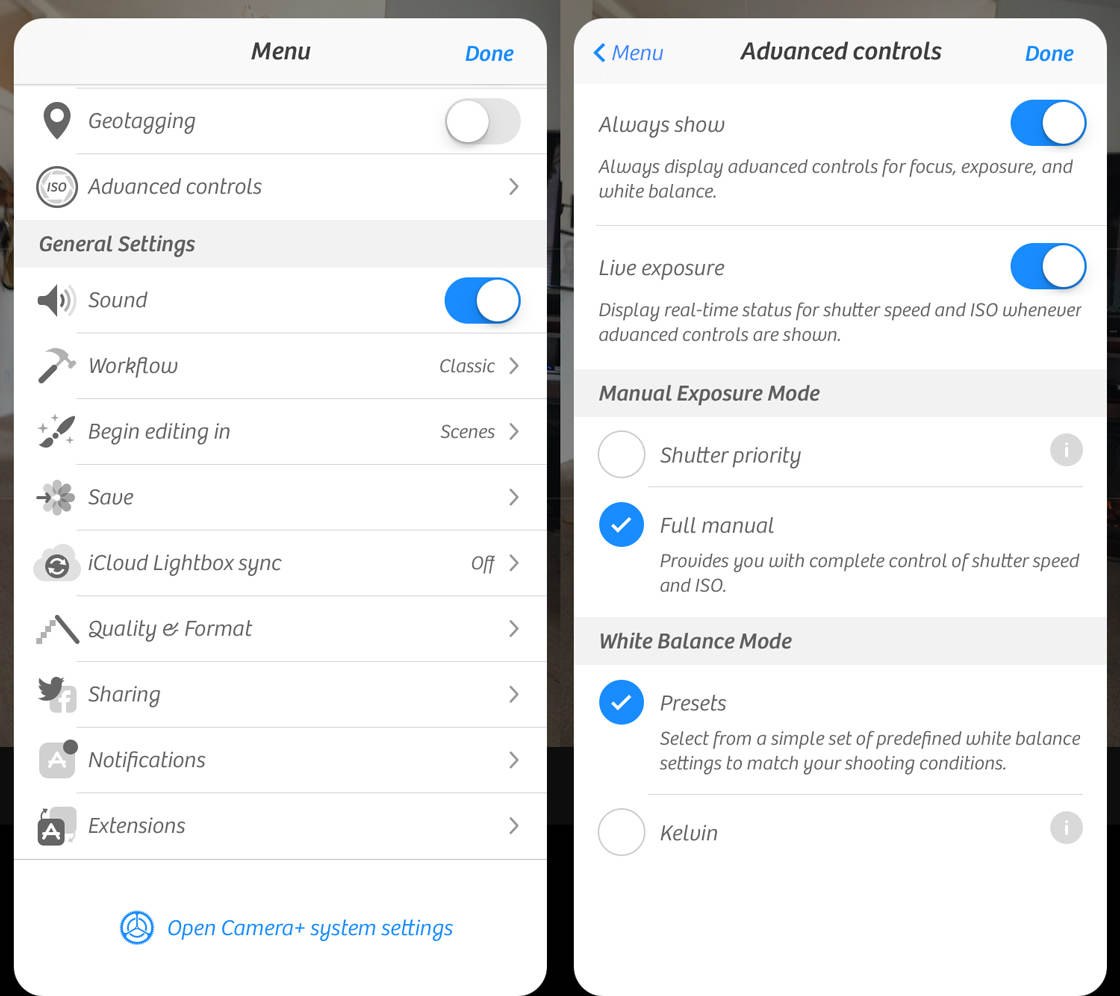
If these controls aren’t visible on your iPhone, tap the menu icon (three dots and dashes) at the bottom right to open the app settings, then tap Advanced Controls, then tap Always Show. While you’re here, turn the Live Exposure option on so you can see the camera’s exposure settings change in real time. Lastly, tap Done.
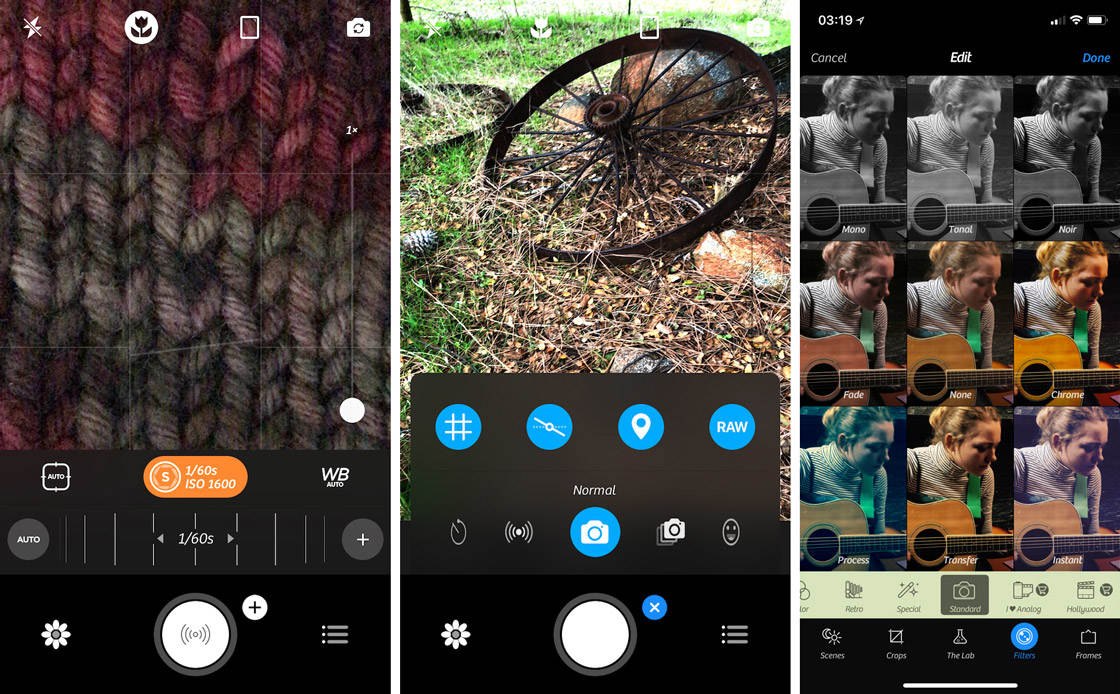
To the right of the shutter button, there’s a plus icon which gives you quick access to several other camera settings. These include the shooting mode (timer, stabilizer, normal, burst and smile), grid display, level display, geo-tagging and RAW. The plus icon changes to an x and turns blue. Tap this to close the menu.
The flower icon at the bottom left takes you to the photo editing section of the Camera+ app, which we’ll explore later in this tutorial.
2. Shoot Photos With Camera+
In this section, you’ll discover when and how to use each of the Camera+ shooting controls.
2.1 Flash
The first icon in the top left corner is the flash setting. Flash illuminates your subject in low light conditions. Tap the flash icon to access the four flash settings.

The lightning bolt icon forces the flash to be on for every shot while the lightning bolt with a line through it forces the flash to be off for every shot. The auto icon lets the camera decide whether or not to use flash. Finally, the torch icon turns on the iPhone’s torch, illuminating the scene continuously – which is useful when it’s too dark for the camera to focus.
2.2 Macro
The flower icon to the right of the flash icon is your macro mode. Use macro mode for photographing small, close-up subjects. It’s great for insect macro insect photography and flower macro photography.
Tap the Macro icon to enter Macro mode. While it doesn’t change the minimum camera-to-subject distance, Macro mode does a good job of magnifying the subject with a digital zoom.
2.3 Portrait Mode
Portrait mode in the native iPhone camera app gives you soft, out-of-focus backgrounds which are perfect for portrait shots. This feature is only available with iOS 11 and on the iPhone 8 Plus camera, iPhone 7 Plus, and iPhone X camera. You won’t find Portrait mode on the iPhone 8 camera, iPhone 7 or older.
Portrait mode in Camera+ is similar to the one in the native camera app. However, the current version of Camera+ seems to be less reliable than the native camera app when it comes to deciding what should be in focus and what should be blurry. Therefore, for now, use the native iPhone camera app’s Portrait Mode.
2.4 Crop / Aspect Ratio
The icon second from the right controls the crop or aspect ratio. This sets the shape of the image on the image preview, and of the captured image. Tap the icon to toggle between portrait orientation, square, or landscape orientation. Both square and landscape are cropped versions of the portrait orientation, so the photos you shoot in those modes won’t have the highest possible resolution. Therefore, it’s better to use the portrait mode and crop your photos afterward.
2.5 Selfiecam
The rightmost icon gives you access to the front-facing iPhone camera lens. This is perfect for selfies. Tap the icon to toggle between the front and rear-facing lenses. With iOS 11 on the iPhone 7 Plus, iPhone 8 Plus or iPhone X you can still use Portrait Mode with the front-facing lens.
2.6 Zoom
The zoom function is the long vertical line on the right side of the screen. To zoom in, drag the white dot up. To zoom out, drag the dot down.
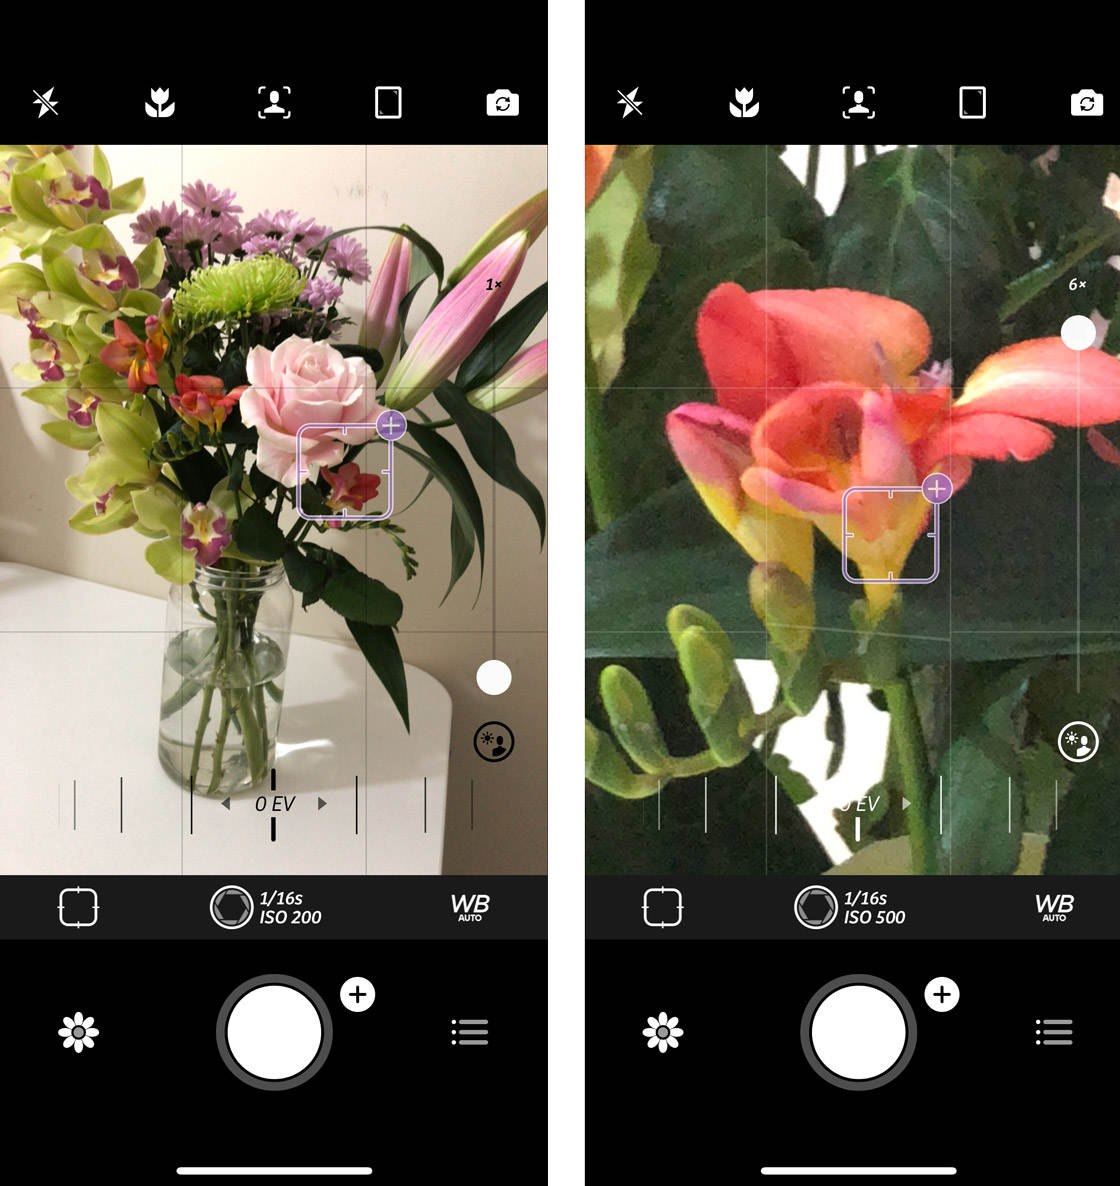
One thing to keep in mind is that the zoom feature on your iPhone is digital, not optical. This results in low-quality images, so avoid using zoom if at all possible. It’s better to zoom right out, and then “zoom with your feet” (i.e. get closer to your subject). Alternatively, stay zoomed out, but crop the photo afterward using the Camera+ photo editor’s crop tool. Also, staying zoomed out means you’ll get less blurry shots due to unsteady hands.
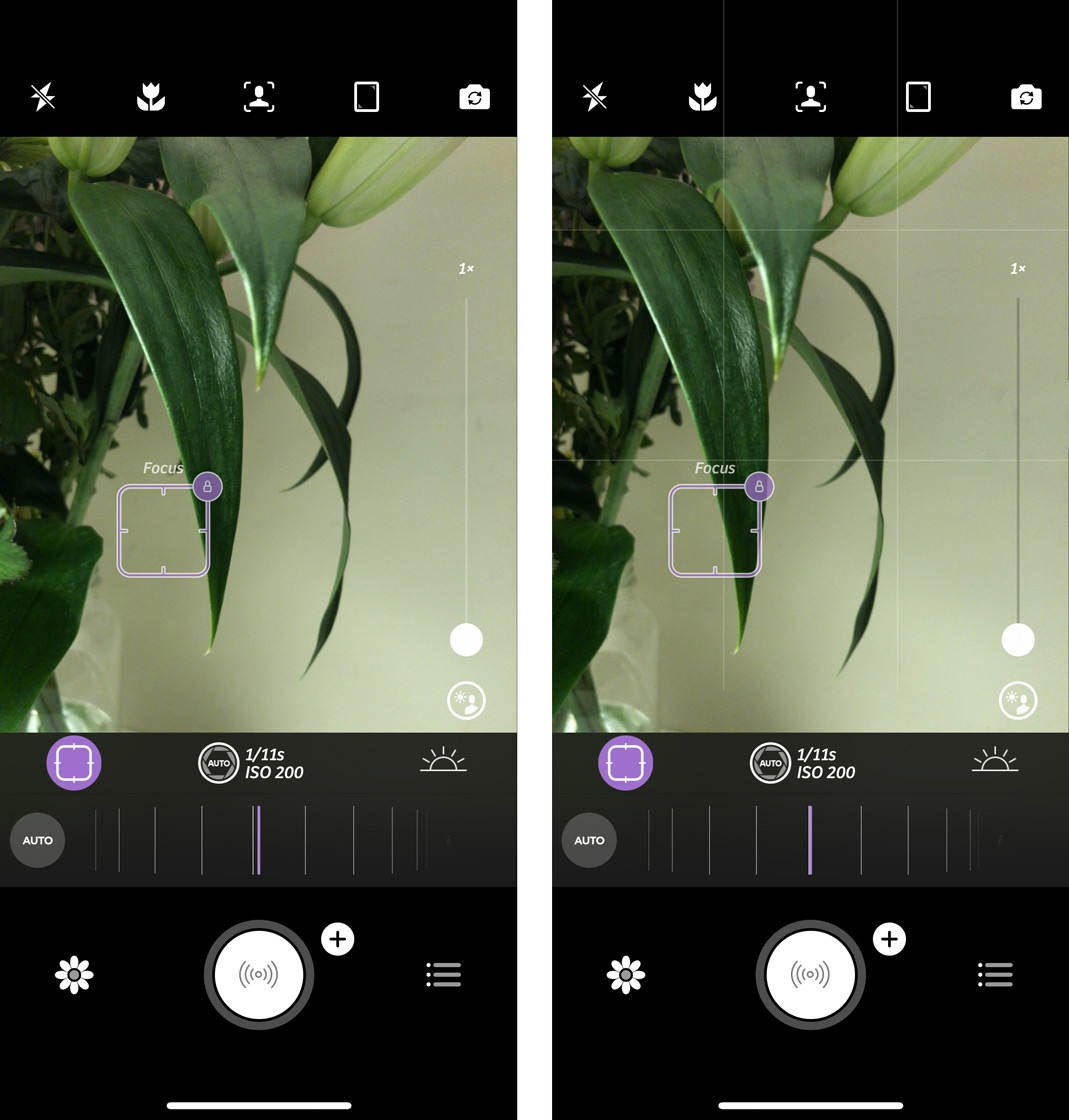
2.7 Manual Focus
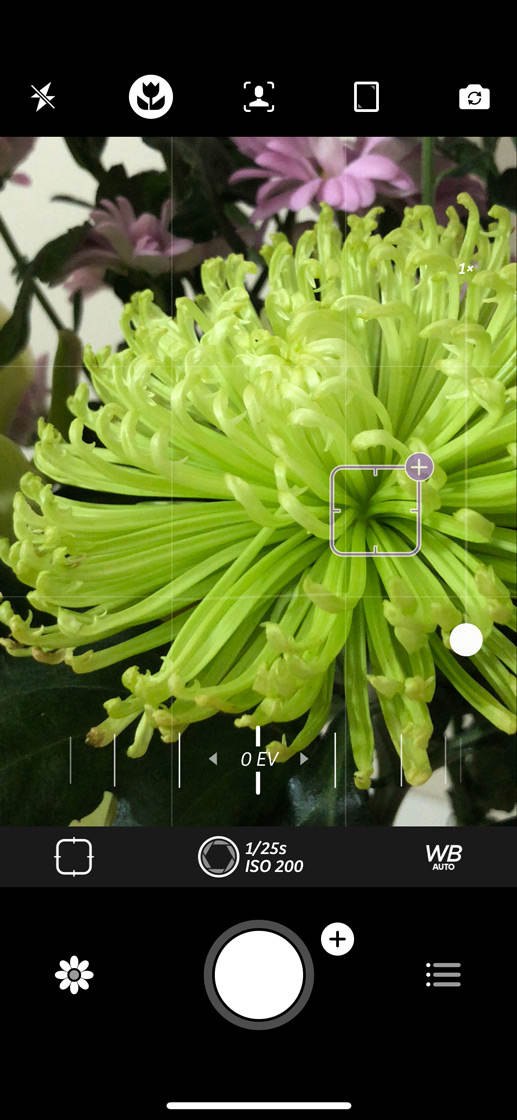
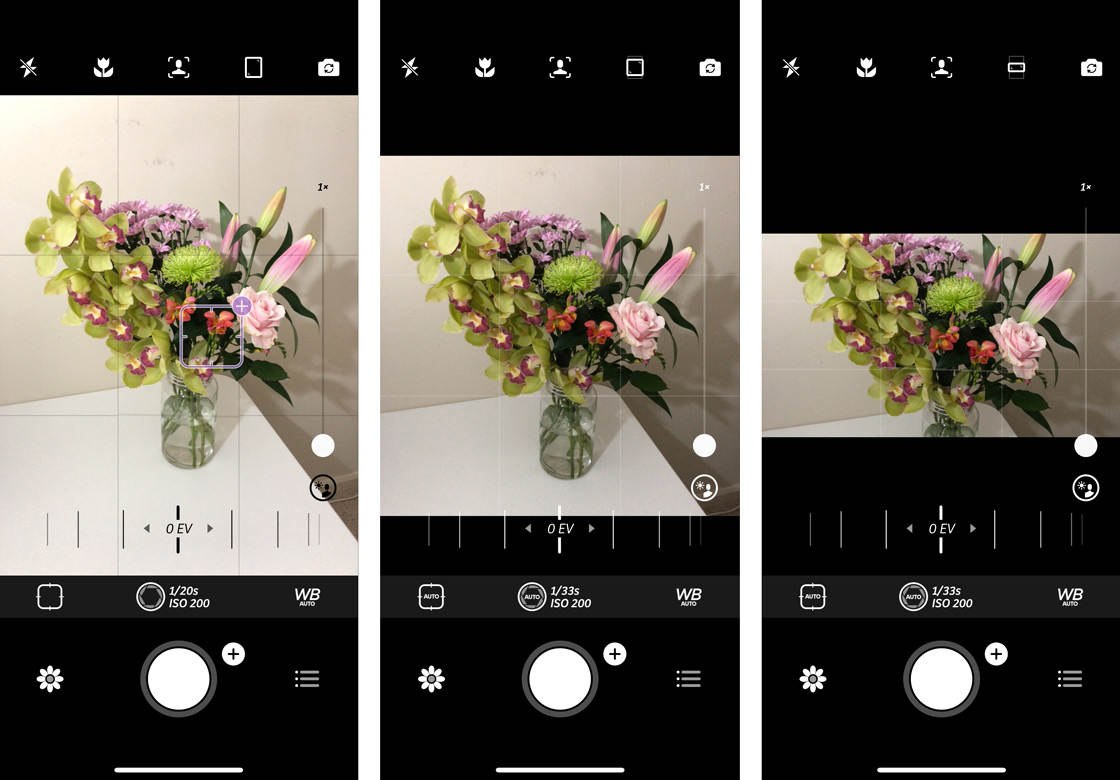
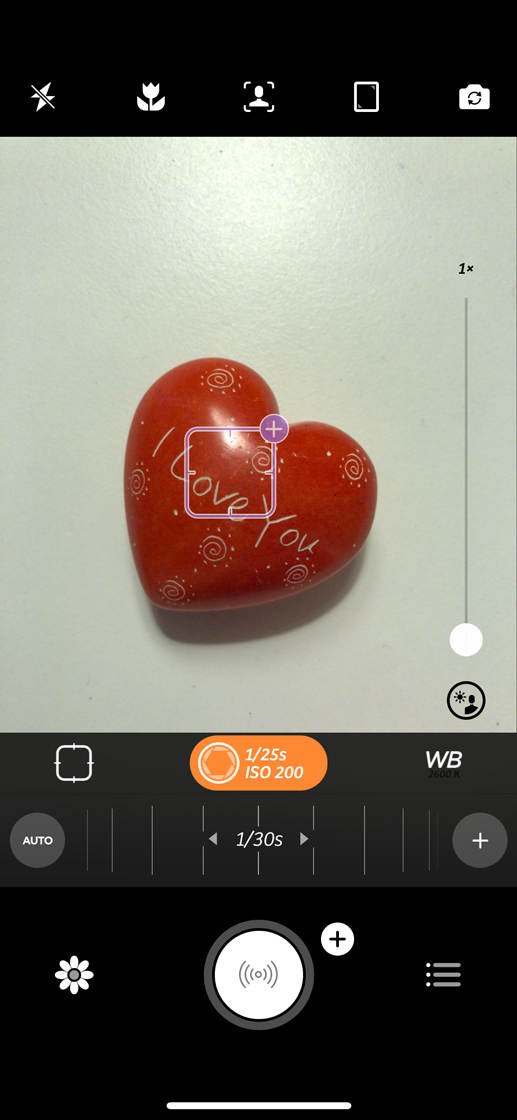
By default, Camera+ will automatically focus where it thinks the subject is. To set the focus point yourself, tap the screen where you want the focus point to be. This point also controls focus and exposure.
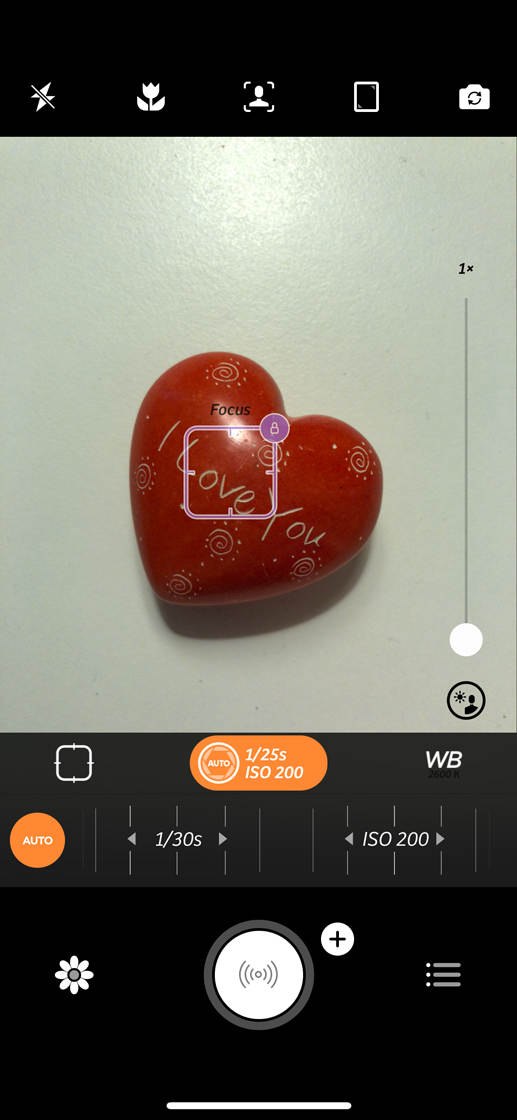
You can now fine-tune your focus point manually. Tap on the focus icon (above the flower icon). Then drag the sliding scale under the viewfinder to make fine adjustments to the focus.
At any time you can return to autofocus by tapping the AUTO icon to the left of the sliding scale.
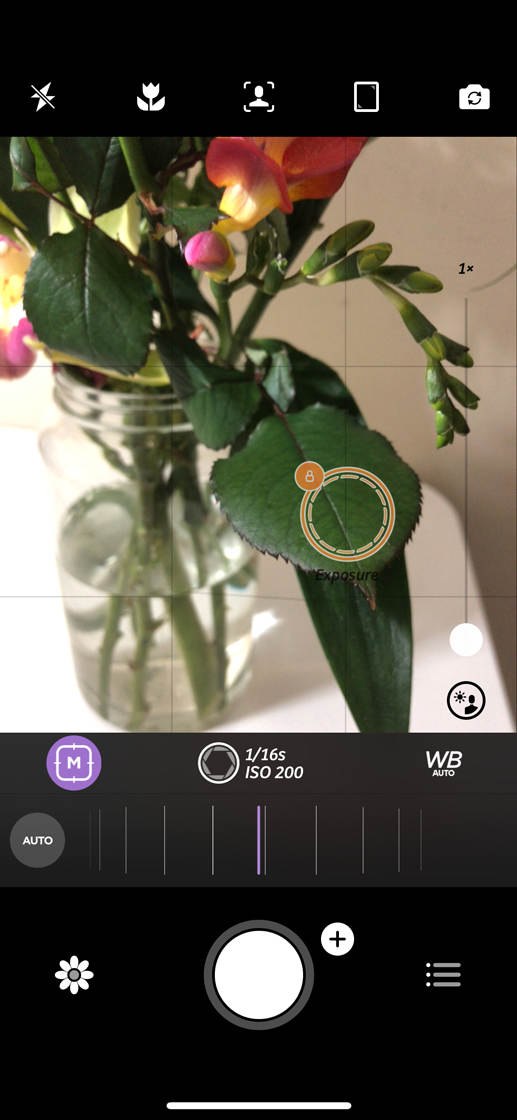
2.8 Manual Exposure Mode
Camera+ automatically chooses a suitable exposure for your subject and scene. Exposure is how bright or dark your image is. Once you’ve selected a focus point, the camera app re-evaluates what it thinks a suitable exposure should be, and chooses the appropriate shutter speed and ISO. ISO is how sensitive your iPhone camera’s sensor is to light.
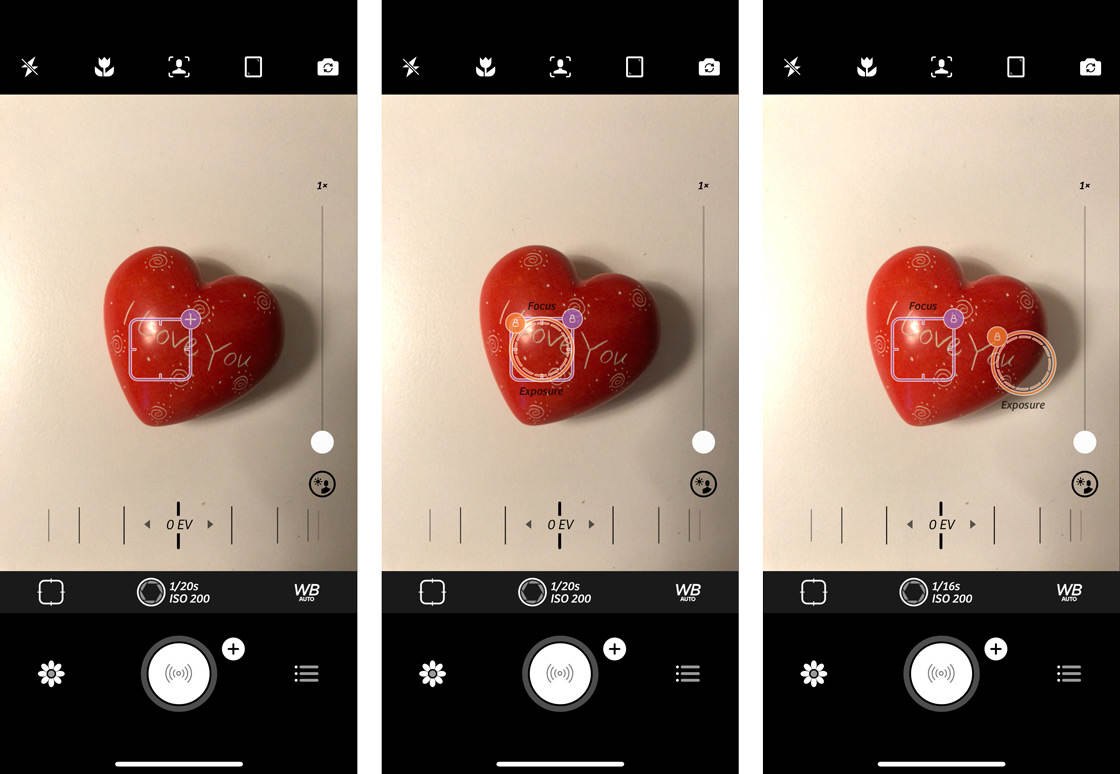
You can override the automatically selected exposure by tapping the plus symbol on the currently selected focal point. This causes a circular orange Exposure icon to appear where you tapped on your scene.
You can now drag this anywhere you like in the scene. Drag it somewhere dark to make the scene brighter. Drag it somewhere bright to make the scene darker.
Once you’re happy with the exposure, you can lock the exposure by tapping the small padlock icon next to the orange circle.
2.8.1 Control The Shutter Speed
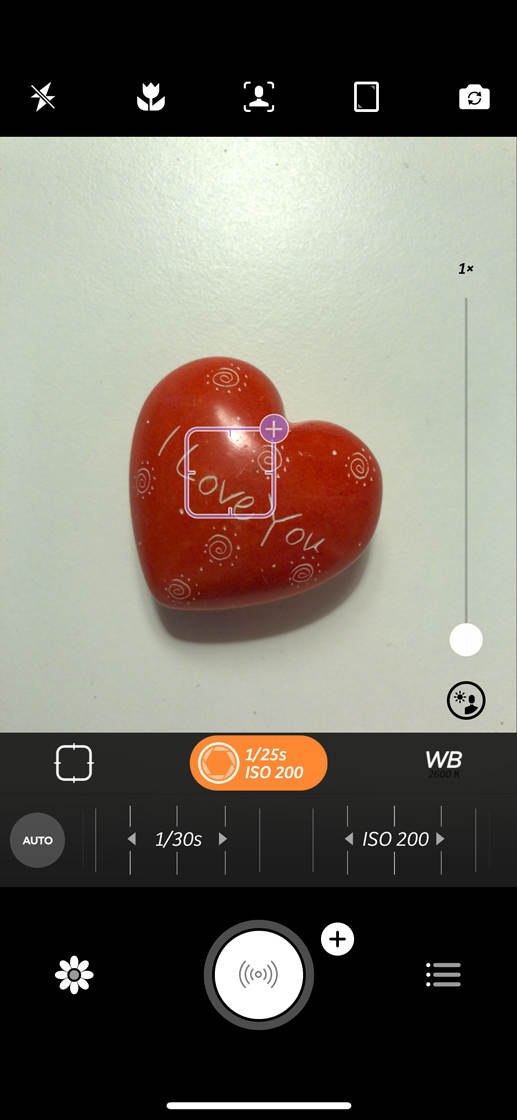
At any time you can make manual changes to the shutter speed and/or ISO settings by tapping on the shutter speed icon found above the shutter button. You will then see a sliding scale representing shutter speed. Drag to the left to choose a slower shutter speed. Drag to the right to choose a faster shutter speed.
2.8.2 Control The ISO Setting
If the ISO scale is not yet displaying to the right of the shutter speed scale, simply tap the plus icon (in a grey circle) to the right of the shutter speed sliding scale. You can then change the ISO setting by dragging the ISO sliding scale sideways. A low ISO value (e.g. 100) means a low sensitivity to light, which is perfect for bright shooting conditions. A high ISO value (e.g. 2000) means a high sensitivity to light, which you may need for low light conditions.
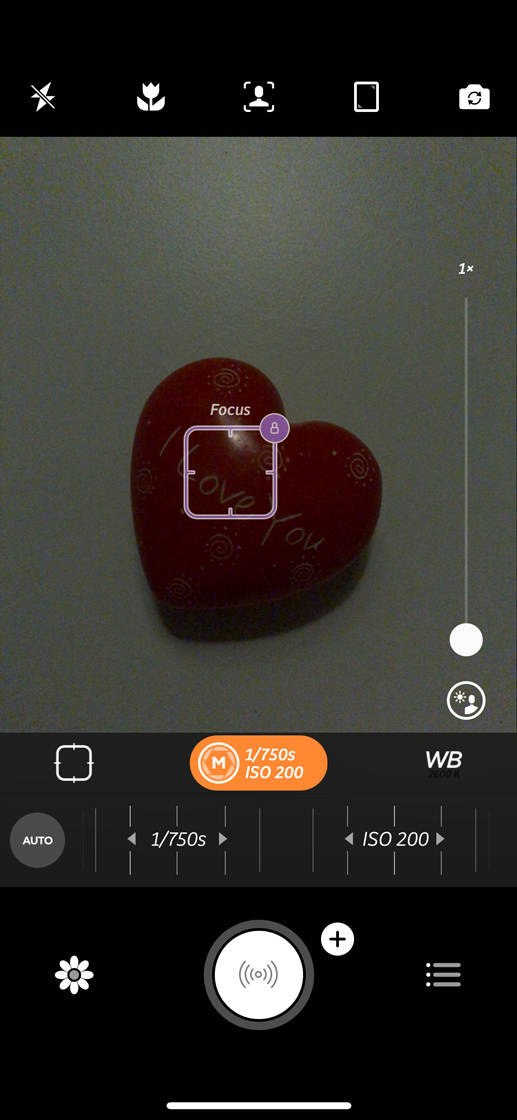
In the example below, you can see the effect of changing the shutter speed to a very fast (or short) 1/750s. It has resulted in a very dark photo, because the exposure resulting from a shutter speed of 1/750s and an ISO setting of 200 would not allow enough light to reach the iPhone’s camera sensor to give a good exposure.
The ISO has been increased manually to ISO 2000 to compensate for the dark photo, as shown below. As you can see, the resulting image is brighter but very grainy.

This is caused by high ISO settings, which amplifies tiny electrical interference present in all electronic devices, including your iPhone’s camera sensor, making the interference visible in the photo. This is usually undesirable, so try to keep your ISO value as low as possible.
2.8.3 Returning To Auto Exposure Mode
If you’re not sure which is the best shutter speed and/or ISO setting, tap the AUTO button to the left of shutter speed sliding scale and your camera will select the settings it thinks are right for the situation.
2.8.4 Setting The Default Manual Exposure Mode
In the Advanced Controls option of the menu settings, you can choose the Manual Exposure Mode. This can either be Shutter Priority or Full Manual. The only difference between these two settings is that in Full Manual mode you get access to change the ISO value (as well as the shutter speed value) by default. However, you can still access and control ISO via the Shutter Priority mode by tapping the plus icon (in a grey circle) to the right of the shutter speed slider – so it really doesn’t matter which mode you choose.
2.9 White Balance
White balance is how warm or cool the captured colors are in your photos. Early in the morning or late in the afternoon, when the sun is low, colors often appear warm or more red/orange. On an overcast day with no direct sunlight, colors can appear cooler or blueish. A subject photographed near grass or foliage often appears to be bathed in a greenish light.
How cool or warm colors are is referred to as “color temperature” and it’s measured in degrees Kelvin. The camera app calculates this color temperature automatically, but it doesn’t always get it right. Whites can sometimes look a little blue, or a little pink. That’s where Camera+’s white balance settings can help.
In Camera+, you can choose from a list of white balance presets or use a sliding scale of Kelvin values. Each of the presets is actually a specific color temperature with its own Kelvin value.
To select a white balance preset, tap the WB icon. The white balance presets are Shade, Cloudy, Flash, Daylight, Fluorescent, Incandescent, Sunrise/Sunset, and Candlelight. Swipe the list of presets sideways until you find the most appropriate preset for your lighting conditions. For example, if you’re shooting in the shade, away from direct sunlight, select the Shade preset.
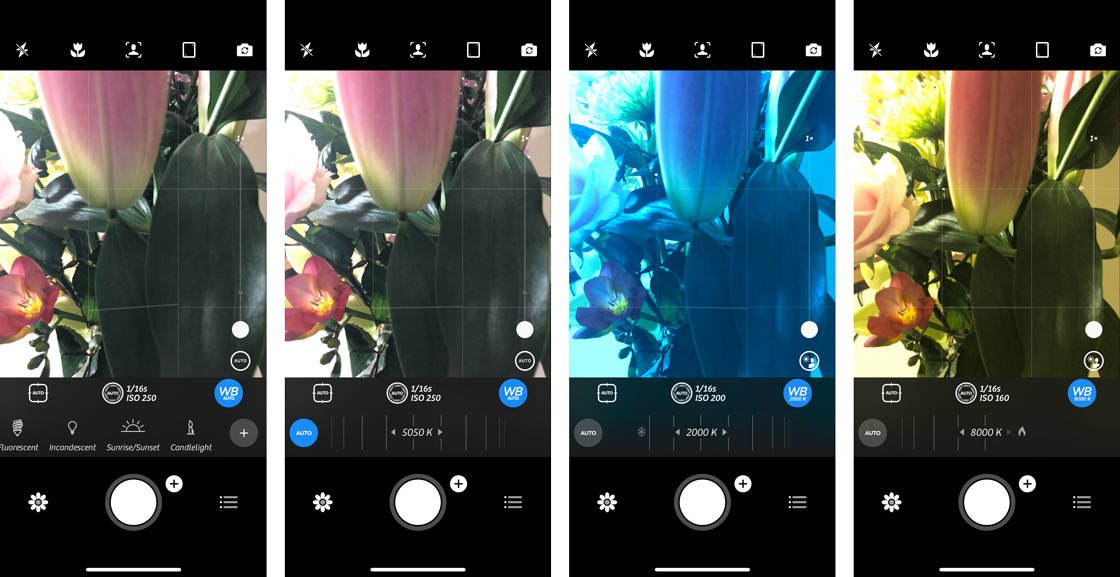
To specify a particular Kelvin value, swipe to the end of the list of presets and tap the plus icon. The list of presets is replaced with a sliding Kelvin scale. Drag the scale left or right to change the color temperature. The lower the Kelvin value the cooler the colors will be rendered. The higher the Kelvin value the warmer the colors will be.
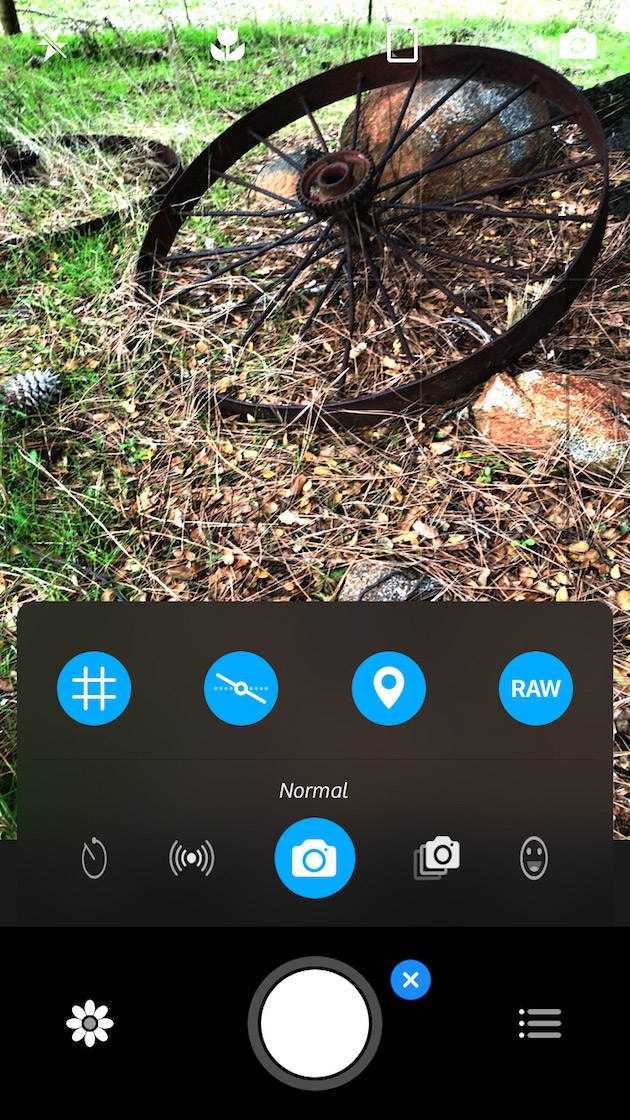
2.10 Additional Camera Settings
Camera+ gives you quick access to some additional settings. These are Rule Of Thirds Gridlines, Horizon Level, Geo-Tagging and RAW. To access these settings, tap the little plus sign next to the Camera+ shutter button. Tap the icon corresponding to the setting you wish to turn on or off. The icon will turn blue when activated.
These additional settings are explained below:
2.10.1 Rule Of Thirds Grid
This gives you a faint overlay on your screen that divides the scene up into nine equal parts. Use this composition tool as a guide for placing your subject, according to the Rule Of Thirds. Try to position your subject, or the most important parts of your subject or scene, where the grid lines cross. Also, try to align the gridlines with the primary horizontal or vertical lines within your scene.
2.10.2 Horizon Level
Use the horizon level to make sure your phone is level before you take a photo. The horizon level is just a line in the middle of the frame which tilts when you move your camera. Make sure that the level line is completely level with the horizontal lines that extend from the left and right of the frame before you press the shutter button and you’ll get a perfect horizon every time.
2.10.3 Geotagging
This feature is handy when you’re traveling because it adds location information to the image file for every image you shoot. It doesn’t affect the image, just the metadata stored along with the image. This can be examined at a later date, or used by your favorite photo organizing tools to help you group photos by their location.
2.10.4 RAW
RAW is a file format. RAW images are unprocessed, which means that your iPhone captures all the information available to it when you take a photo, without making any behind-the-scenes adjustments. Note that RAW files are big files, therefore they take up extra space on your phone. RAW files are also are slower to capture, which affects how quickly multiple photos are captured in burst mode. To have your iPhone store photos in the RAW format then enable this setting by tapping on the RAW icon.
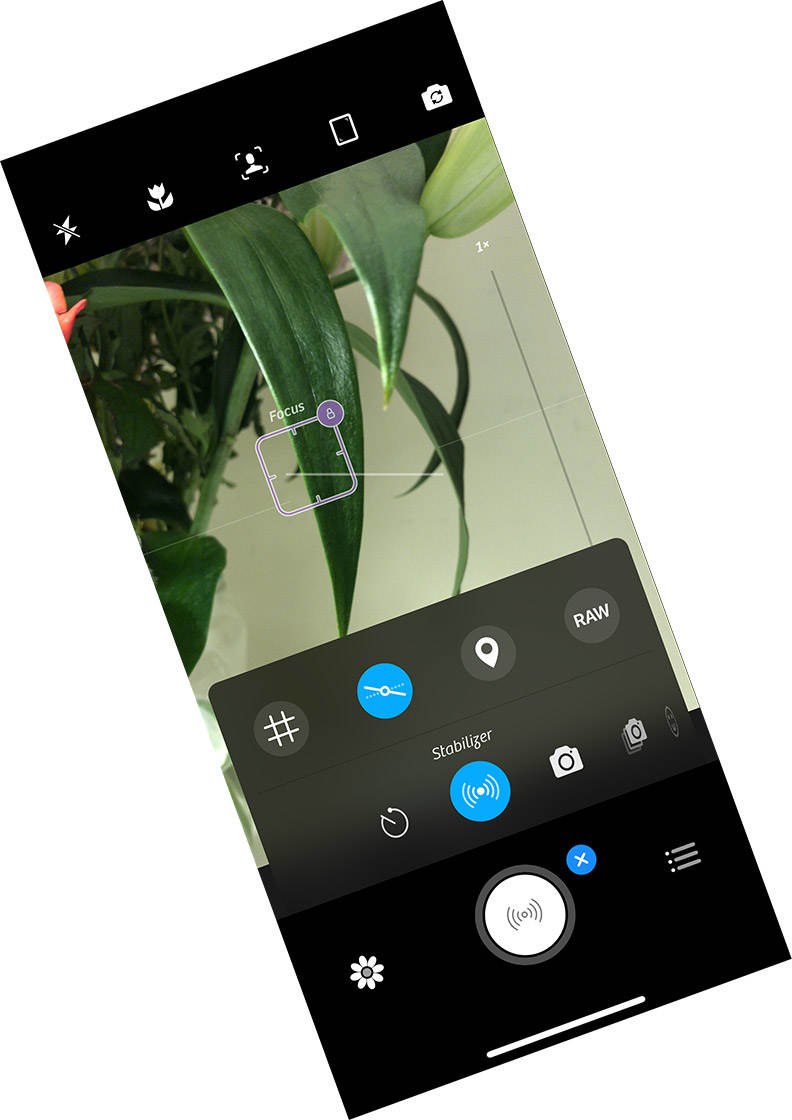
2.11 Shooting Modes
Camera+ can shoot in one of several shooting modes. These include Timer, Stabilizer, Normal, Burst, and Smile. To access the available shooting modes, tap the little plus sign next to the Camera+ shutter button. Swipe the second row of icons sideways to select the shooting mode you require.
The purpose of each shooting mode is explained below:
2.11.1 Self-Timer
The self-timer lets you introduce a delay between you pressing the shutter button and the photo actually being taken. Use this feature when you want to be in the shot, or when you want to prevent blurry photos caused by camera shake created when you press the shutter button. You can change the length of the countdown by tapping the number in the middle of the screen.
2.11.2 Stabilizer
Stabilizer mode helps keep camera shake out of your photographs when you’re shooting in low light by boosting the ISO so that a faster shutter speed can be used. Fast shutter speeds mean the camera or subject move a shorter distance whilst the shutter is open, reducing the likelihood of blurry photos.
2.11.3 Normal
This is the default shooting mode, and, with this mode activated, pressing the shutter will result in a single, unstabilized shot being taken straight away.
2.11.4 Burst Mode
With burst mode enabled, you can capture a series of images in rapid succession for as long as the shutter button is pressed.
2.11.5 Smile Detection
With this mode selected, and once you have pressed the shutter button, Camera+ waits until your subject smiles before automatically taking the photo. Each time your subject smiles another photo is taken.
3. Edit Photos With Camera+
Camera+ comes with a complete set of editing tools including manual adjustments, preset filters, and frames.
3.1 Select A Photo To Edit
First of all, to access the Camera+ editor from the camera screen, tap the flower icon in the bottom left corner. You’ll see all of your Camera+ images in a filmstrip format.
If you want to edit a photo you shot with a different camera app, import it by tapping the plus icon at the top right, then tap Select Photos, tap the photos you want to edit, tap Import, then tap Done.
Tap the photo you want to work on, then tap Edit. At the bottom of the screen, you’ll see the five main editing categories: Scenes, Crops, The Lab, Filters, and Frames.
In the remainder of this section, you’ll discover how to use all of the Camera+ editing tools to enhance your images.
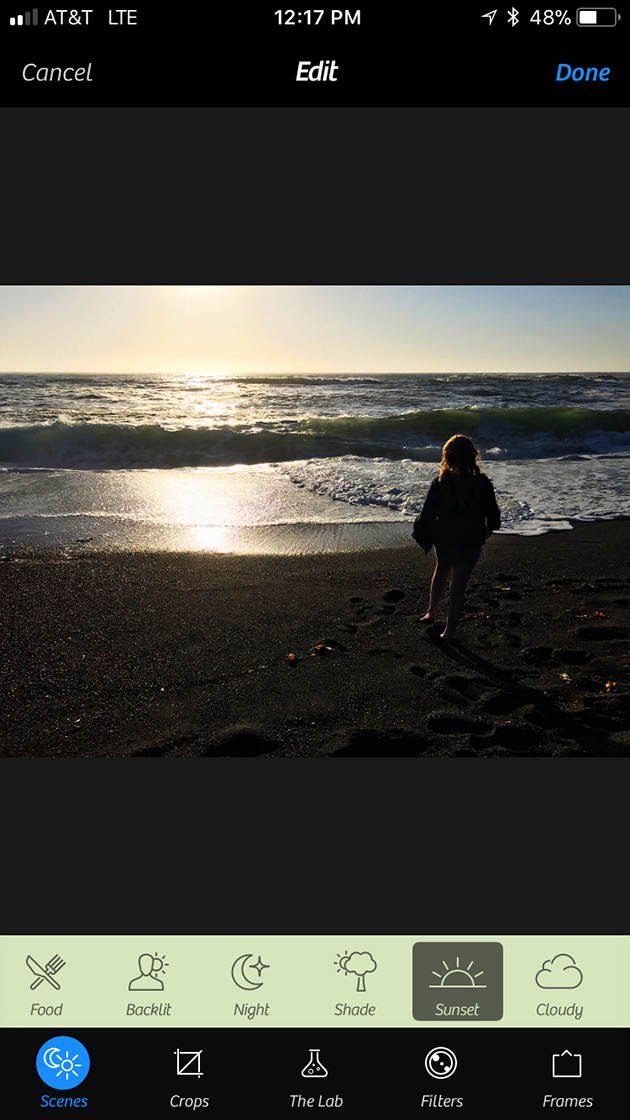
3.2 Scenes
Scenes are auto-correcting presets which are tailored to suit different shooting conditions or subjects. These offer a quick-fix to exposure and color without you having to make any manual adjustments.
Tap the Scenes icon. In the bar above, swipe to view the wide range of scene presets. Tap a preset to apply its effects to your image. If you don’t like the effect, tap a different preset, or tap None to remove the edits. When you’re happy with the edits, tap Done at the top right.
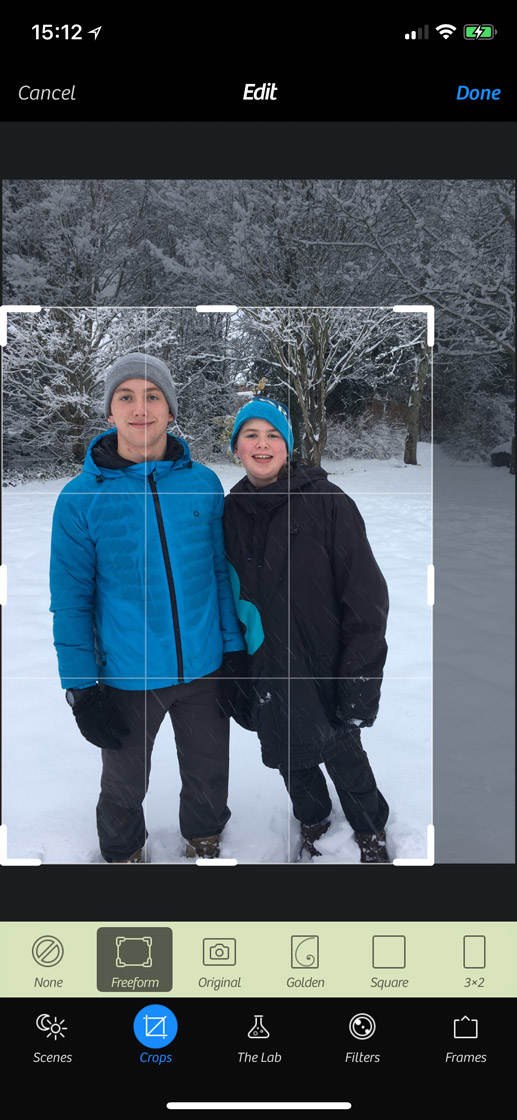
3.3 Crops
The Crop tool lets you remove the edges of your image using one of many standard aspect ratios. Alternatively, you can use the freeform option and set the crop dimensions yourself. Once you’ve chosen a crop setting, drag the white handles on the edges or corners until you’re happy with the crop. Then tap Done.
3.4 The Lab
The Lab contains a wide range of manual adjustment tools including color, exposure, sharpness, orientation, and vignette. In the sections below you’ll discover how to use each of these tools. In all cases, the tools and settings you choose can be applied to your photo by tapping the blue tick icon displayed in each tool. Remember to use these tools in moderation. If the use of the effect is apparent to the viewer, then it’s almost certainly too much.
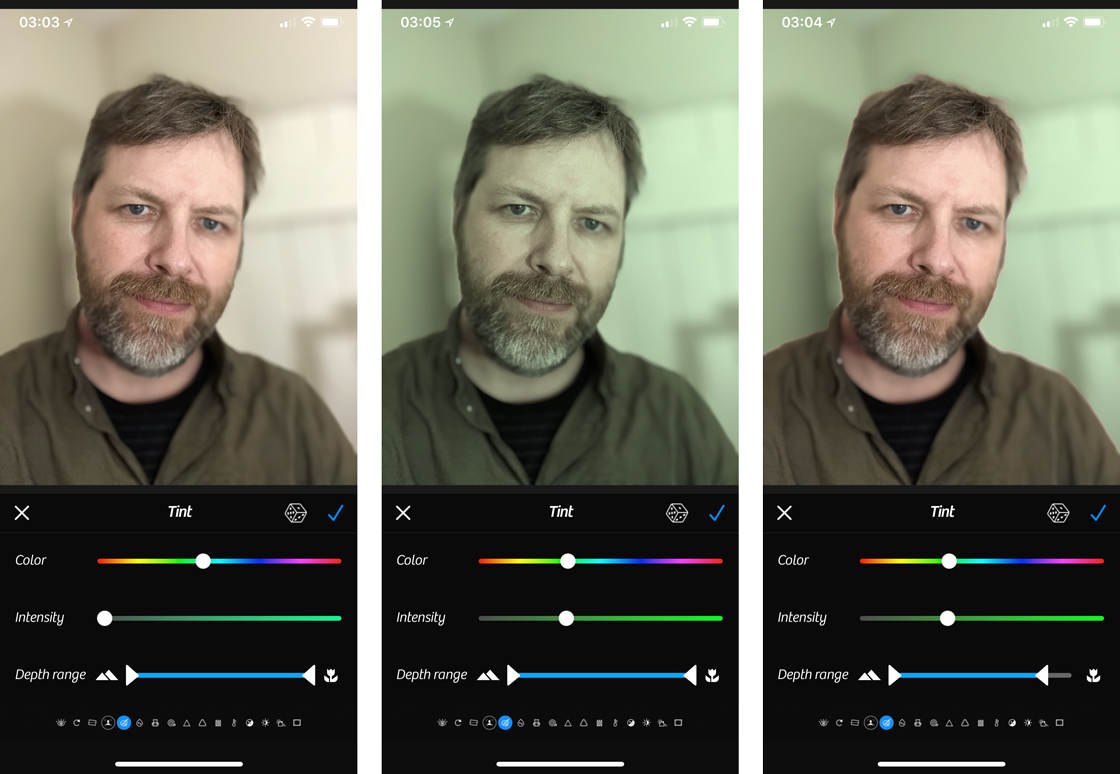
If you’re editing photos taken with a dual lens iPhone capable of depth perception (e.g. the iPhone X), then Camera+ app adds a Depth Range control to all the Lab tools (with the exception of Clarity, Rotate & Flip, Straighten, Portrait, and Vignette). This control allows you to specify how much of the scene, from the background to the foreground, receives the applied effect.
The set of three photos below illustrates how the depth range works. The first photo shows a portrait captured on an iPhone X with no tint applied yet. The second photo has a green tint applied, but it affects the whole photo. The third example shows how the depth range setting has been adjusted to prevent the foreground from receiving the tint, leaving the portrait subject unaffected by the green tint.
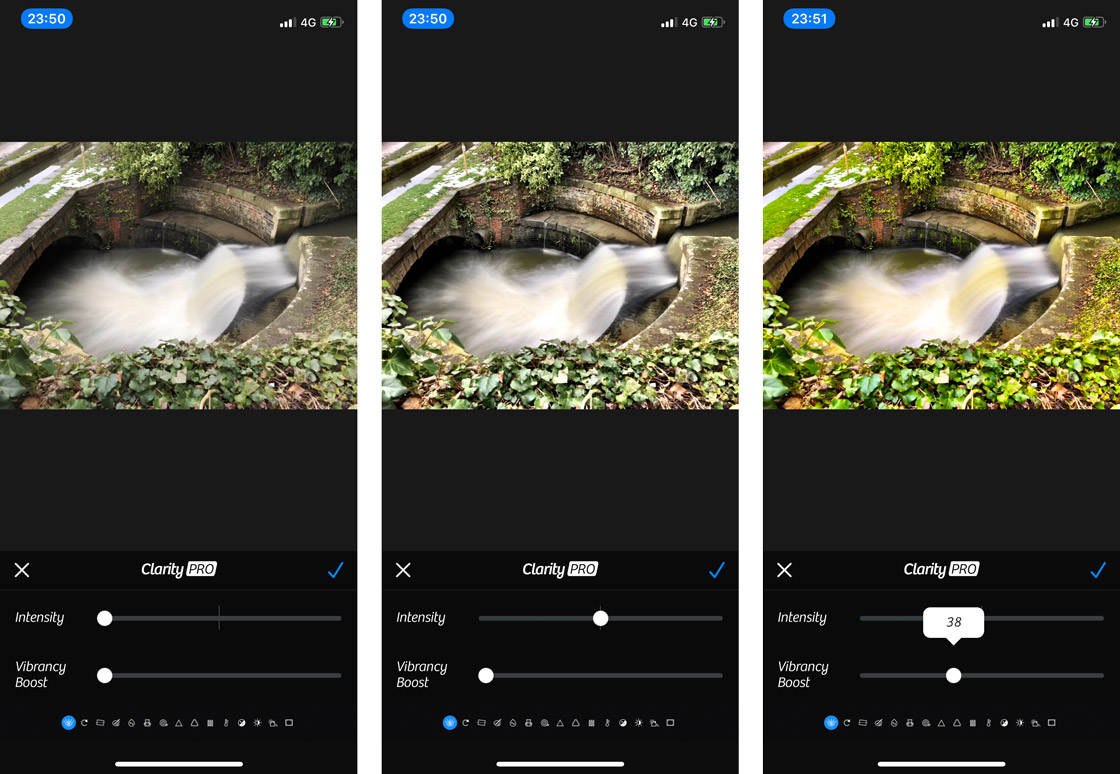
3.4.1 Clarity
The clarity tool lets you adjust the intensity of the exposure or the vibrancy of the colors. To use, simply drag the sliders until you achieve the look you want.
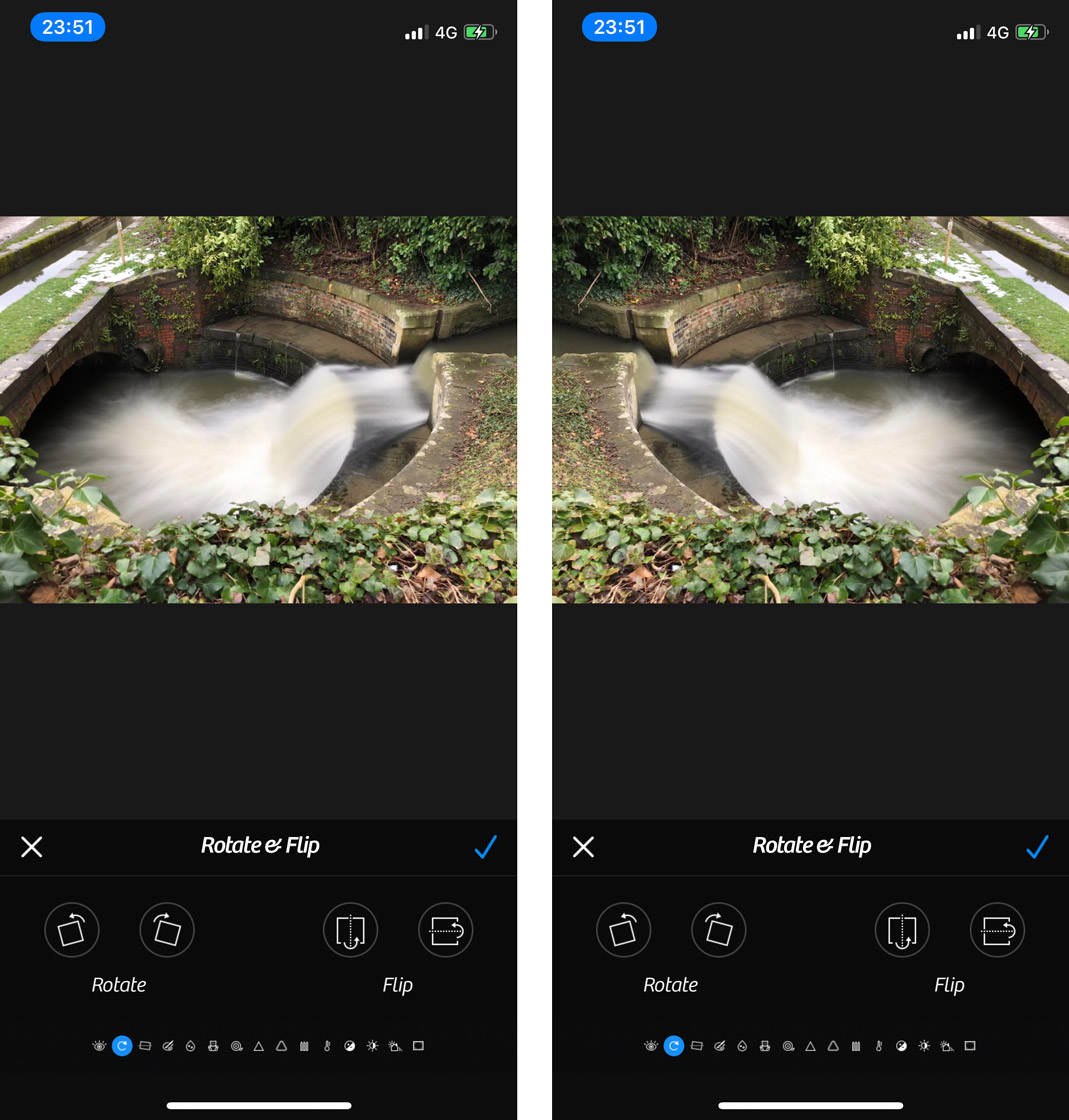
3.4.2 Rotate & Flip
You can rotate your photo in either direction, in 90-degree jumps. To do this, either use one of the two rotate icons, or tap on the photo and drag in the direction you want to rotate.
Flip the photo vertically or horizontally by tapping on the corresponding flip icon, or swiping the photo in the direction you want it to be flipped.
3.4.3 Straighten
Unlike the rotate tool above, where you are limited to the 90-degree increments, the straighten tool lets you make very small rotation adjustments. There are three ways to rotate your photo. You can tap on the photo and drag your finger to rotate it. Alternatively, use the horizontal slider to set the amount of rotation. Lastly, for smaller increments, simply tap the small rotation icons which are located either side of the rotation slider. Each tap results in a 1/10th degree of rotation.
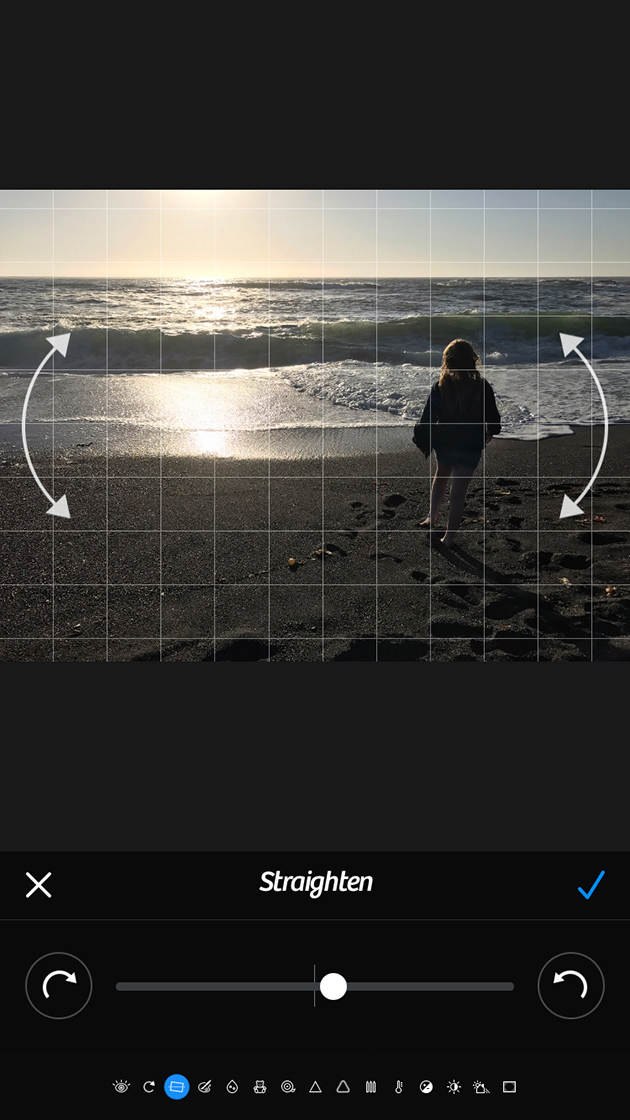
Use this tool to fix a crooked horizon, or to straighten up the primary vertical in your photo – such as a telegraph pole or tower.
3.4.4 Tint
To add a color tint to your photo, first, use the Color slider to choose the color you want to apply, then, use the Intensity slider to set how much of the color you want to be applied.
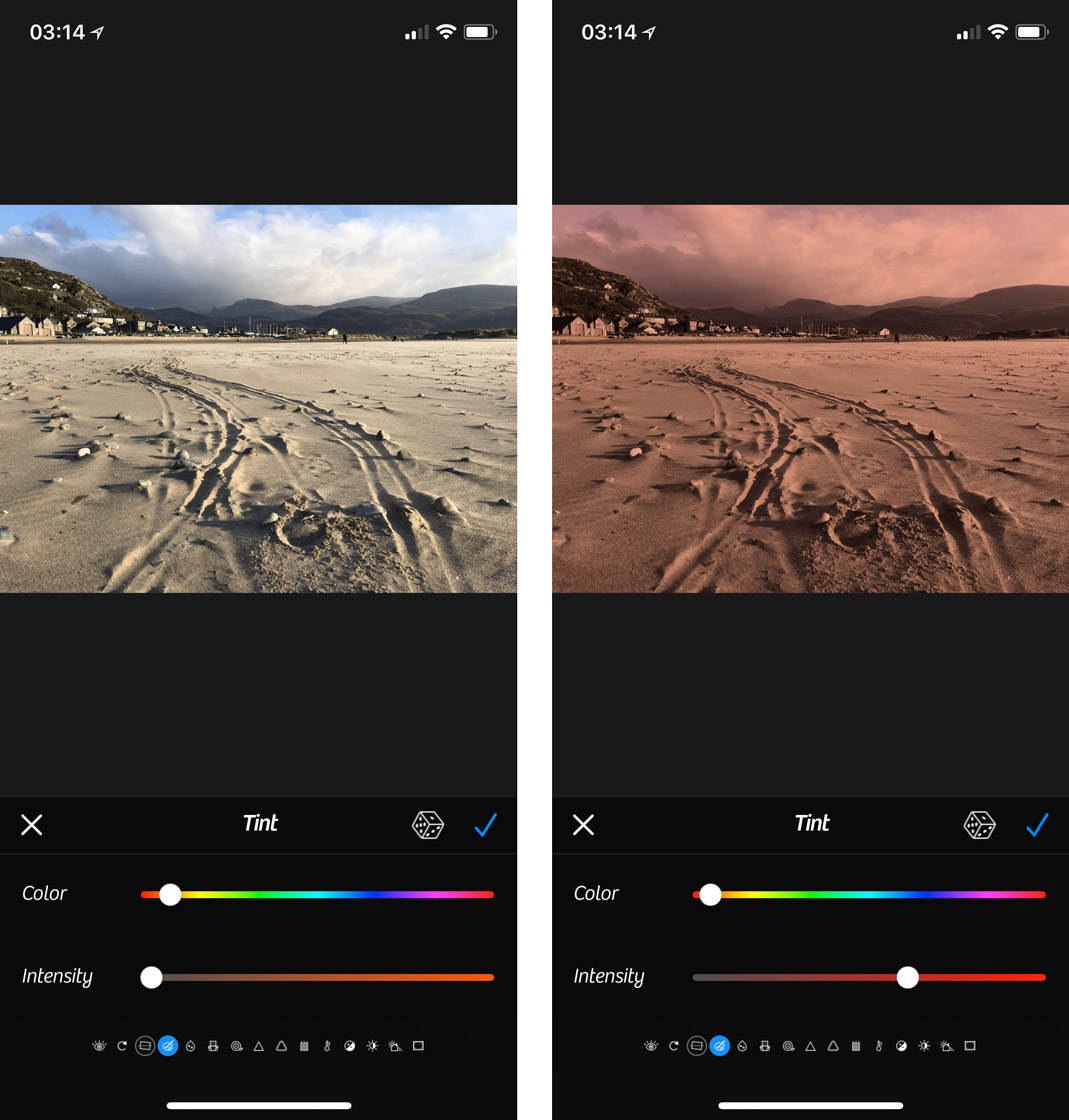
Use this tool to improve a sunset scene by adding warmer colors or make a snowy scene feel cooler by adding a little blue.
Also, if you’re feeling lucky or don’t know where to start, tap the dice icon for a random color and color intensity!
3.4.5 Duotone
This tool is similar to the Tint tool above, but it gives you the ability to apply separate color tints and intensities to the bright and dark areas of the image. Furthermore, it allows you to desaturate (remove the color) from both the bright and dark areas by degrees.
There are a pair of sliders for both Brights and Darks.
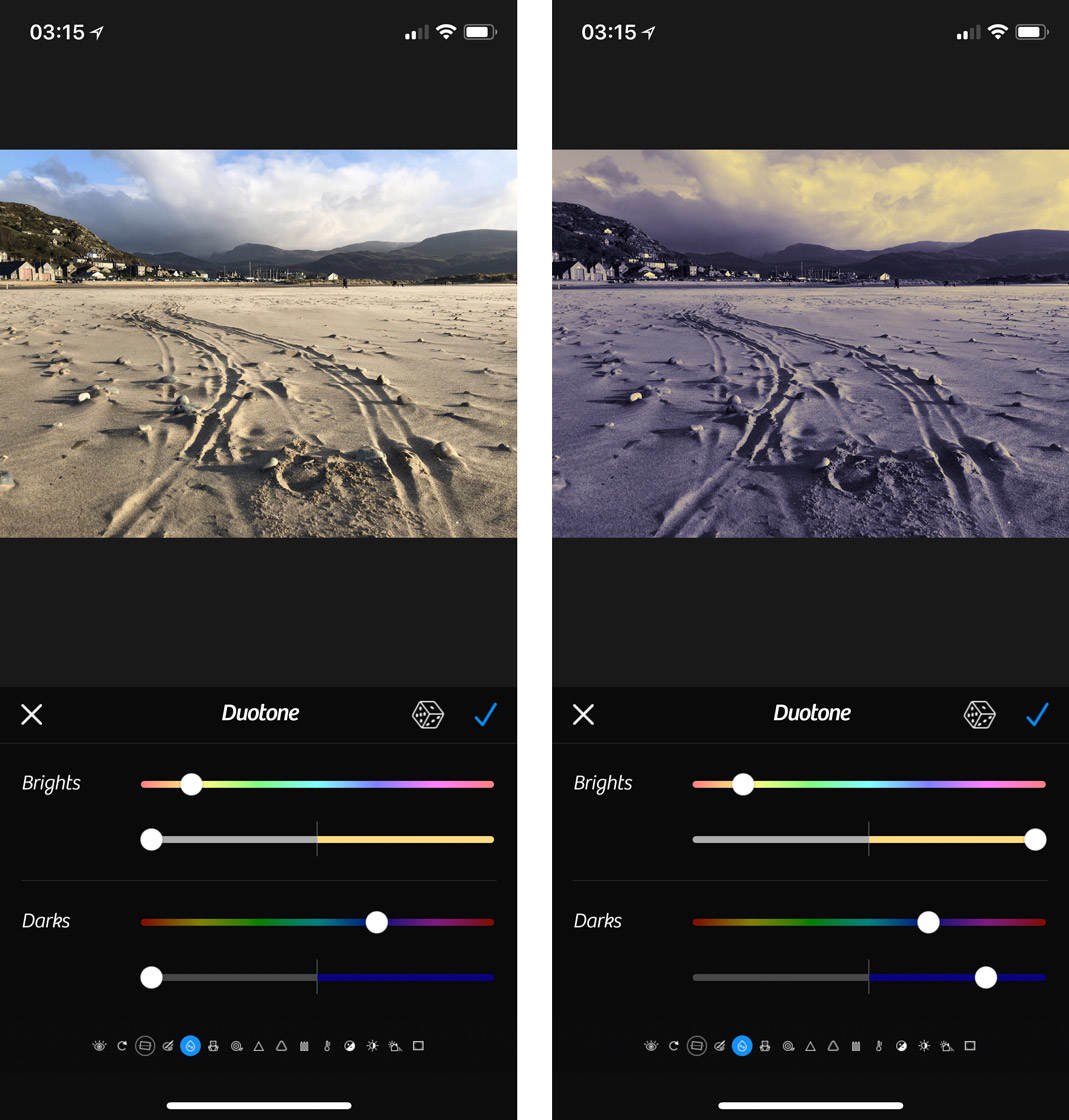
In each case, the top slider selects the color tint to be applied. The bottom slider affects the desaturation and color intensity. Sliding from the left to the middle desaturates the image – turning it black and white in the middle. Sliding from the middle towards the extreme right applies the chosen color in ever-increasing intensity.
3.4.6 Soft Focus
Apply a romantic softness to the entire photo by moving the slider left or right, dialing in the amount of softness you’d like.
3.4.7 Film Grain
To make your photo look like it was shot on grainy, high-speed film, simply dial in the amount of grain you want by moving the slider horizontally.
3.4.8 Sharpen
The sharpen tool can’t fix a very blurry photo, but it can sharpen any edges it finds to make your photo appear sharper. Move the slider horizontally to get the correct sharpness.
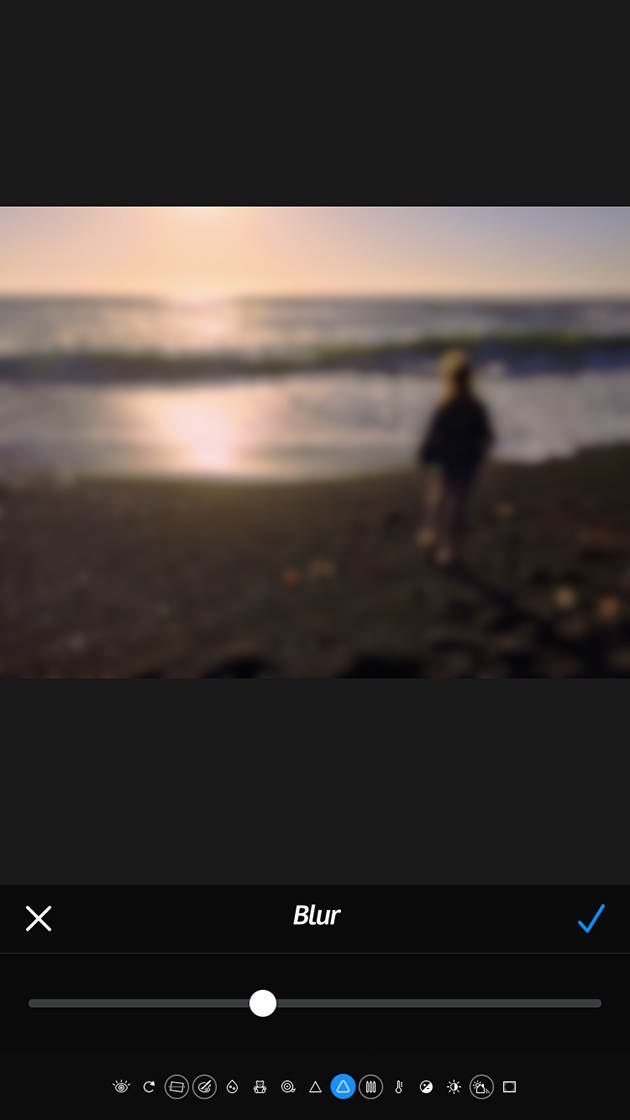
3.4.9 Blur
This is a more extreme version of soft focus and will make your image completely blurry. Choose how blurry you want the photo to be by moving the slider.
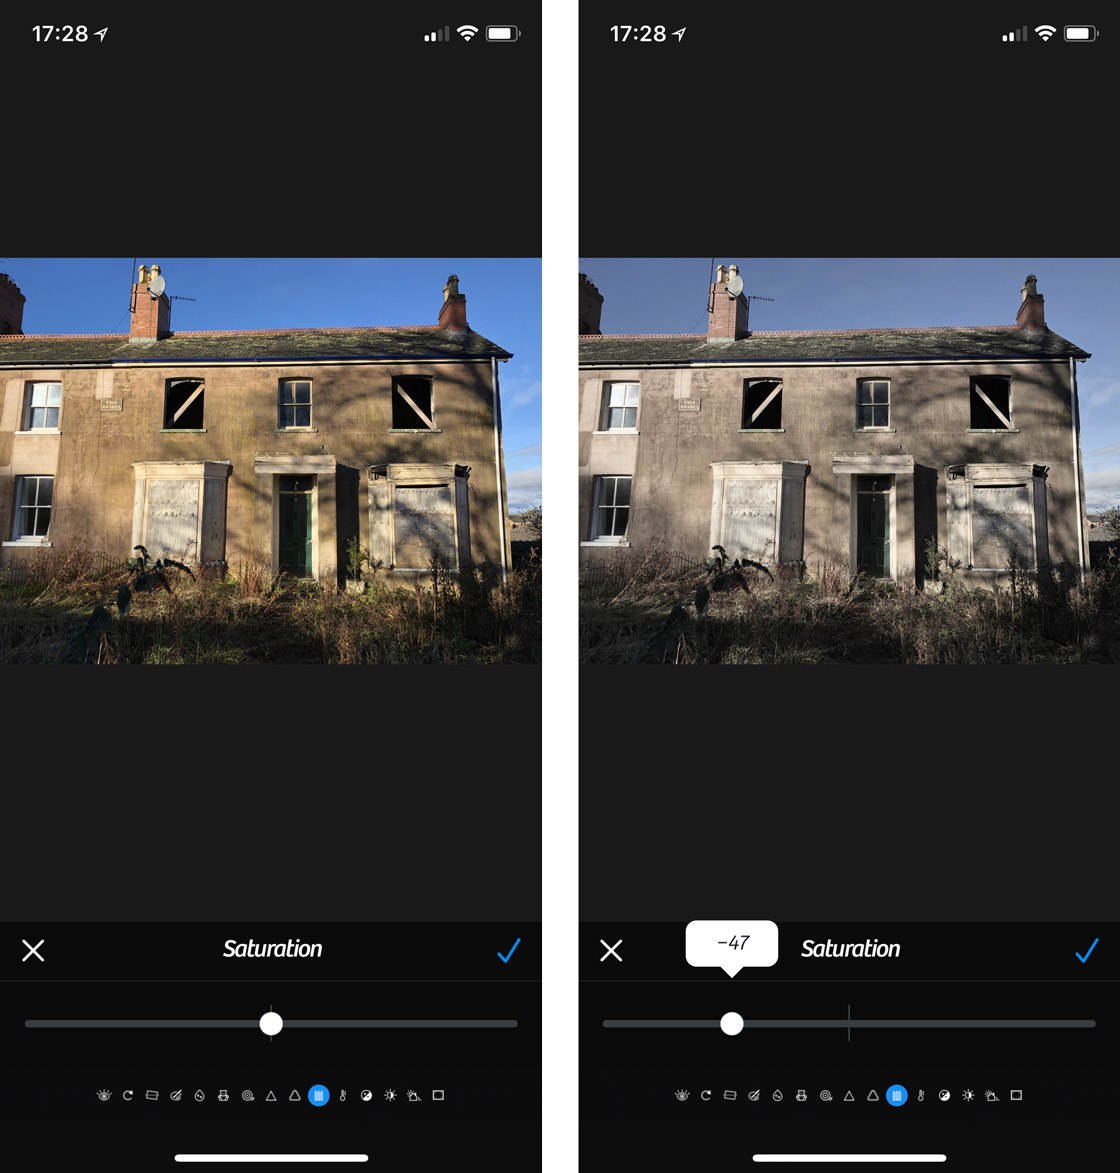
3.4.10 Saturation
The saturation tool deepens or mutes the colors in the photo. The central position on the slider applies no changes to saturation. Sliding it to the left mutes the colors and sliding it to the right deepens the color saturation.
3.4.11 Temperature
Use this tool to correct an unintended color cast, for example, when shooting indoors with only household lighting, or outdoors at nighttime under street lighting, the images can be a little too orange – or warm. So, to fix this, move the slider to the left for a cooler color temperature, or to the right for a warmer color temperature.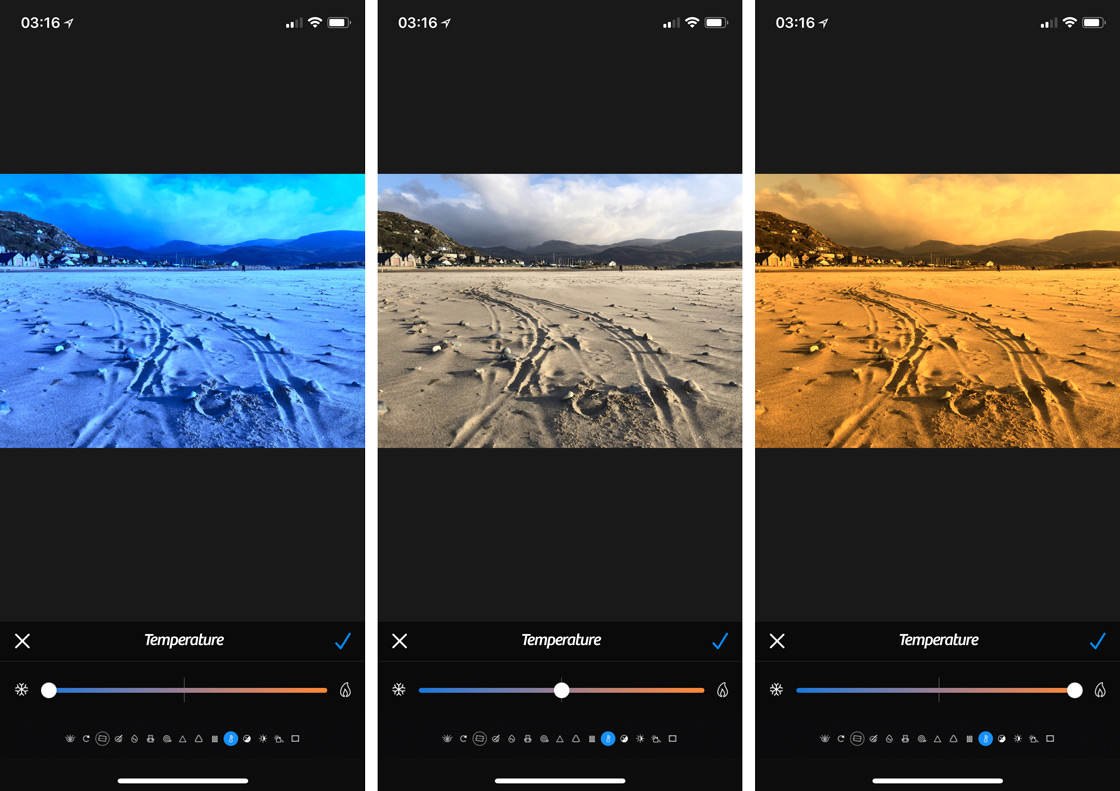
3.4.12 Exposure
You can improve an image that’s a little too bright or a little too dark by moving the exposure slider to the left to reduce the exposure (darkening the photo), or to the right to increase the exposure (brightening the photo). However, it’s worth noting that this tool can’t reveal detail in pure black or pure white regions of your photo – because no detail was captured there in the first place.
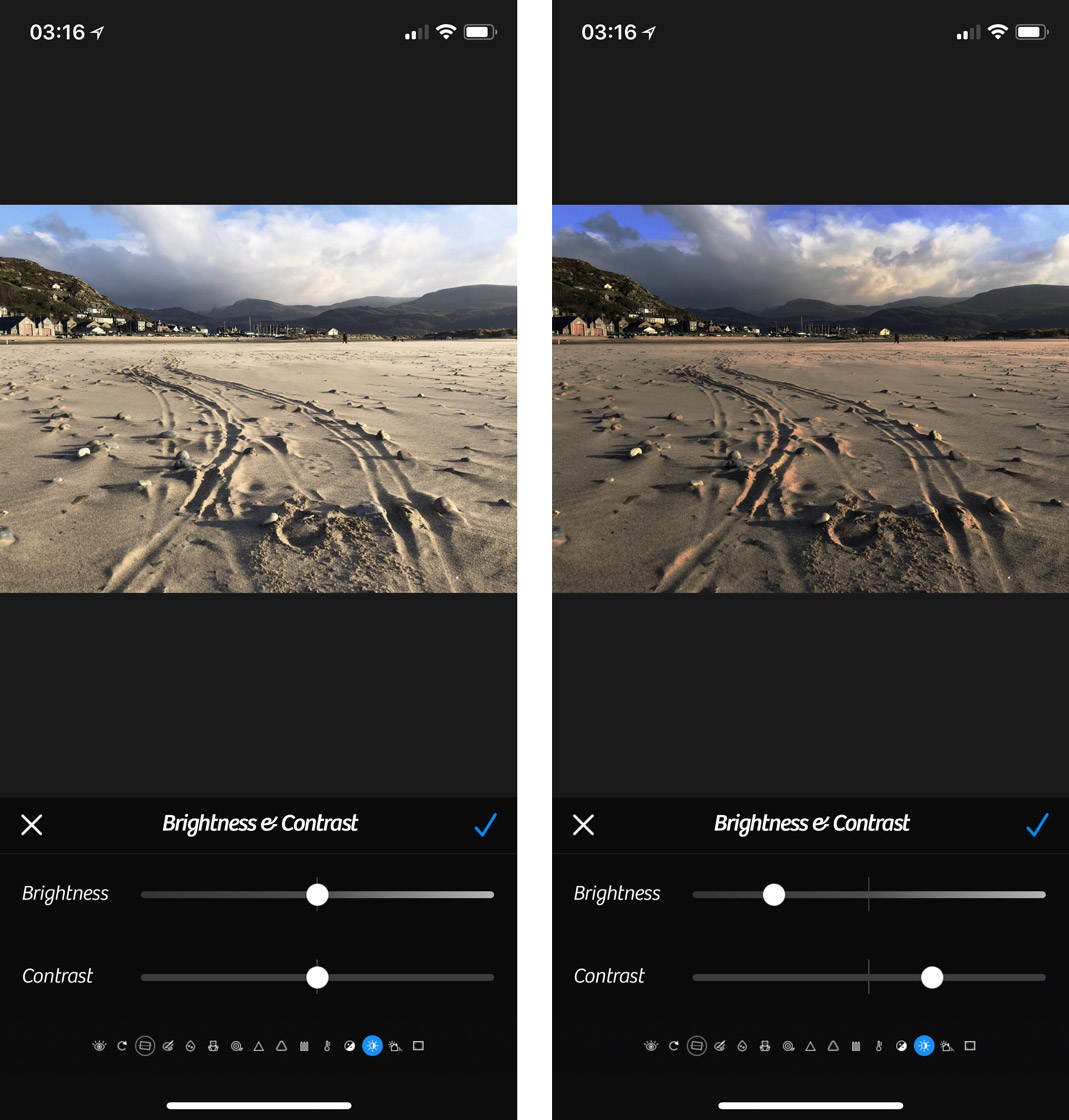
3.4.13 Brightness & Contrast
You can fix brightness and contrast issues by moving the corresponding slider left or right to decrease or increase brightness or contrast respectively.
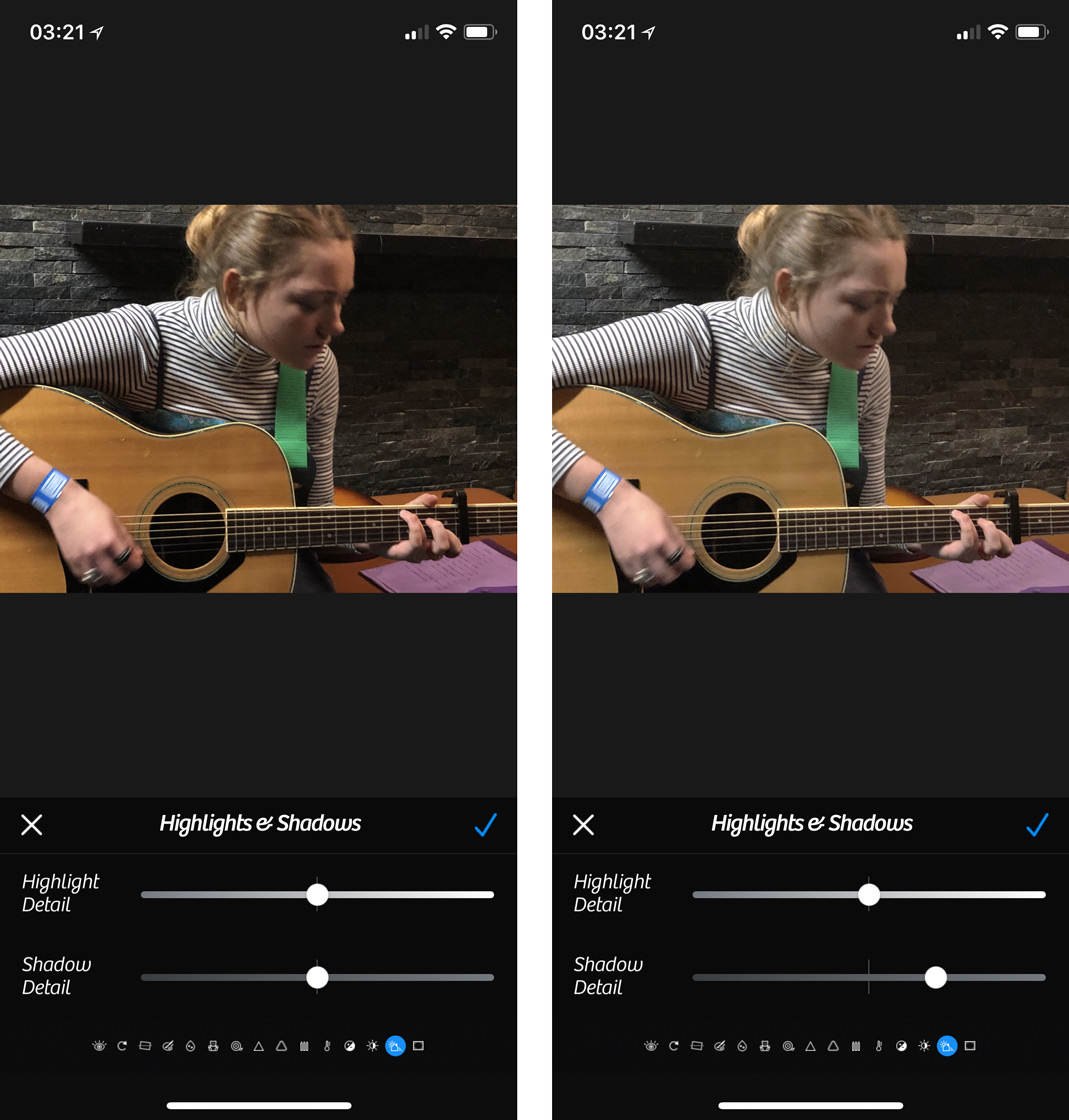
3.4.14 Highlights & Shadows
It’s often a bad idea to brighten or darken the whole of an under or over-exposed photo, so, use this tool to selectively brighten the highlights (brightest areas of your photo) or darken the shadows by moving the corresponding slider left or right to decrease or increase brightness in the highlights or shadows respectively.
3.4.15 Vignette
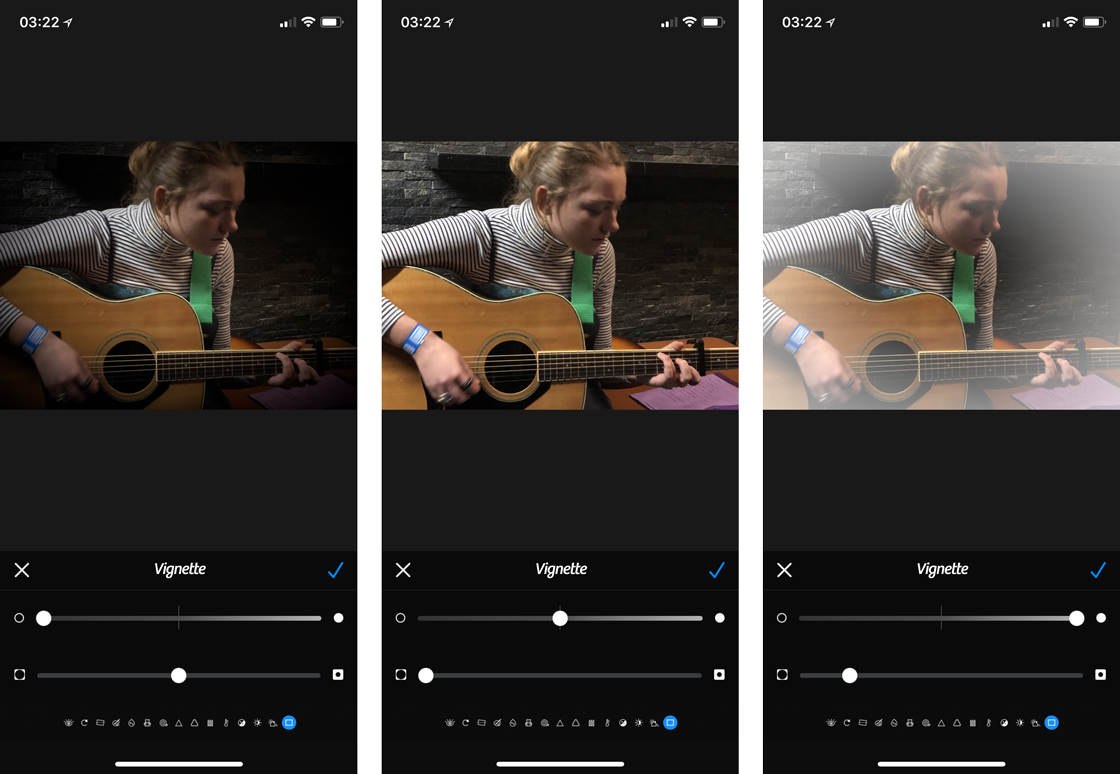
The vignette feature creates a dramatic tunnel-vision effect which, as a result, can help draw attention to your subject, or conceal distracting elements near the edges or corners of your photo.
The top slider controls the opacity and color of the vignette. The vignette is disabled with the slider at the central position.
Move the top slider to the left to create a dark-colored vignette, noting that the further to the left you slide, the darker and more opaque the vignette.
Move the top slider to the right to create a light-colored vignette, noting that the further to the right you slide, the brighter and more opaque the vignette.
Finally, the bottom slider controls how far the vignette reaches from the edges into the center of the scene, as demonstrated in the three examples below which show the two extremes of dark to light vignettes, with the center photo having no vignette.
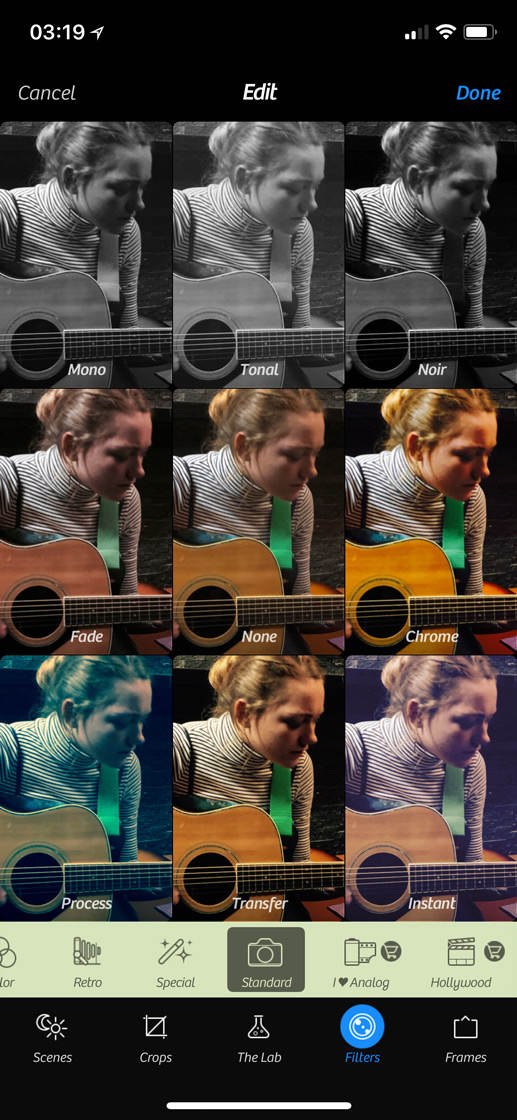
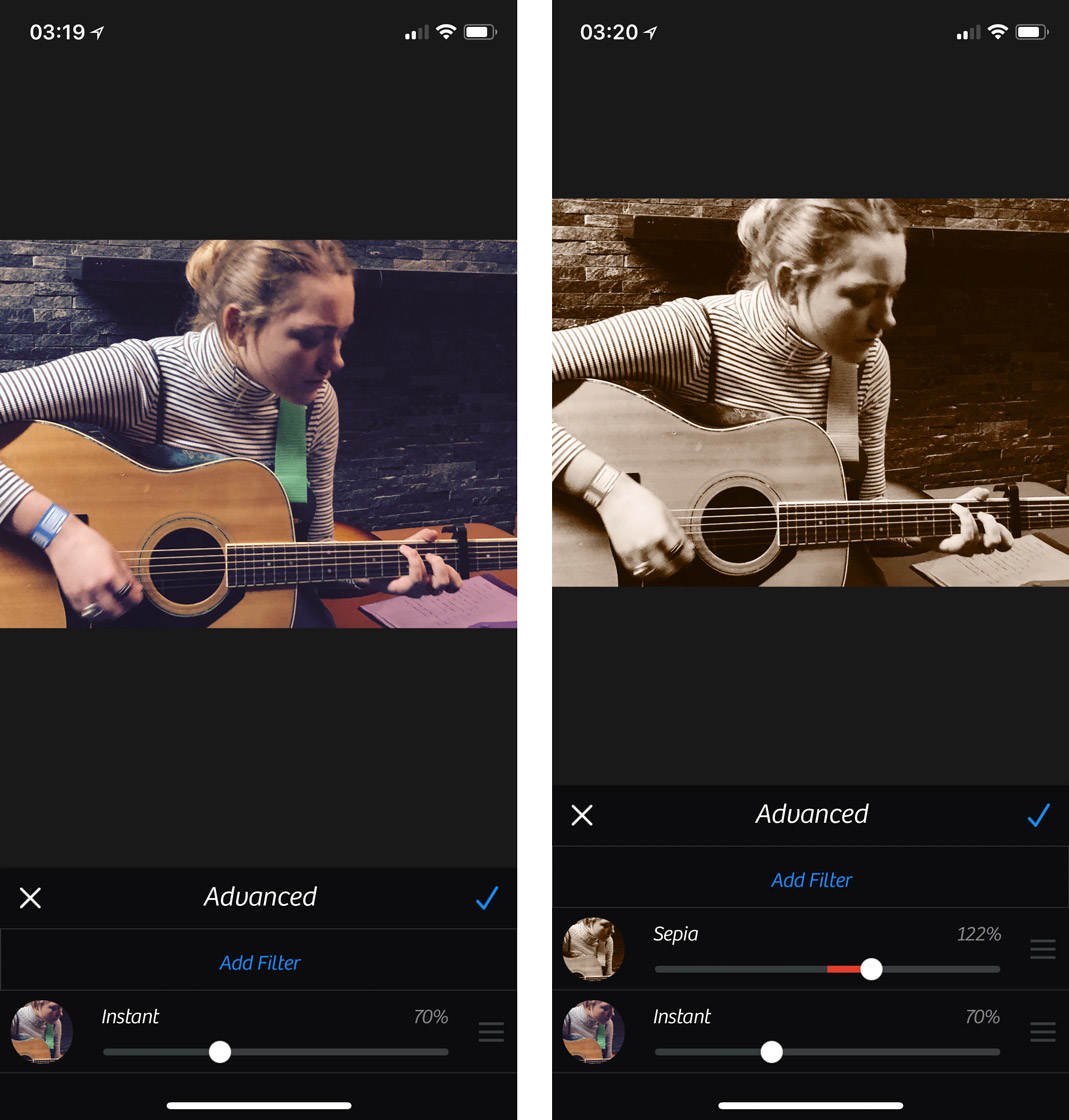
3.5 Filters
Filters are one-tap stylistic effects, however, each has an advanced option allowing you to adjust the intensity of the filter effect. Firstly, explore the filter categories, which include color filters, retro filters, standard filters and optional premium filters which you can purchase in-app. As you select a filter category, the app displays multiple versions of the photo you’re currently editing but with a preview of the different filters applied.
To apply a filter you like, simply tap the corresponding filter preview, but, f you change your mind, you can easily remove the filter by tapping the Remove icon.
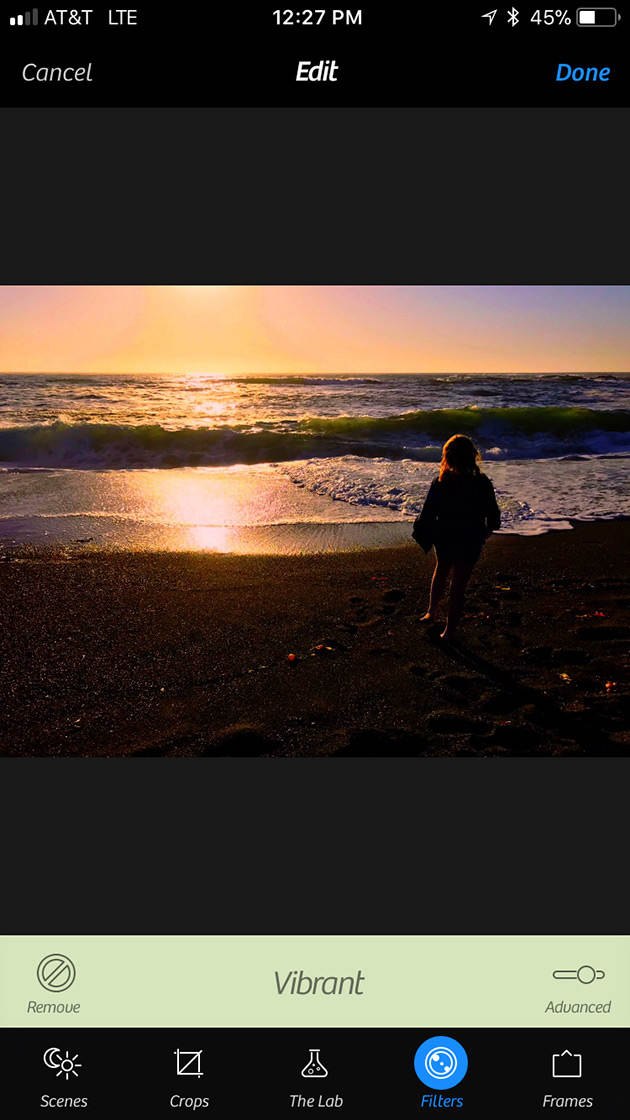
To adjust the intensity of the filter, tap the Advanced icon to reveal a slider with the default 100% displayed. Finally, reduce the intensity of the effect by moving the slider to the left, or increase the filter intensity by moving the slider to the right.
You can also layer multiple filters for more creative control. To add another filter, in the advanced settings, press Add Filter.
3.6 Frames
Frames are another way to add a fun final touch to your photo. As well as creating a border around your photo, you can also add a caption, however, there’s limited control over the caption style and position.
Firstly, explore the available frames by tapping on each frame category. Then you’ll see the photo you’re currently editing displayed in each of the available frames. Finally, tap on the frame preview you like best.
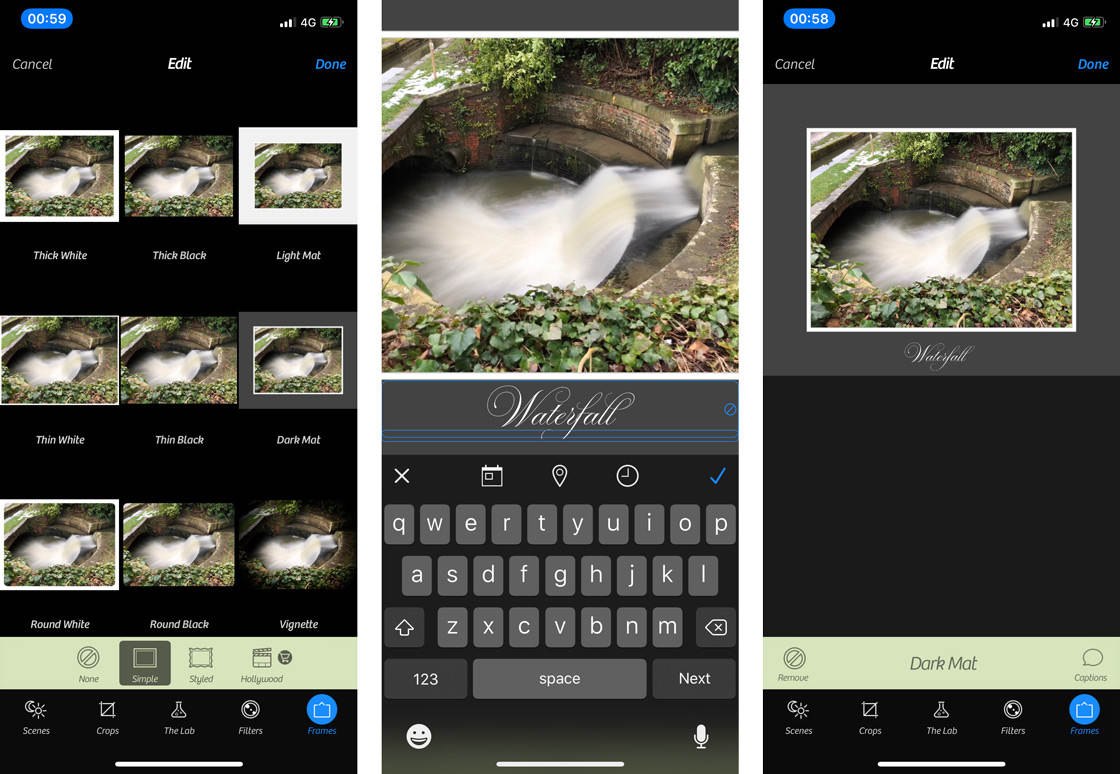
To set a caption, tap the Caption icon, then type the words you’d like to see displayed on your photo. To remove the caption, tap the Remove icon.

I have used Camera+ primarily for editing photos. This tutorial gave a lot of great information on manual controls. I look forward to trying more manual settings in the future. 🙂
Good article, but…. Camera+ doesn’t have a native landscape shooting mode? If I’m reading this correctly, you have to shoot everything portrait and then crop to landscape?
Hi Ian. You can shoot full-resolution landscape shots but only if you rotate the iPhone as you would in the native camera app. The landscape mode is actually a 16:9 widescreen aspect ratio – which works whether the iPhone is held vertically or horizontally. However, the rectangular shape of the iPhone’s sensor means that you’ll only get a landscape photo which uses the full width of the iPhone’s sensor (and therefore, all its pixels) if you hold the camera horizontally. I hope that answers your question.
Outstanding, really I love the tips mentioned here. I think these are so useful for iphone photography. Thanks.
Do you have any idea or tip on how to retrieve lost photos within the Lightbox of Camera+?
How can I give photos a file name (not a caption on the photo itself)?
can you do a pano using this app?
I have used Camera+ for several years, and mostly in Raw. I need to get photos off my iphone7 onto an external hard drive as storage on the phone is a problem. How do I do this?
What happens to photos if I ‘Save all?”