Snapseed is an incredible iPhone photo editing app. But are you daunted by its huge range of editing tools? In this Snapseed tutorial, we guide you through the app with step-by-step instructions and video tutorials. You’ll quickly master the Snapseed app… even if you’re a complete beginner. Read on to discover how to use Snapseed photo editing tools to turn ordinary images into stunning masterpieces.
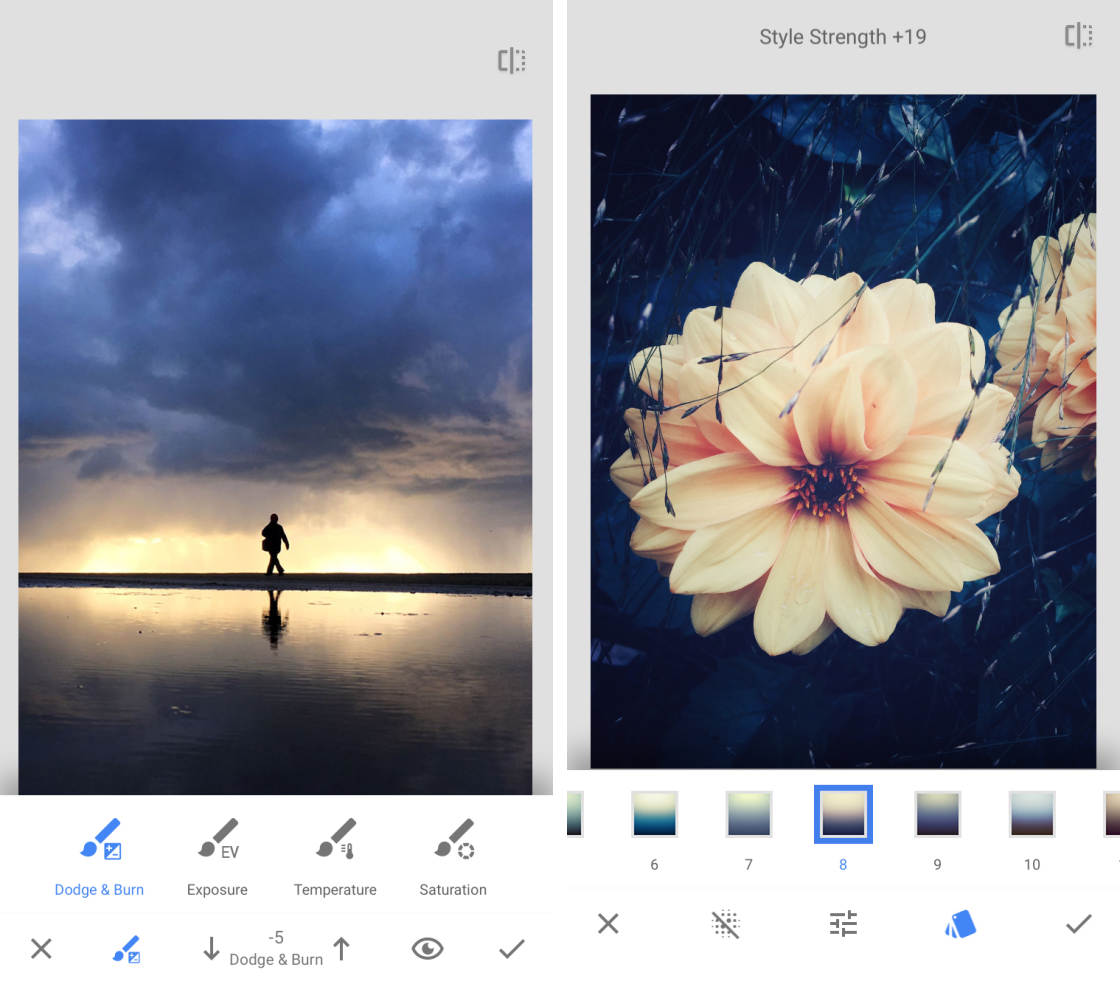
Table Of Contents: Snapseed App Tutorial
Click any title link below to go straight to that section of the Snapseed tutorial.
1. Open An Image In Snapseed Photo Editor
2. Enhance Color, Exposure & Detail
2.1 Tune Image
2.2 White Balance
2.3 Details
4. Improve Composition
4.1 Crop
4.2 Rotate
4.3 Perspective
5. Clean Up Your Photos For Flawless Edits
5.1 Healing
5.2 Portrait
6. Use Selective Editing Tools
6.1 Brush
6.2 Selective
6.3 Masking
6.4 Vignette
7. Change The Mood With Snapseed Filters
8. Use Looks As A Starting Point For Your Edits
8.1 Apply A Look To Your Photo
8.2 Customize A Look
8.3 Create Your Own Custom Looks
You can download Snapseed from the App Store for free. There are no hidden in-app purchases or subscription fees.
1. Open An Image In Snapseed Photo Editor
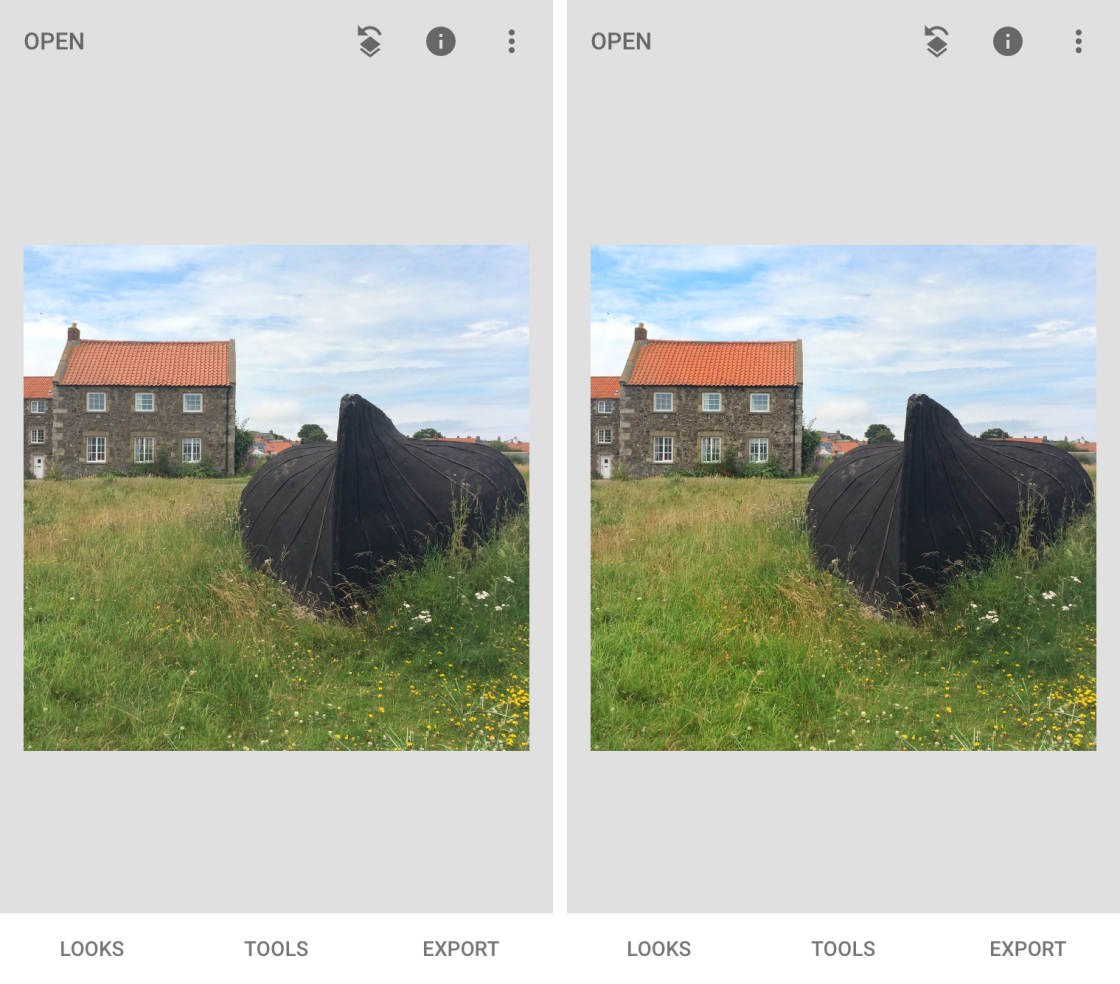
In the Snapseed app, tap Open.
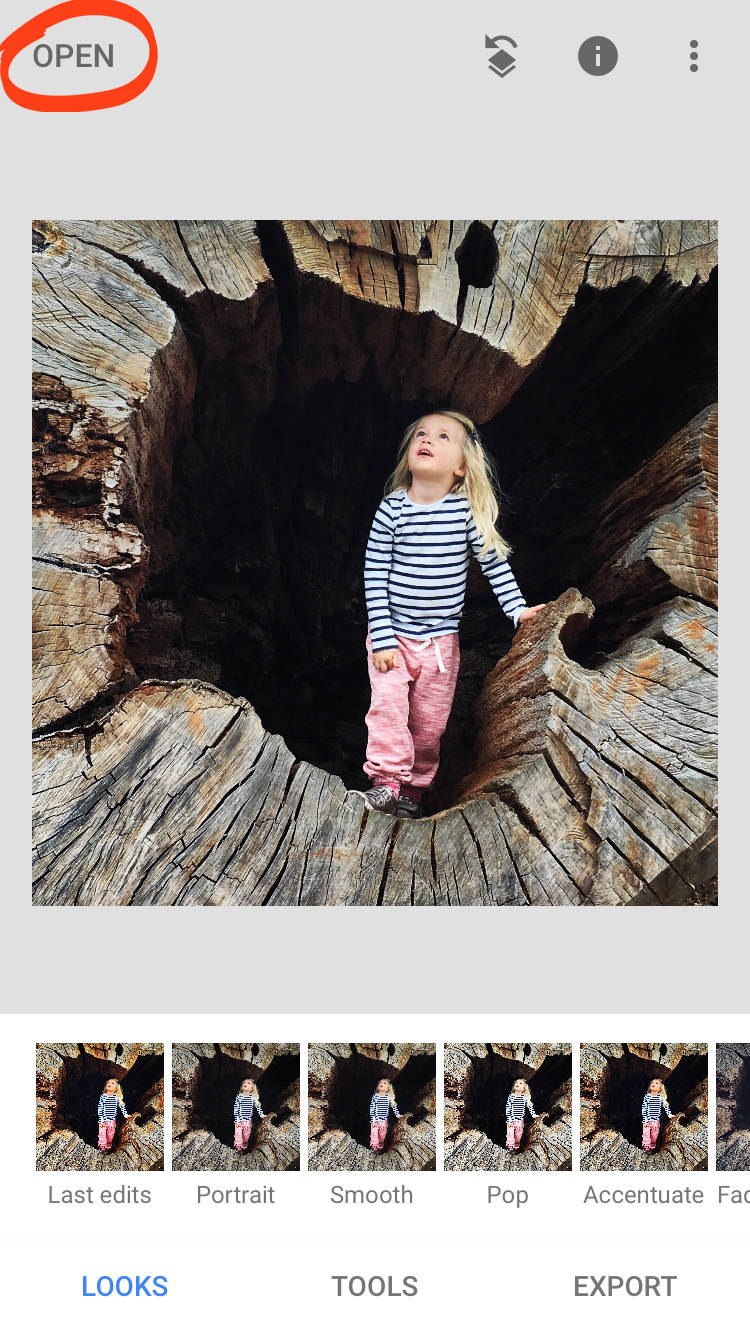
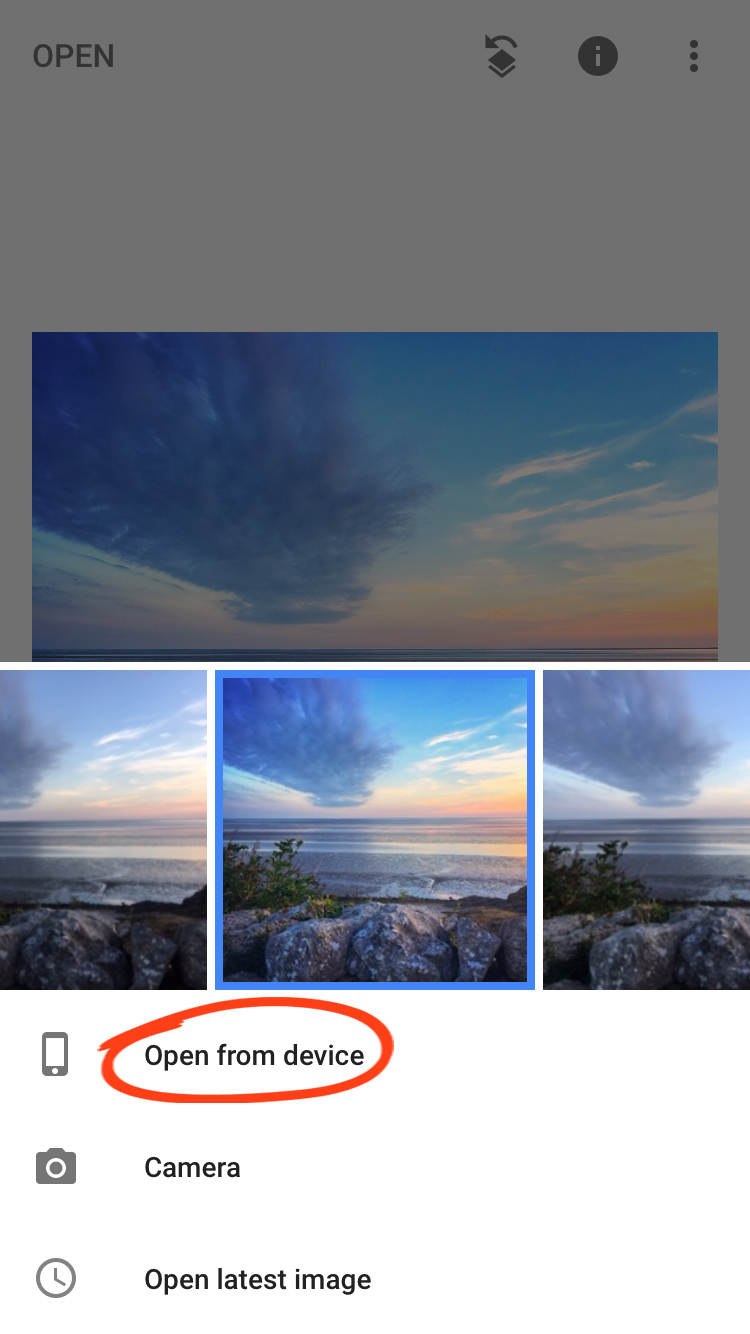
Tap Open From Device to access your iPhone’s photo library and albums. Or swipe across the row of image thumbnails to see your recent images. Tap on the photo you want to open.
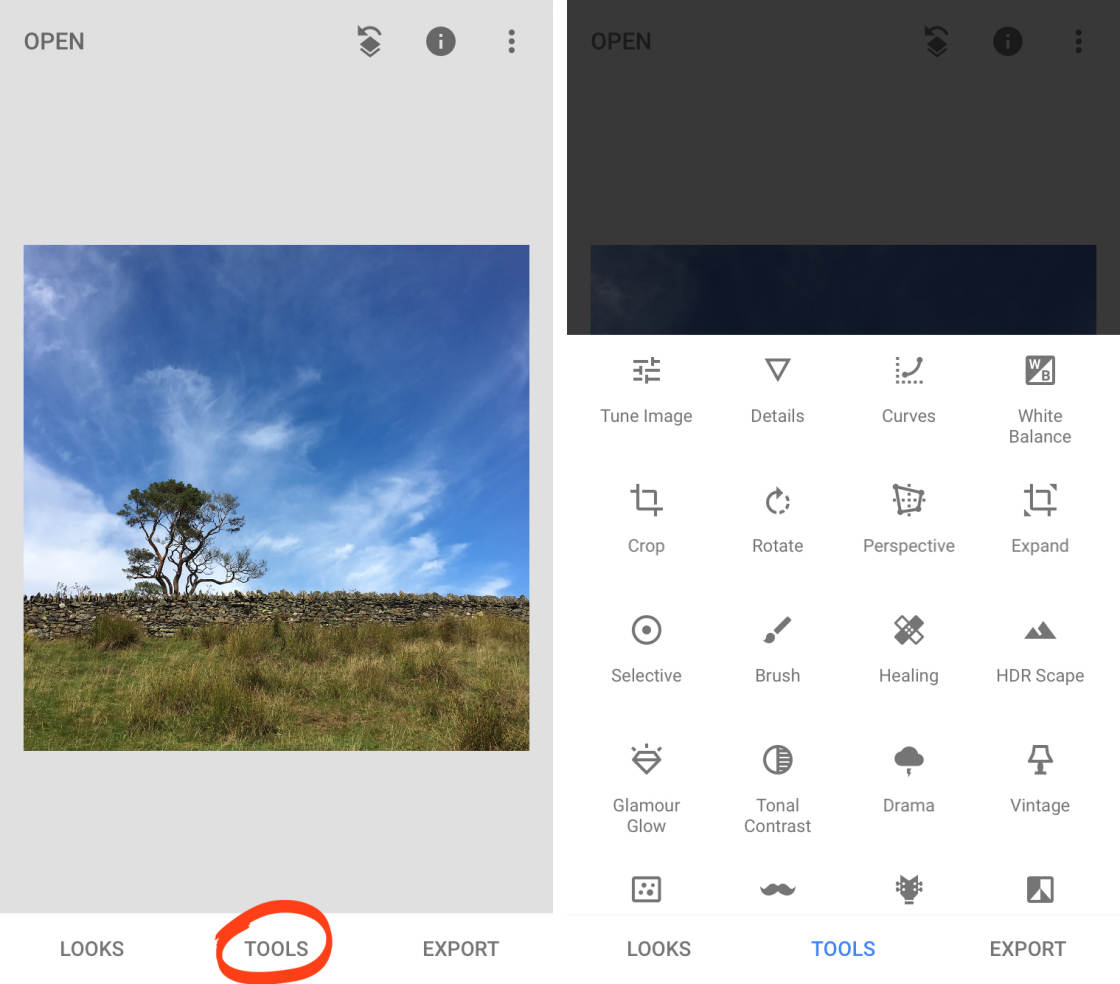
There are two Snapseed photo editing areas within the app: Looks and Tools. Switch between these areas by tapping Looks or Tools at the bottom of the screen.
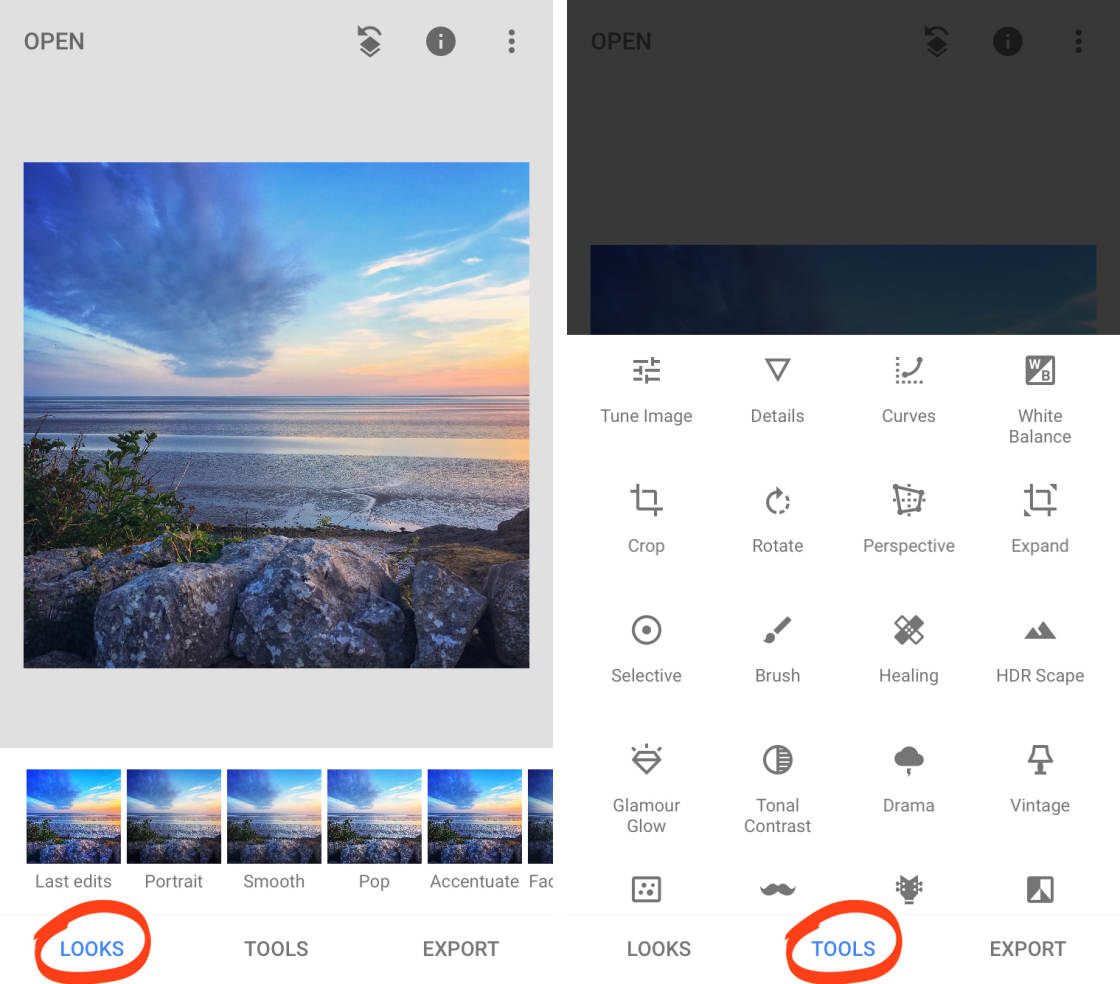
In this Snapseed tutorial, you’ll learn how to use Looks and Tools to create beautiful iPhone photos.
2. Enhance Color, Exposure & Detail
In this section, you’ll discover how to improve color, exposure (brightness levels), and detail in your photos. With a few simple edits, you can turn an ordinary dull photo into a spectacular masterpiece.
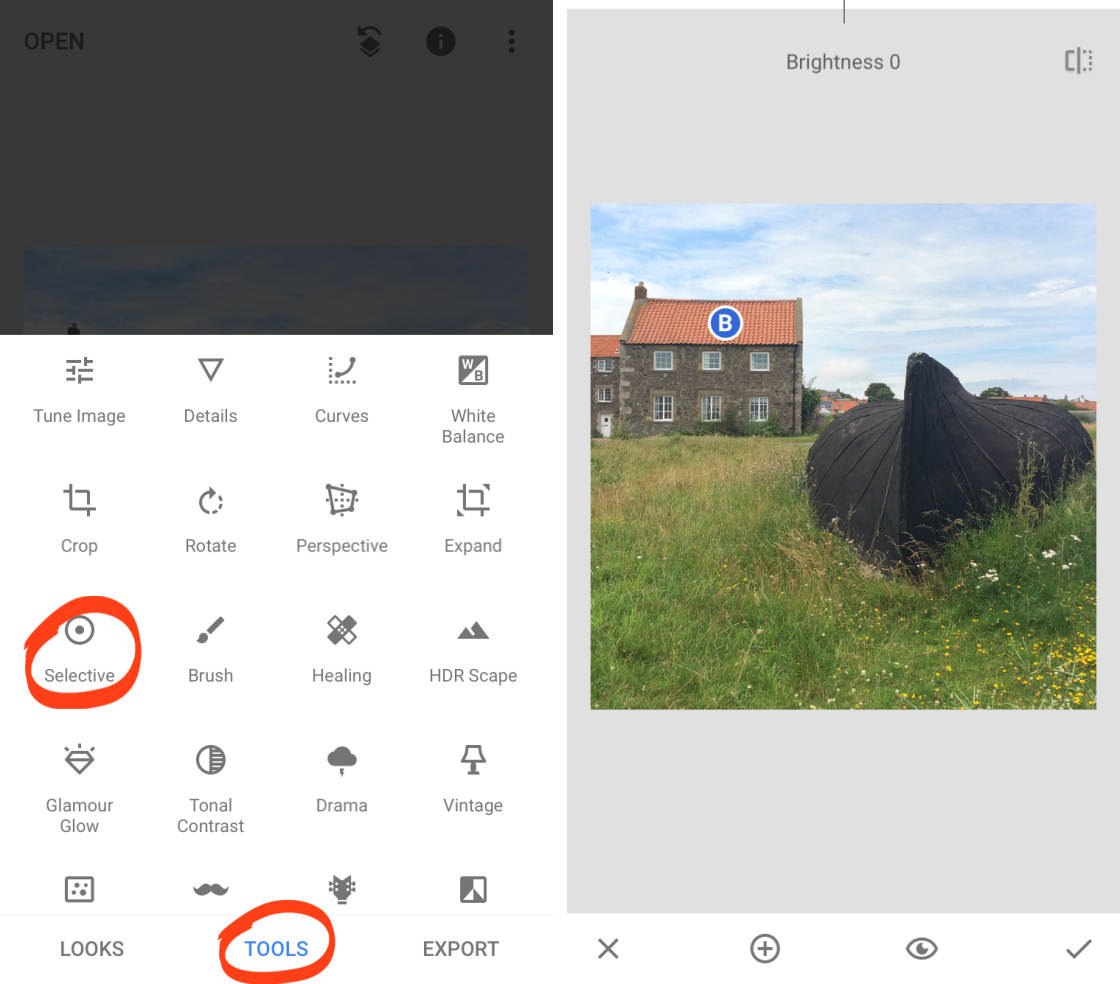
Open a photo, then tap Tools. You’ll see the menu of Snapseed photo editing tools as shown on the right below.
2.1 Tune Image
The Tune Image tool allows you to get perfect color and exposure in your photos.
This is the tool you’ll use most often in Snapseed editing because it greatly improves any photo.
The example below shows how you can turn a dull, dark photo into an eye-catching image with amazing colors.
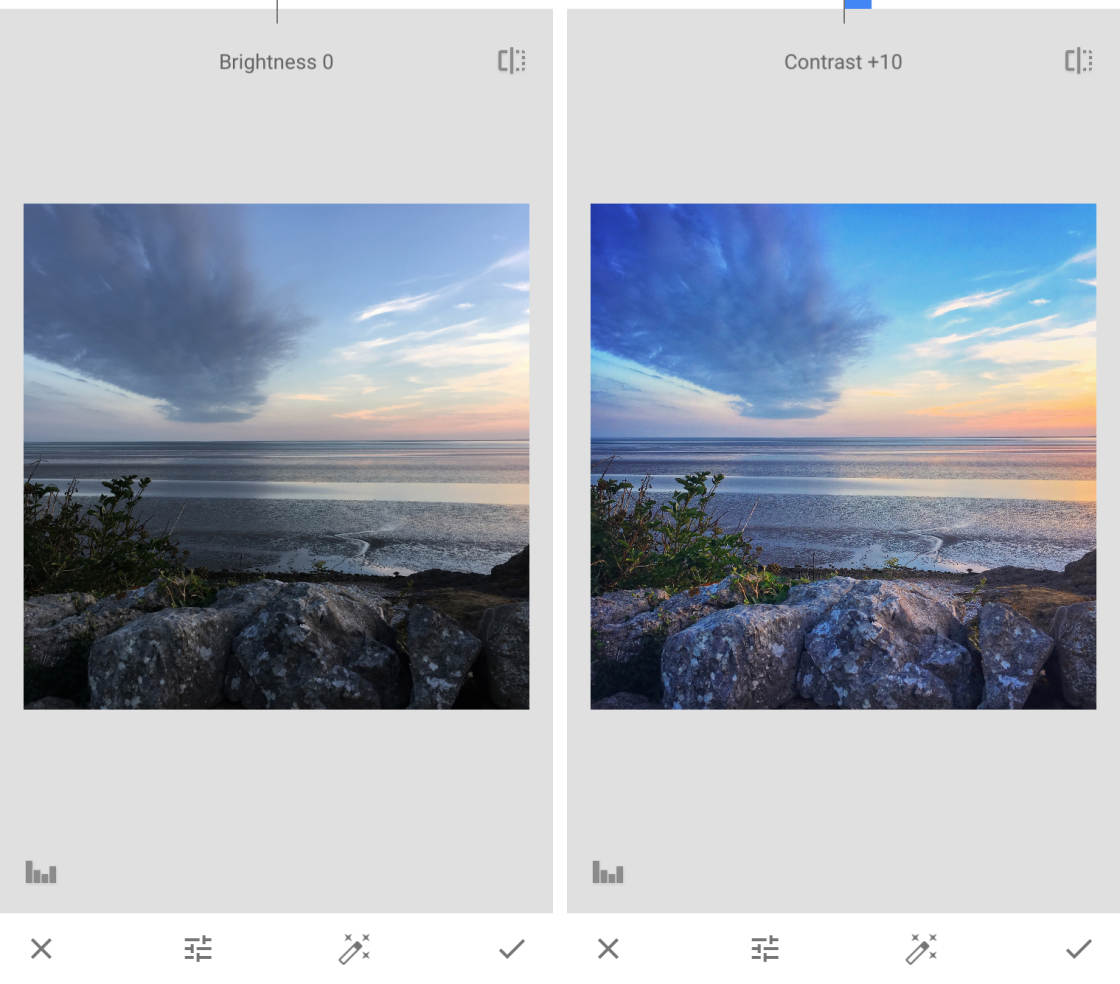
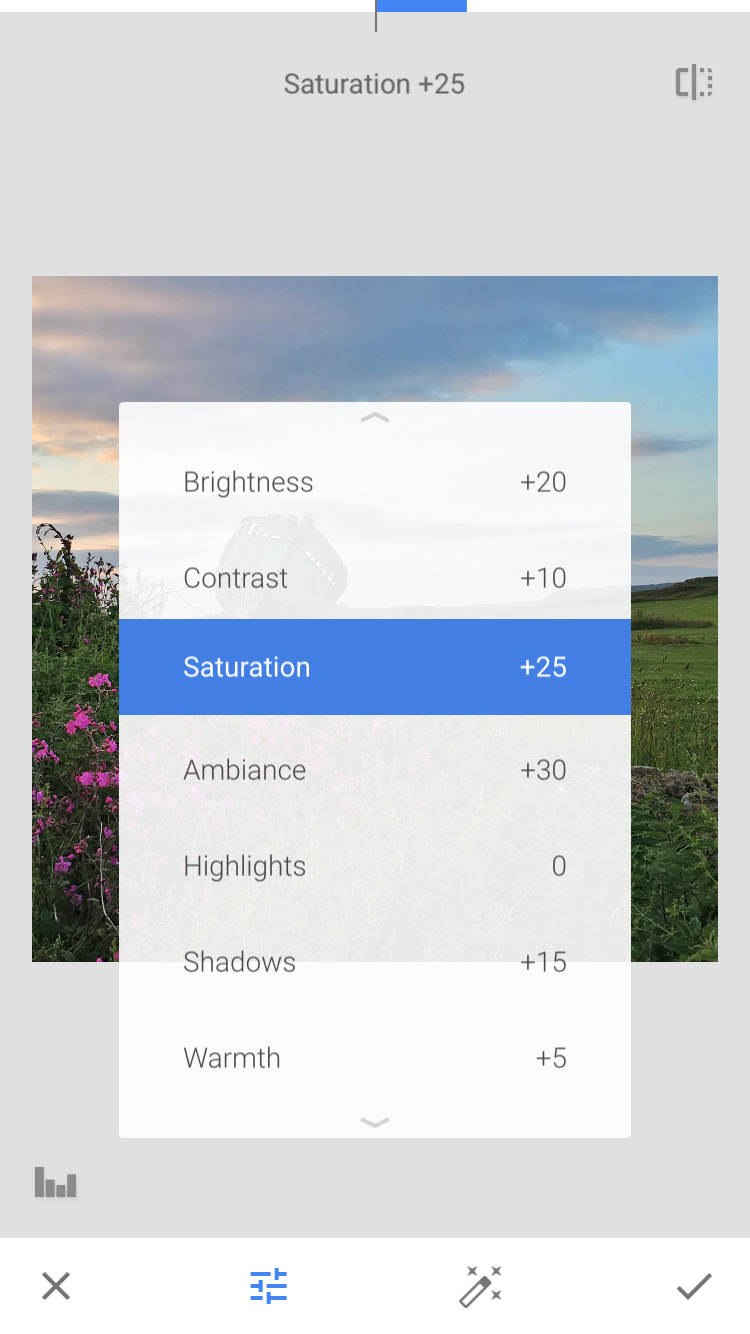
In the Tools section of Snapseed, tap Tune Image. Swipe up or down on your photo to open the Tune Image menu. Select the tool you want to use, e.g. Brightness, Contrast, etc.
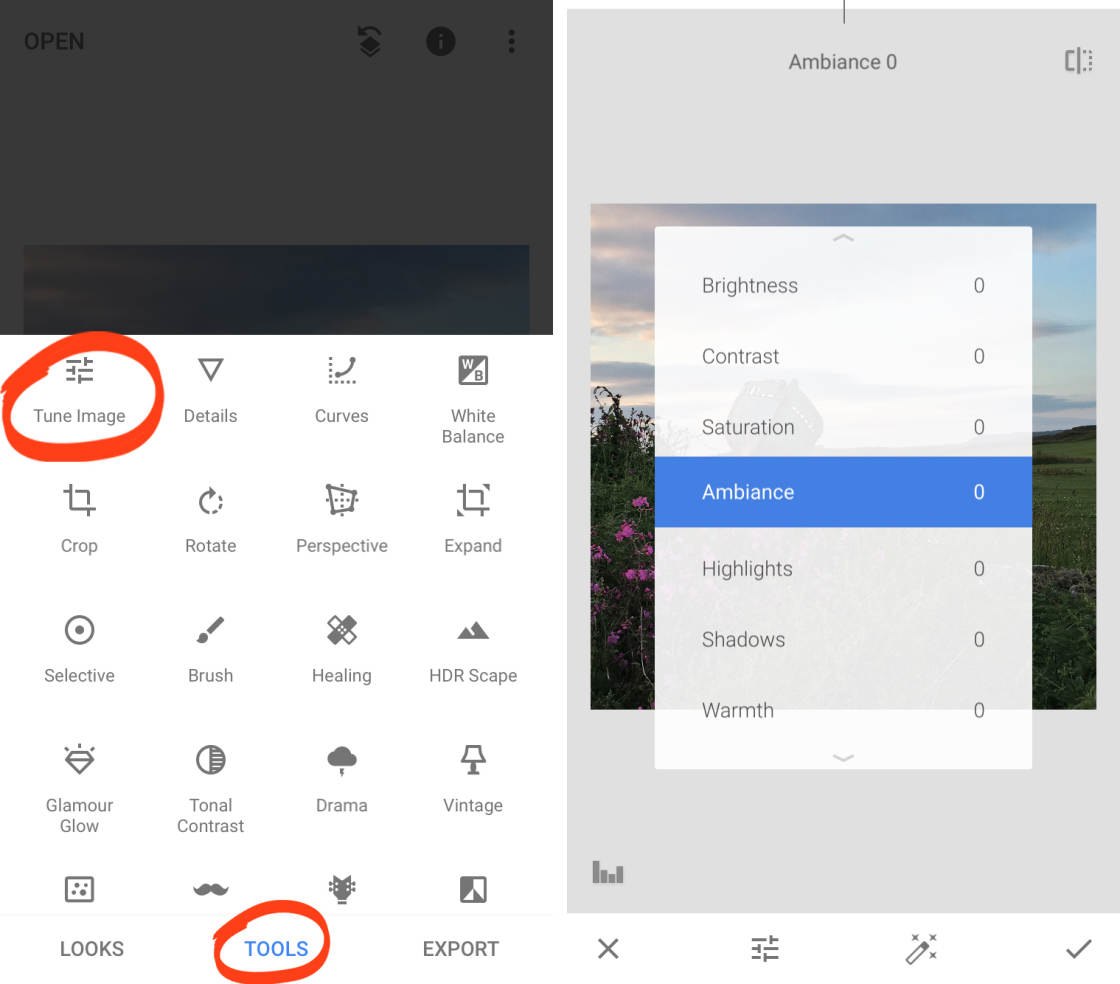
Here’s how the Tune Image tools affect color and exposure in your photo:
- Brightness: Darken or brighten the entire image.
- Contrast: Increase or decrease the difference between the dark and bright areas.
- Saturation: Make the colors more or less vibrant.
- Ambiance: Adjust color saturation and contrast at the same time.
- Shadows: Darken or lighten only the shadows (dark areas) in your image.
- Highlights: Darken or lighten only the highlights (bright areas) in your photo.
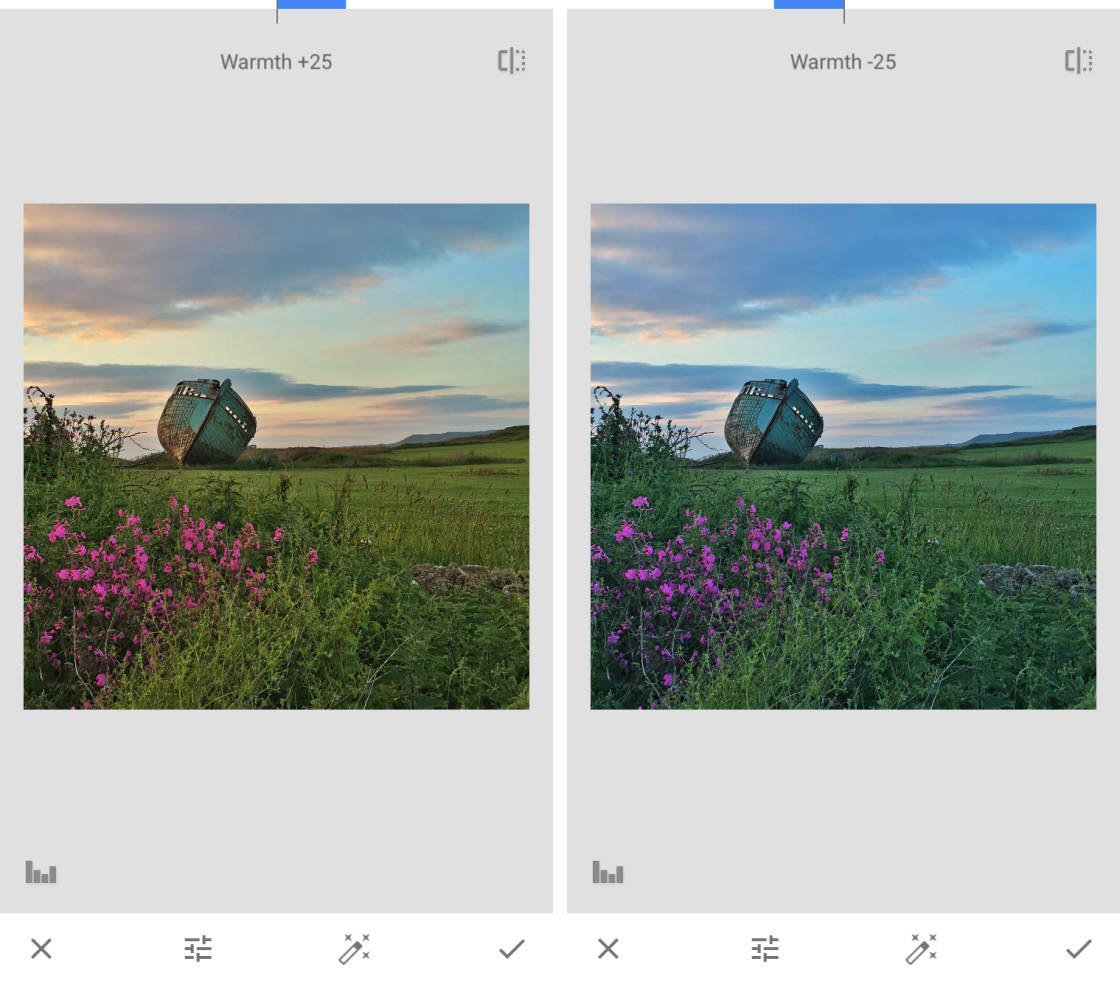
- Warmth: Add a warm orange or cool blue color cast to your image.
When you’ve chosen a tool, swipe left or right over your photo to make the adjustment. You’ll see the setting value at the top of the screen.
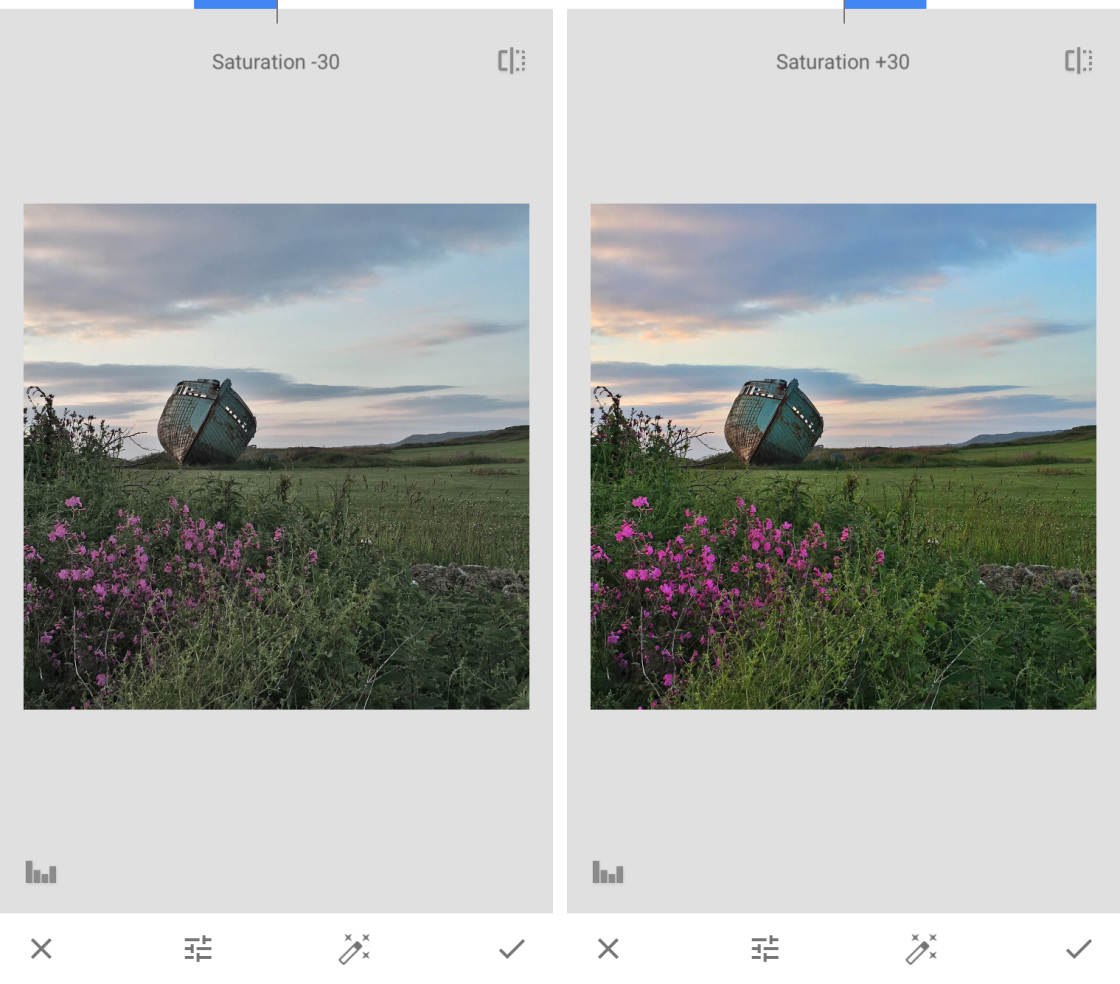
The example above shows how you can adjust the color vibrancy using Saturation. The example below shows how you can warm up or cool down the colors with Warmth.
To open the Tune Image menu again, swipe up or down. Choose another tool, then swipe left or right to adjust the setting. Repeat this process to use any other tools in the menu.
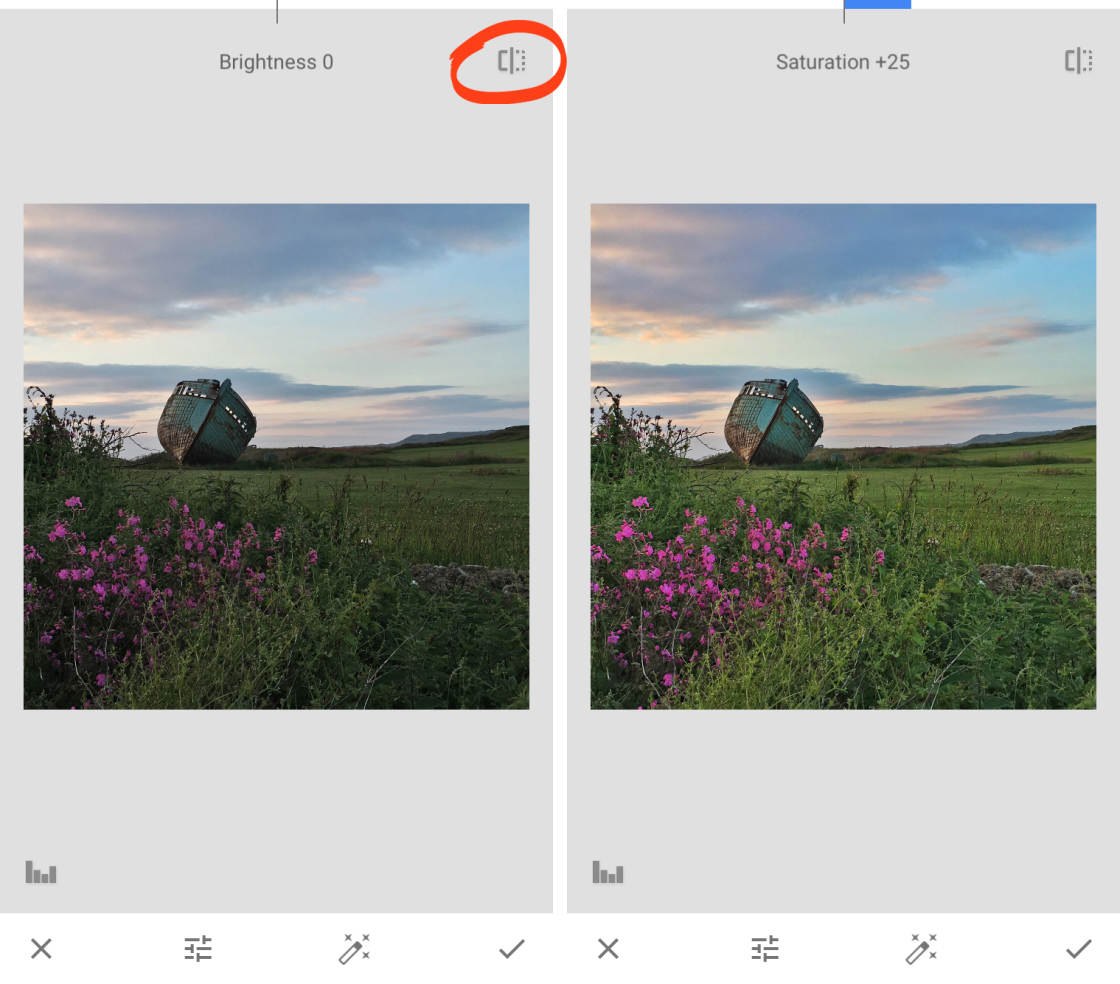
Compare the before and after versions of your photo using the icon at the top right. Tap and hold the icon to see the original photo. Release your finger to return to the edited image.
When you’re happy with your Snapseed edit, tap the checkmark.
Watch this video from my iPhone Editing Academy online course to discover how to create stunning Snapseed edits with Tune Image.
My iPhone Editing Academy online course shows you how to use photo editing apps to make ordinary photos look spectacular. Join now and learn how to use photo editing apps to create beautiful iPhone photos.
2.2 White Balance
The White Balance tool lets you enhance your photo by applying different color tints.
Use these tints to enhance colors, correct unwanted color casts, or change the mood of a photo.
In the Tools section of Snapseed, tap White Balance. Swipe up or down to open the White Balance tools, then select a setting from the menu.
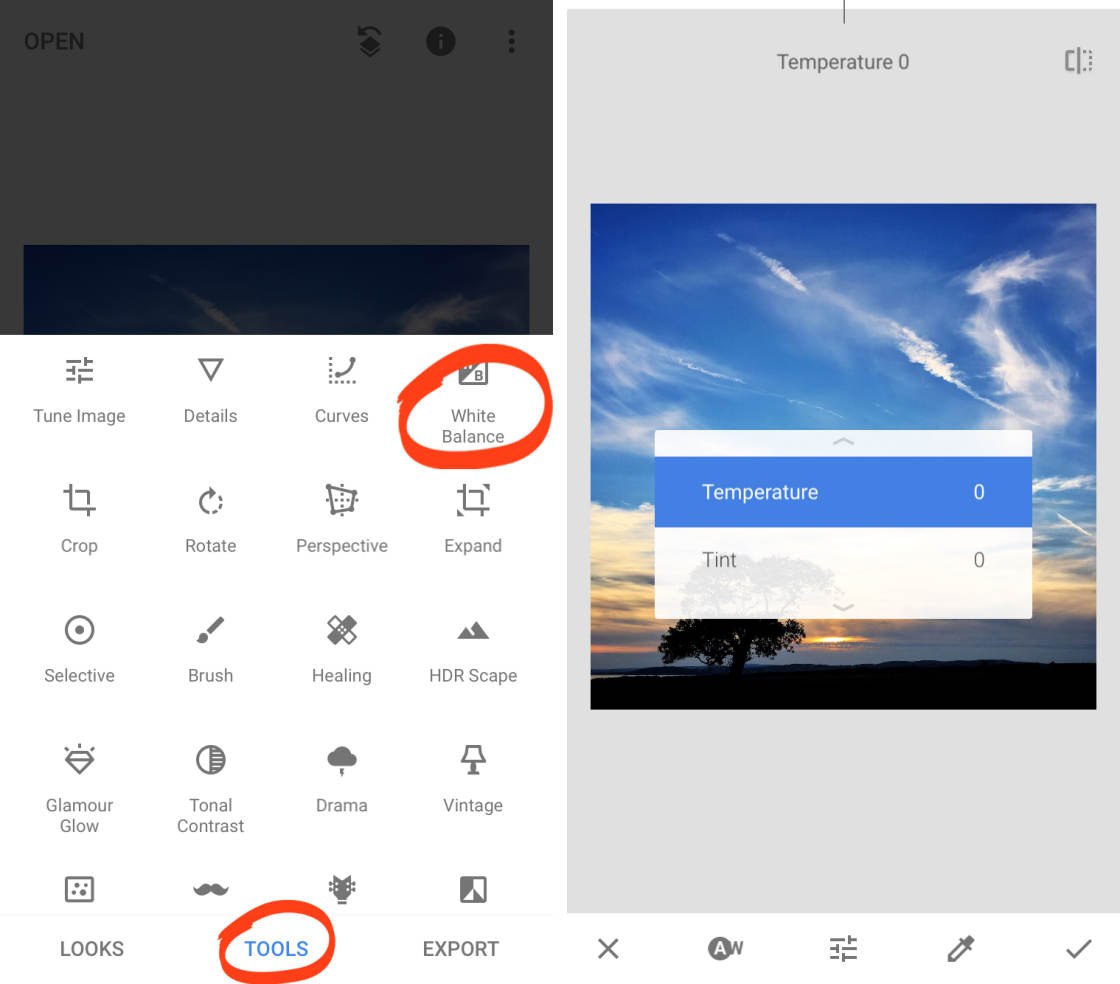
There are two White Balance tools:
- Temperature: Make the colors in your photo cooler (more blue) or warmer (more orange).
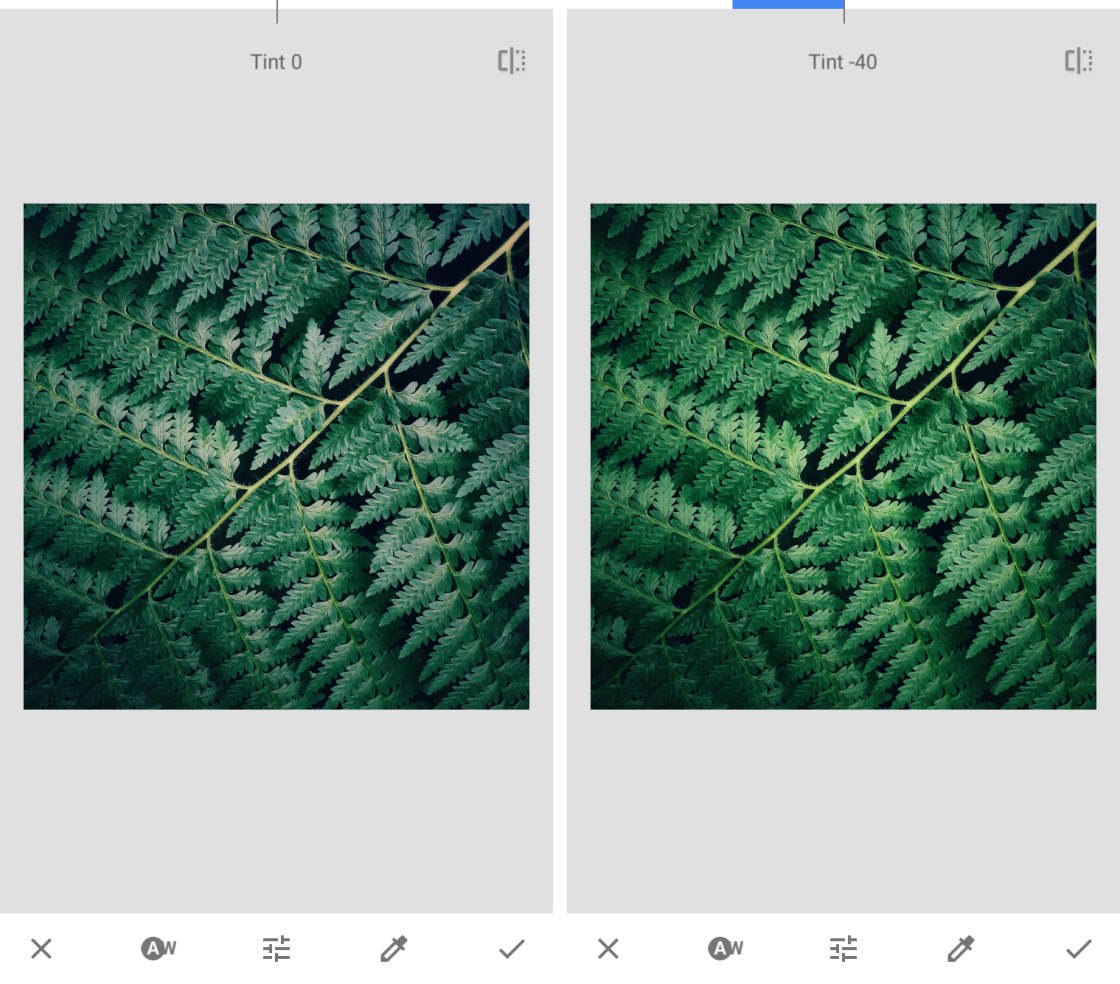
- Tint: Add a green or pink color tint to your image.
When you’ve chosen a tool, swipe left or right to adjust the setting.
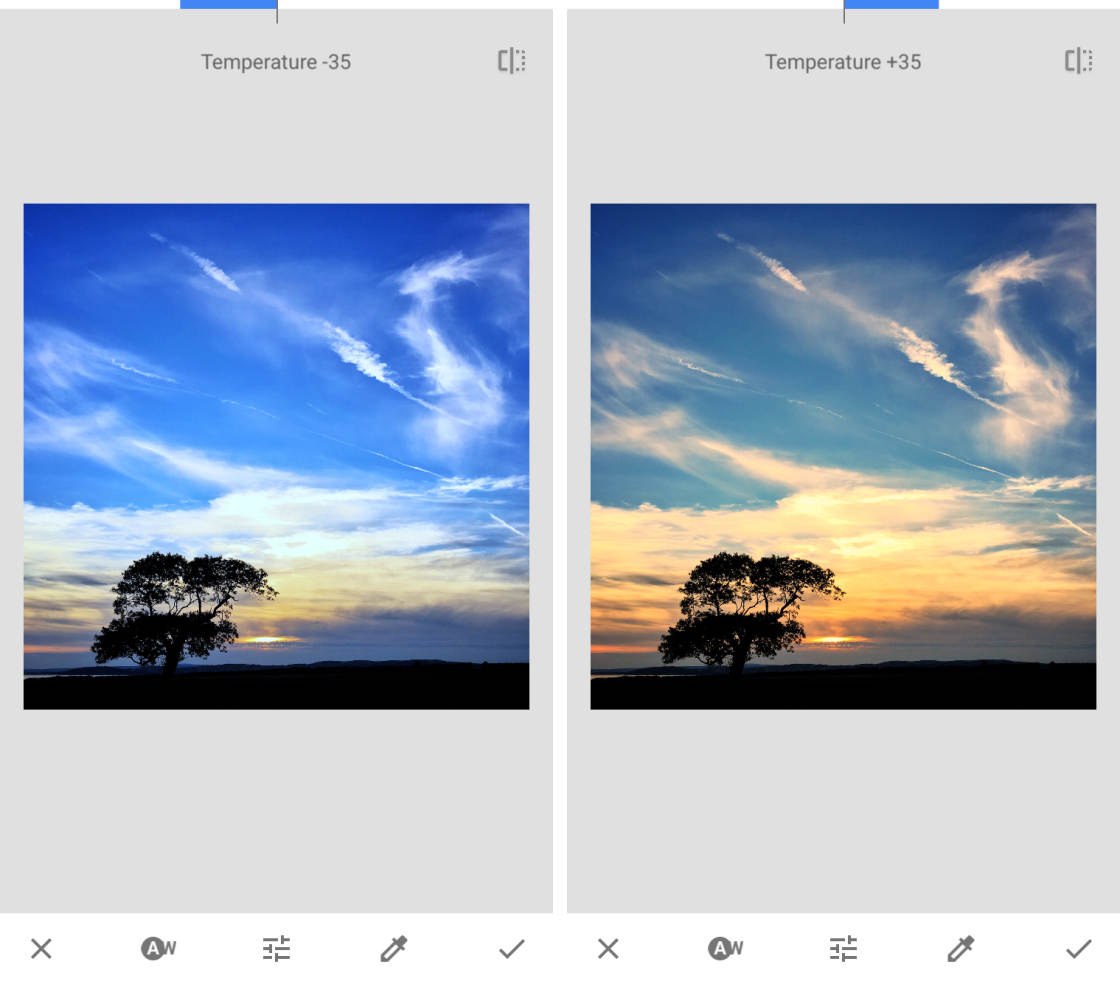
The example above shows how you can cool down or warm up colors using Temperature. Warming up the colors is perfect for enhancing your sunset photos.
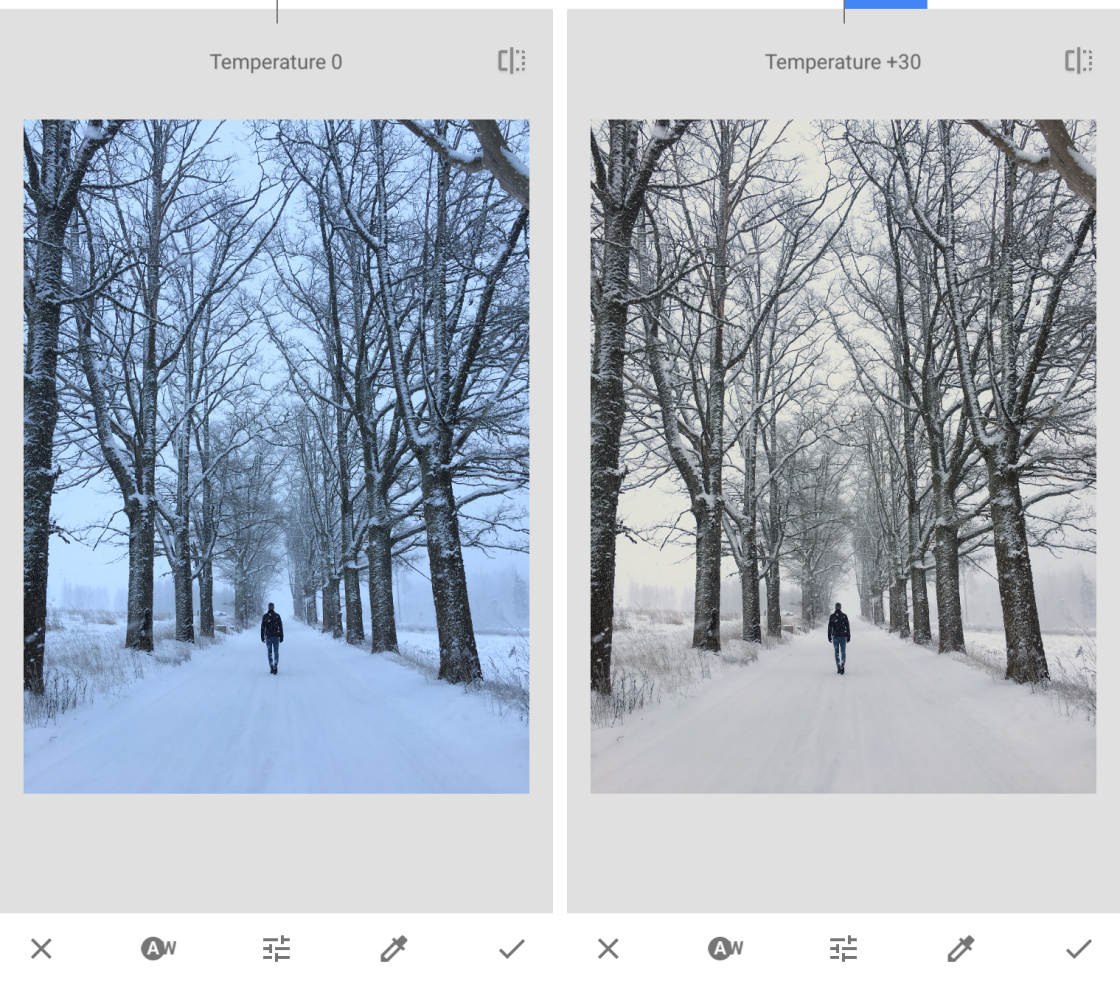
Temperature is also useful for correcting warm or cool color casts. In the photo below, the snow appears blue. To fix this, increase the Temperature to warm up the colors and make the snow appear white.
The next example shows how you can use the Tint setting to bring out the greens in a photo. This is great for boosting the colors in your photos of leaves.
When you’ve finished using the White Balance tool, tap the checkmark to apply your edits.
2.3 Details
The Details tool brings out the texture and fine detail in your iPhone photos. This tool works well on photos with an interesting texture, such as rust, wood grain, peeling paint, etc.
In the Snapseed Tools, tap Details. Swipe up or down, and select the setting you want to change.
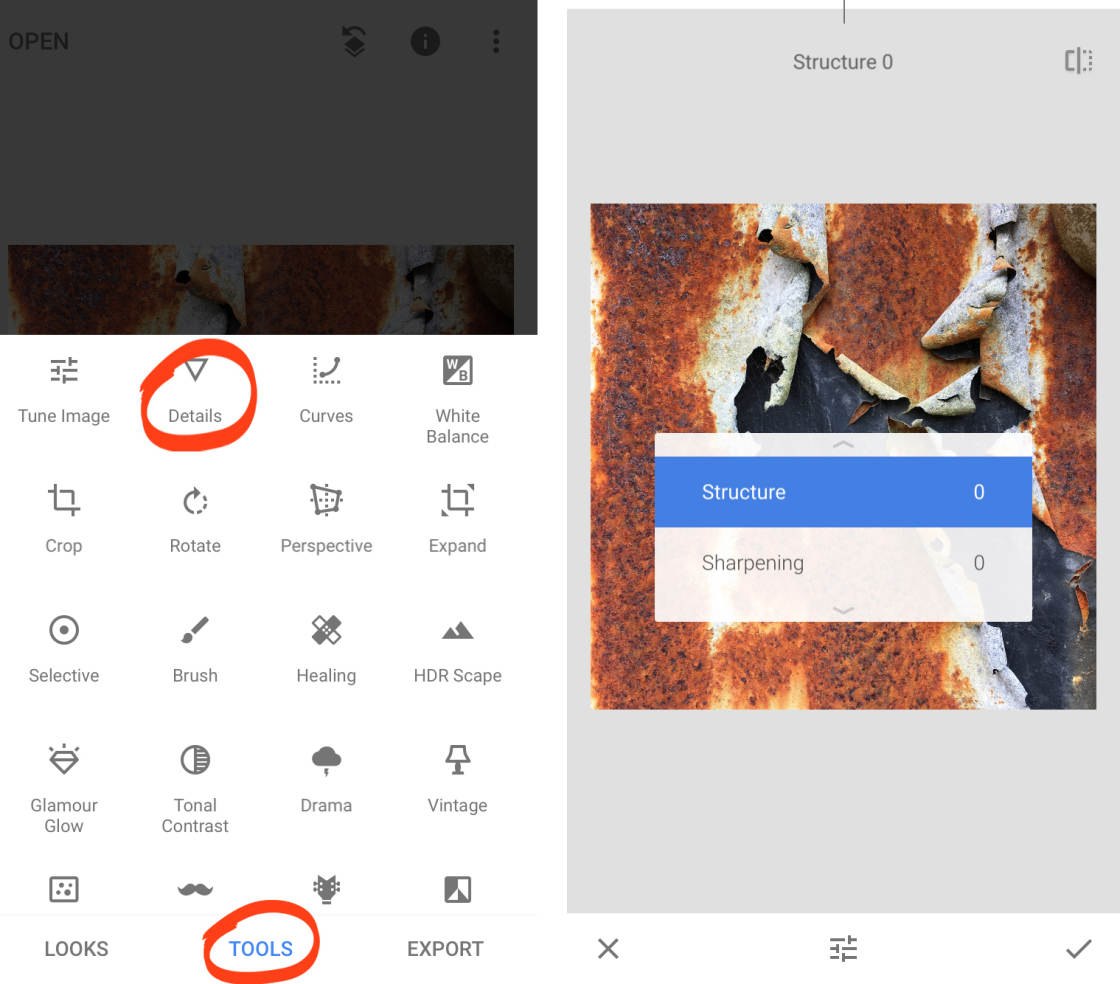
In most cases, Structure produces better results. The Sharpening tool often reduces the quality of your image by introducing grain. If you do use Sharpening, use it in moderation.
Like the other Snapseed tools, swipe across the screen to adjust the setting.
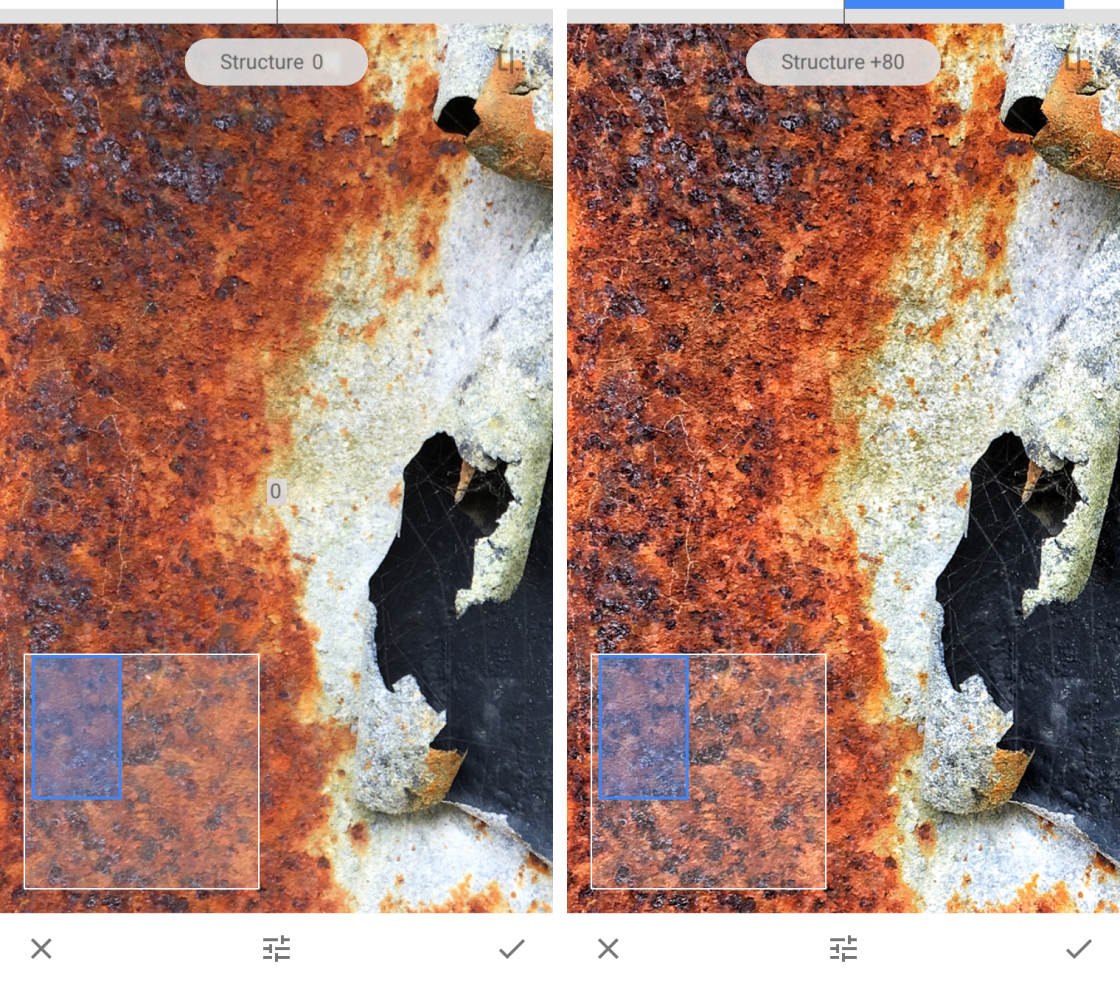
When using the Details tool, zoom in to see your adjustment more clearly. To zoom in, place two fingers on the screen, then pinch outwards (drag your fingers apart). While zoomed in, check your adjustment hasn’t introduced quality issues such as grain.
The Details tool is fantastic for giving your texture photos the wow factor. But keep in mind that it won’t improve all of your pictures.
For example, you wouldn’t want to bring out the texture in a portrait photo. This would make the person’s skin look bad, and make them look a lot older!
3. Modify Individual Edits
Before we explore more Snapseed editing tools, you’re going to discover an incredible feature of this app.
Snapseed uses “non-destructive editing.” That means you can delete or modify any individual edit at any point in the future.
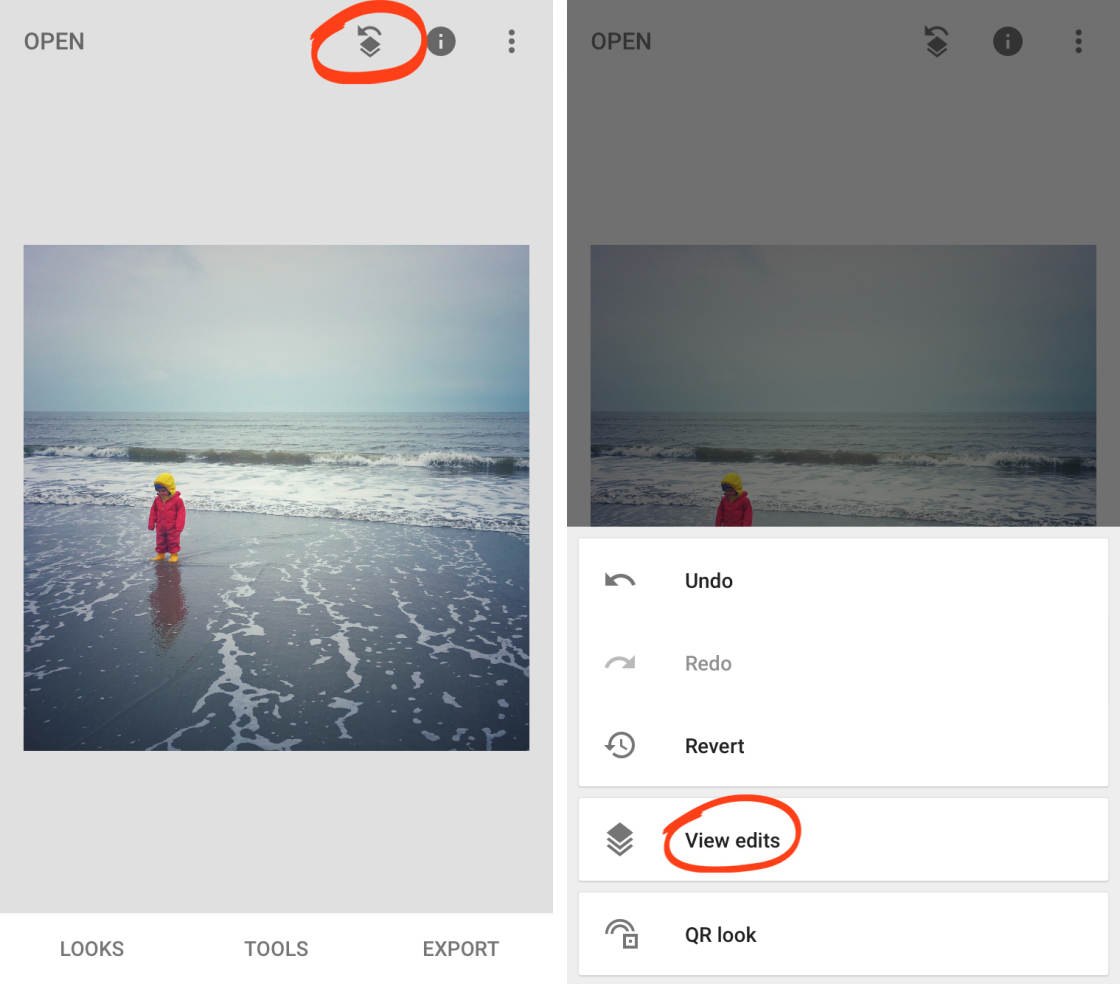
After you’ve applied some edits to a photo, tap the Edit History icon (square with a curved arrow) at the top of the screen. Then tap View Edits in the menu.
At the bottom right you’ll see the edit stack. This contains all of the edits you made, with the latest edit at the top of the stack. Tap any edit in the stack to reveal three options.
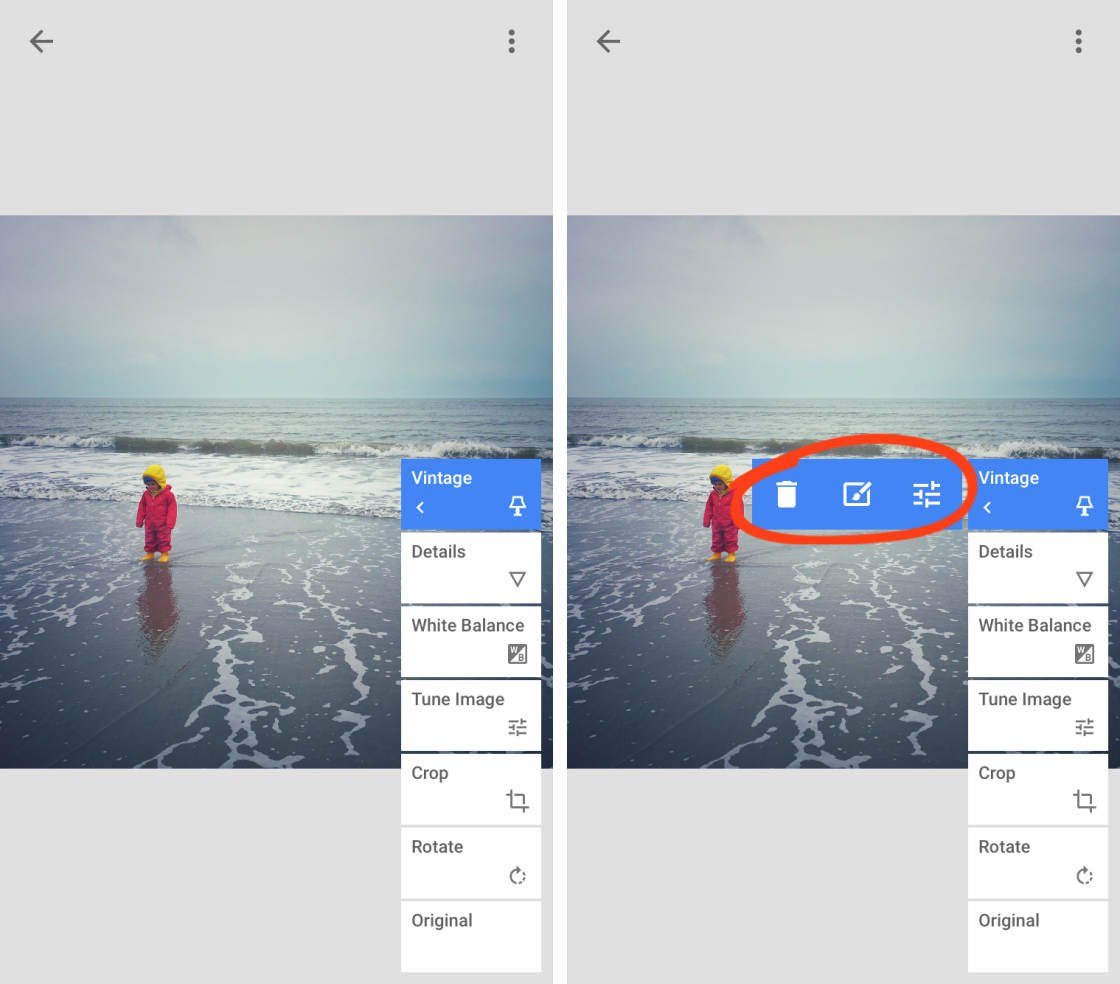
Use the Trash icon to delete that edit from your photo. Tap the Sliders icon to modify the edit. This opens up the editing tool where you can change the settings you originally applied.
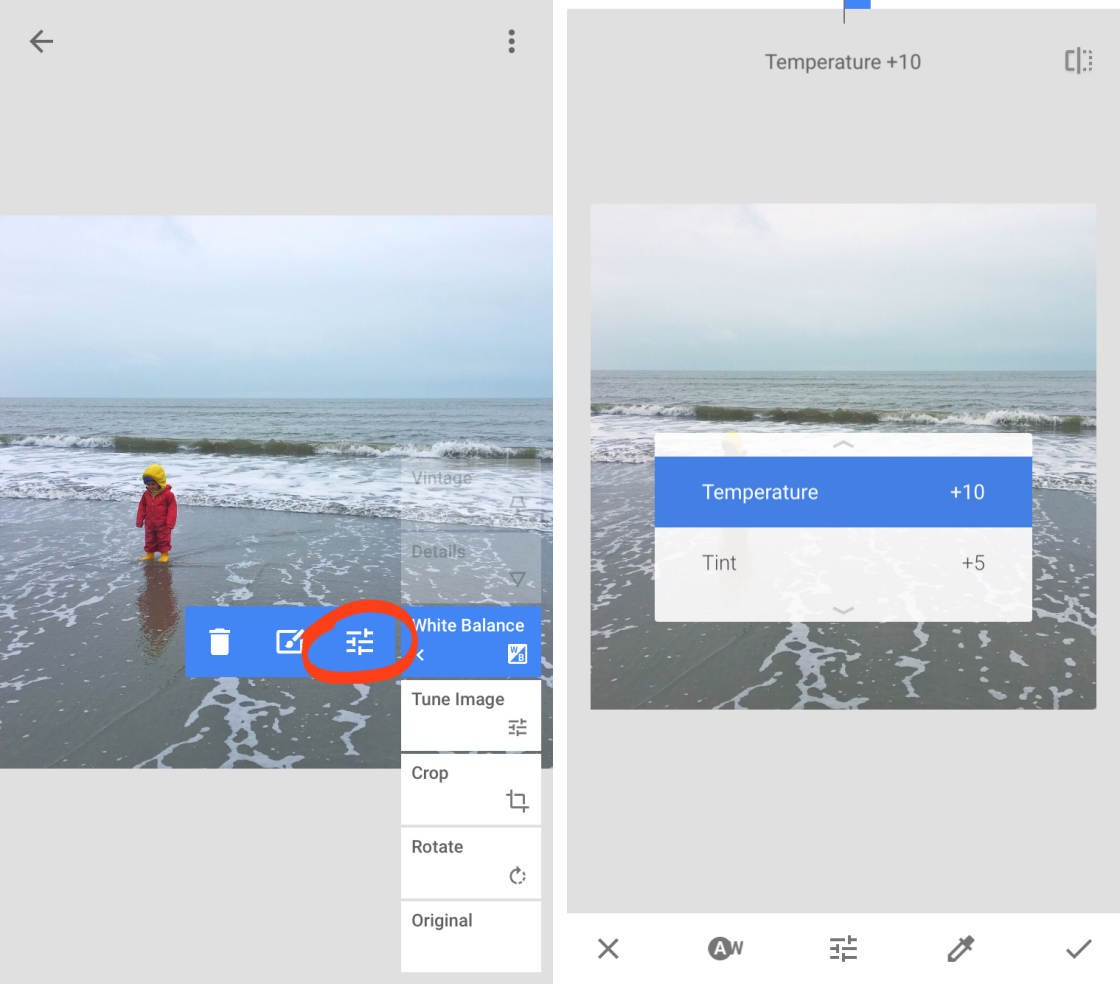
The Brush icon opens up the masking options. Masking allows you to apply the edit to selected parts of the image. You’ll learn about masking and selective editing in section 6 of this tutorial.
When you tap an edit in the stack, the edits above it are temporarily removed from your image. But you can bring these edits back by tapping them in the stack.
When you’ve finished modifying edits, tap the back arrow at the top right to exit the Edit History screen.
4. Improve Composition
In this section, you’ll learn how to improve the composition of your photos with Snapseed editing tools. The Crop, Rotate and Perspective tools help you turn an amateur snapshot into a high-quality professional image.
Open your photo in Snapseed, then tap Tools.
4.1 Crop
The Crop tool lets you cut away the edges of your image. It’s like cutting off the edges of a printed photo with scissors.
Cropping removes distracting elements or empty space from the edges of the frame. It can also improve composition and emphasize the essential aspects of the photo.
In the Snapseed Tools, tap Crop. Select an aspect ratio, e.g. Original, Square, 4:3, etc. Or select Free if you prefer to crop without being restricted to particular dimensions.
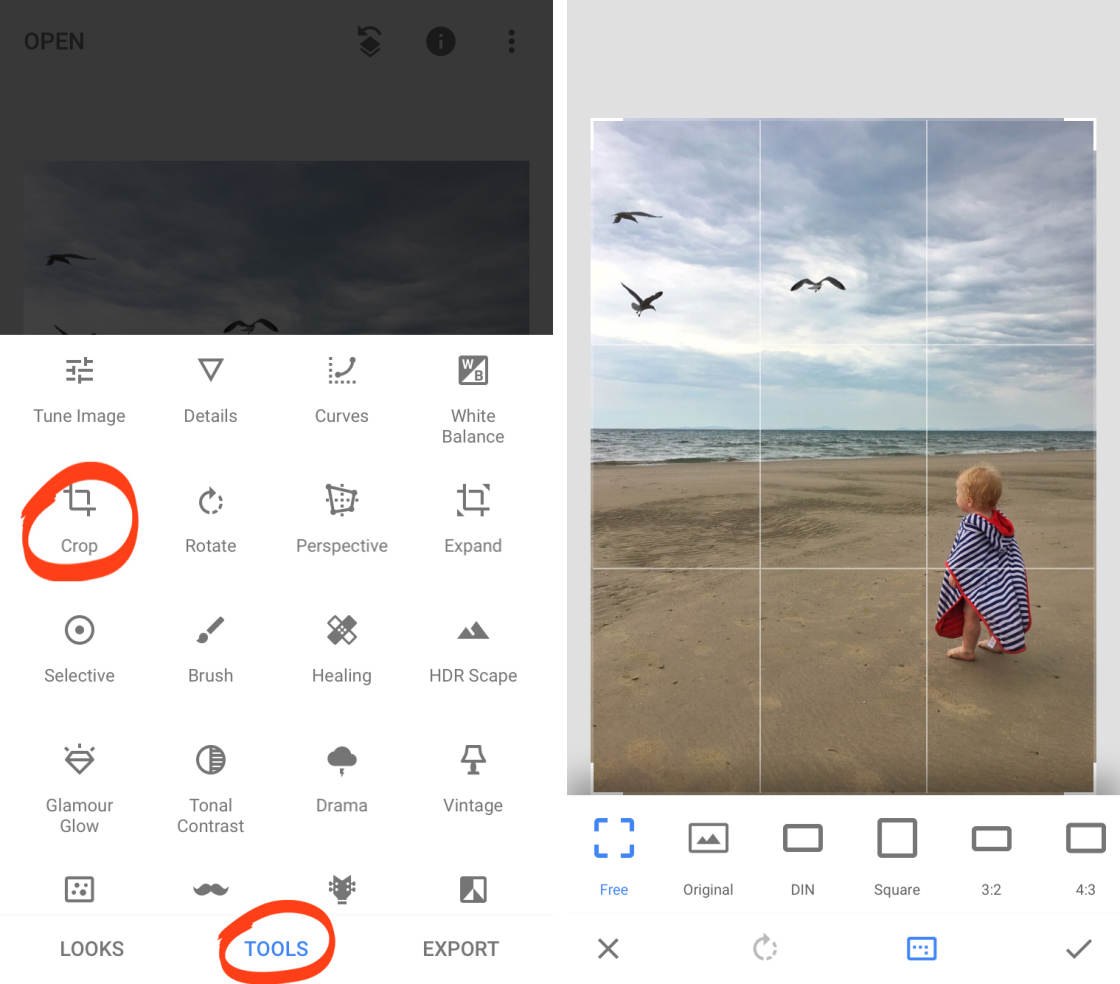
In the example below, the Square aspect ratio is selected. A square crop removes the empty space at the bottom of the image, placing more emphasis on the child and birds.
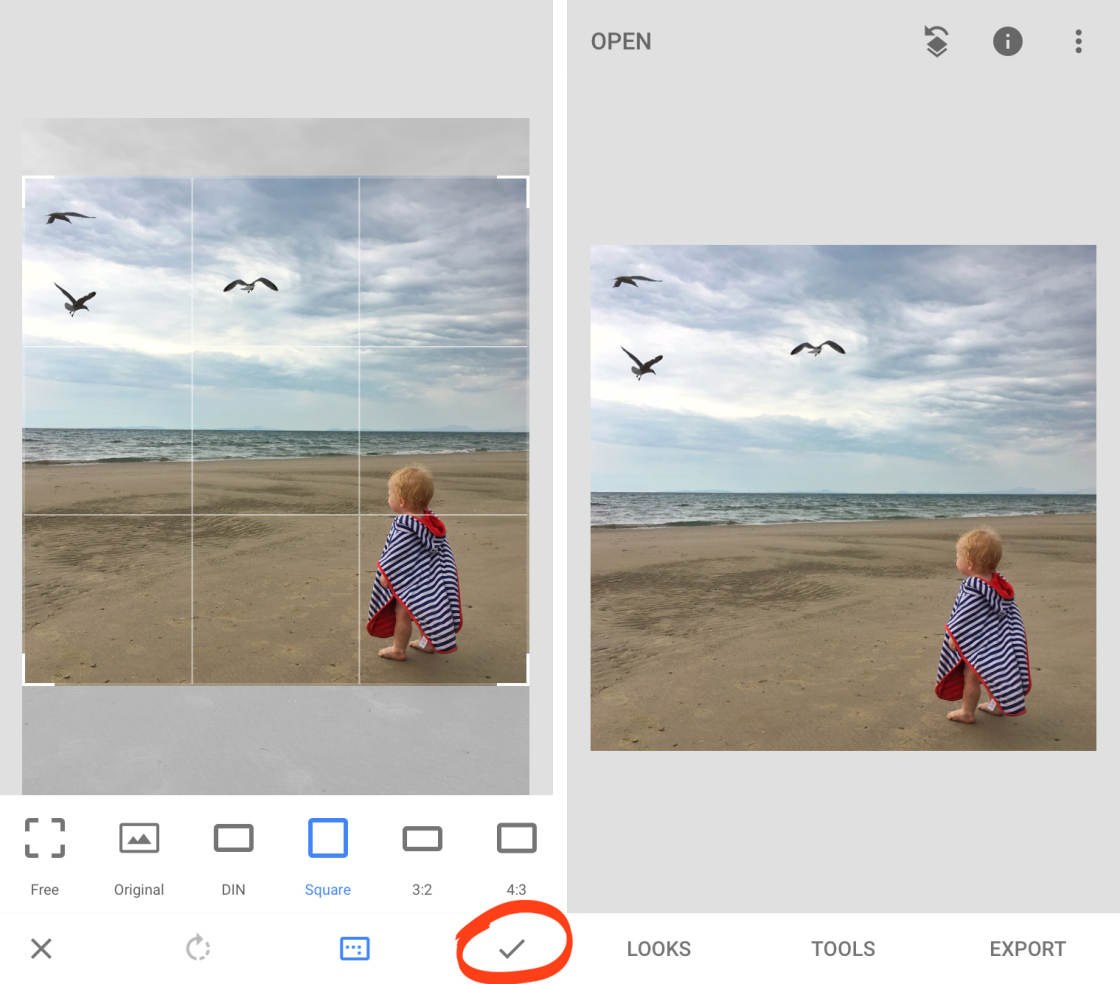
Drag the corner handles to adjust the crop position. Tap the checkmark to complete the edit.
Now, cropping might sound simple. But learning which parts of the image to crop out, and which to keep, is more complex. To create the most striking compositions, you must learn the art of cropping.
In this video, you’ll master the hidden art of cropping your photos to create more eye-catching compositions.
Join my iPhone Editing Academy course and discover how to create beautiful masterpieces through editing.
4.2 Rotate
Nothing screams unprofessional, amateur photography more than a horizon that isn’t straight.
But don’t worry if you didn’t hold your iPhone perfectly level when taking a photo. The Rotate tool in Snapseed makes it easy to straighten your image.
In the Snapseed Tools, tap Rotate. Snapseed analyzes your image and attempts to automatically rotate and straighten it.
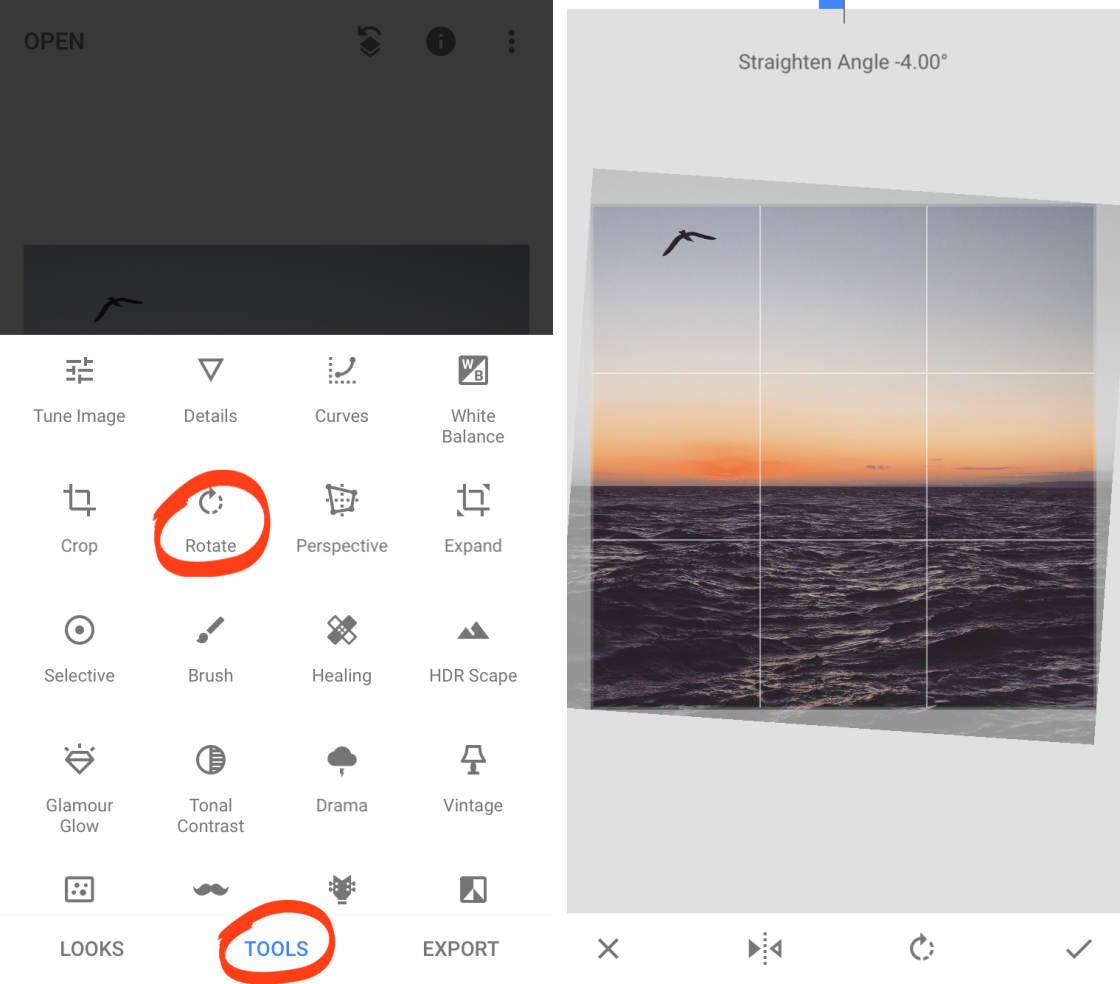
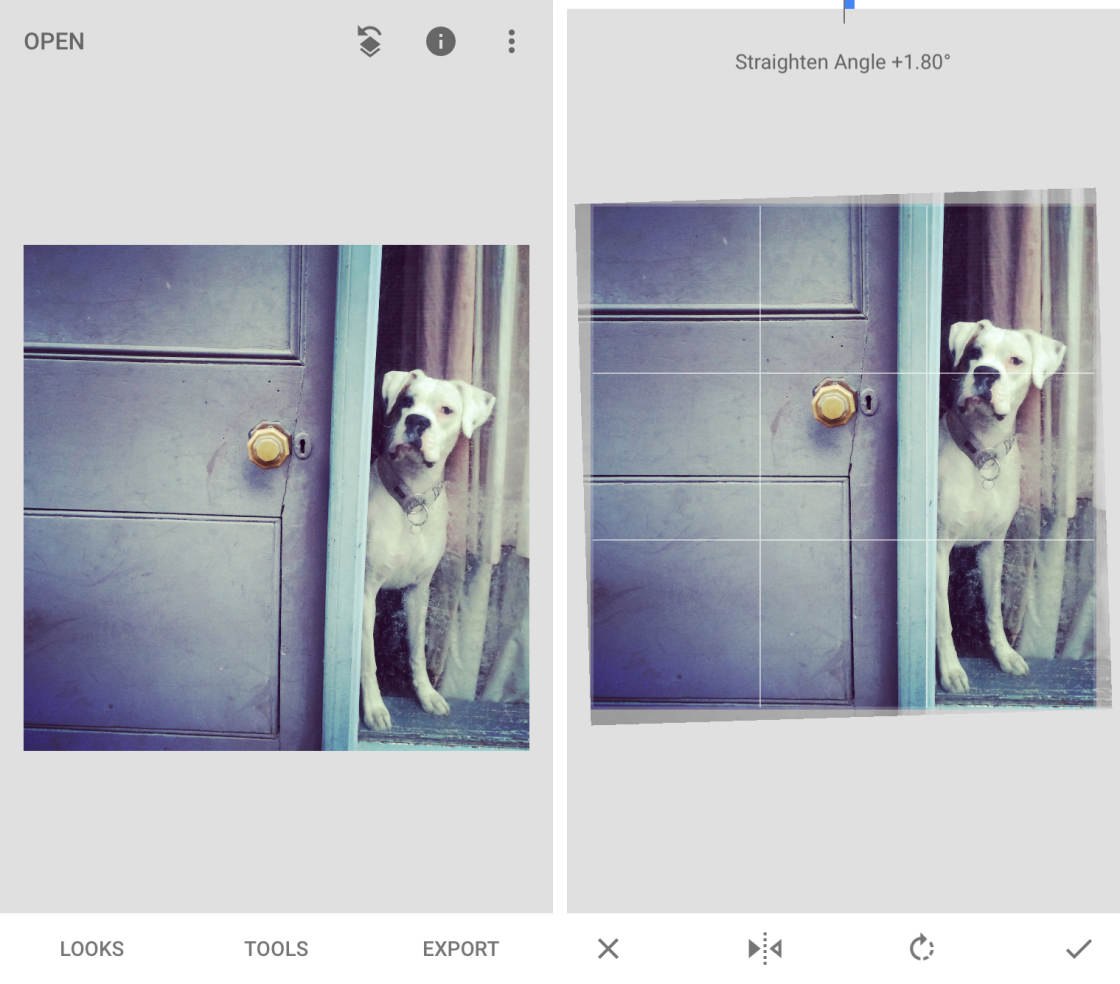
Sometimes Snapseed doesn’t get the rotation right. Or it doesn’t automatically rotate your photo. To rotate your photo manually, drag your finger over the image. Use the gridlines to help you get the image straight.
When you rotate a photo, the tilted edges get cropped. Check that you’re not going to lose any important elements from the edges of the frame. If you’re happy with the edit, tap the checkmark.
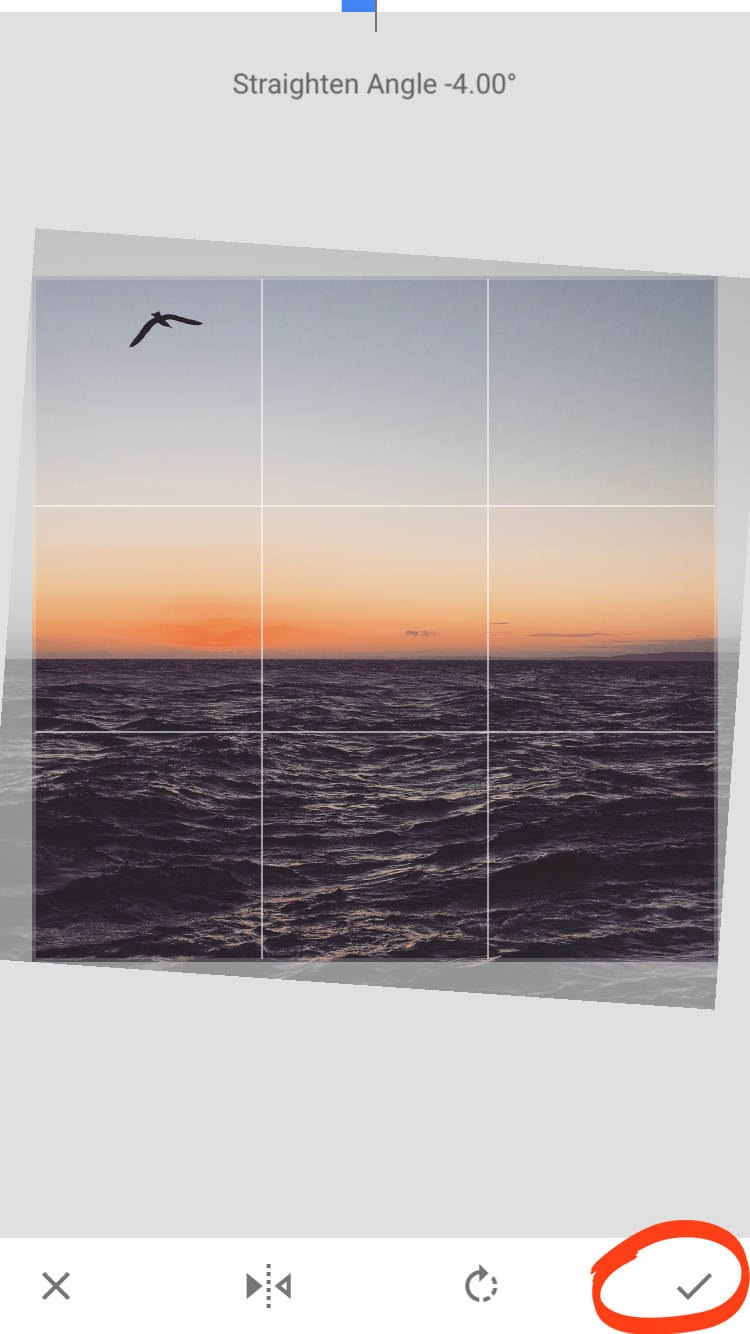
The Rotate tool is perfect for straightening horizons in your landscape photos. But you can use it to fix any photo where the important elements aren’t level.
4.3 Perspective
The Perspective tool offers more ways to straighten elements and correct perspective problems.
One of the most common perspective problems occurs when you tilt your iPhone upwards. For example, if you shoot a tall building, the vertical lines don’t appear straight. Instead, they converge toward the top of the image.
Learn how to use the Perspective tool in this video from my iPhone Editing Academy course. These techniques turn your ordinary images into incredible photos that you’ll be proud to share.
Join my iPhone Editing Academy course and become an expert at using apps to enhance your iPhone photos.
In the example below, I shot the door with the iPhone tilting slightly up. So the vertical lines don’t appear parallel.
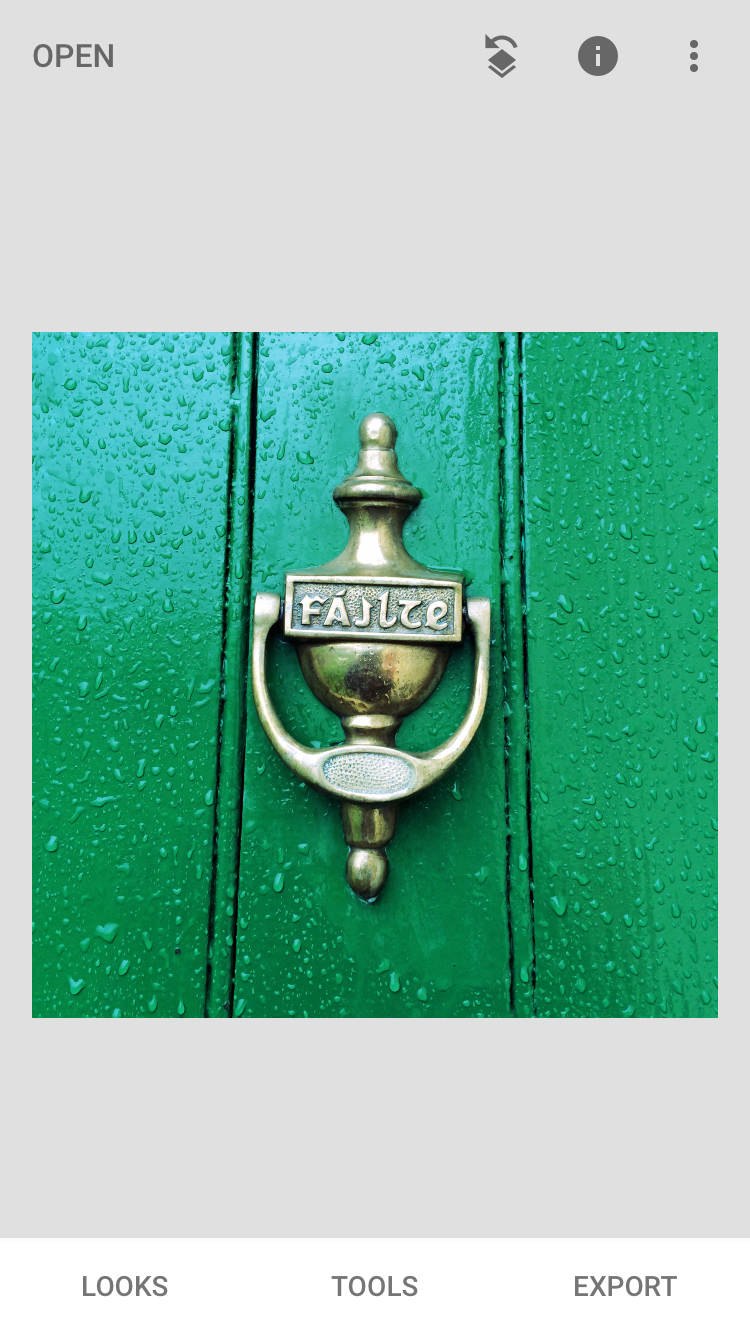
To fix this, open the Snapseed Tools, and tap Perspective. Select the Tilt option beneath your image.
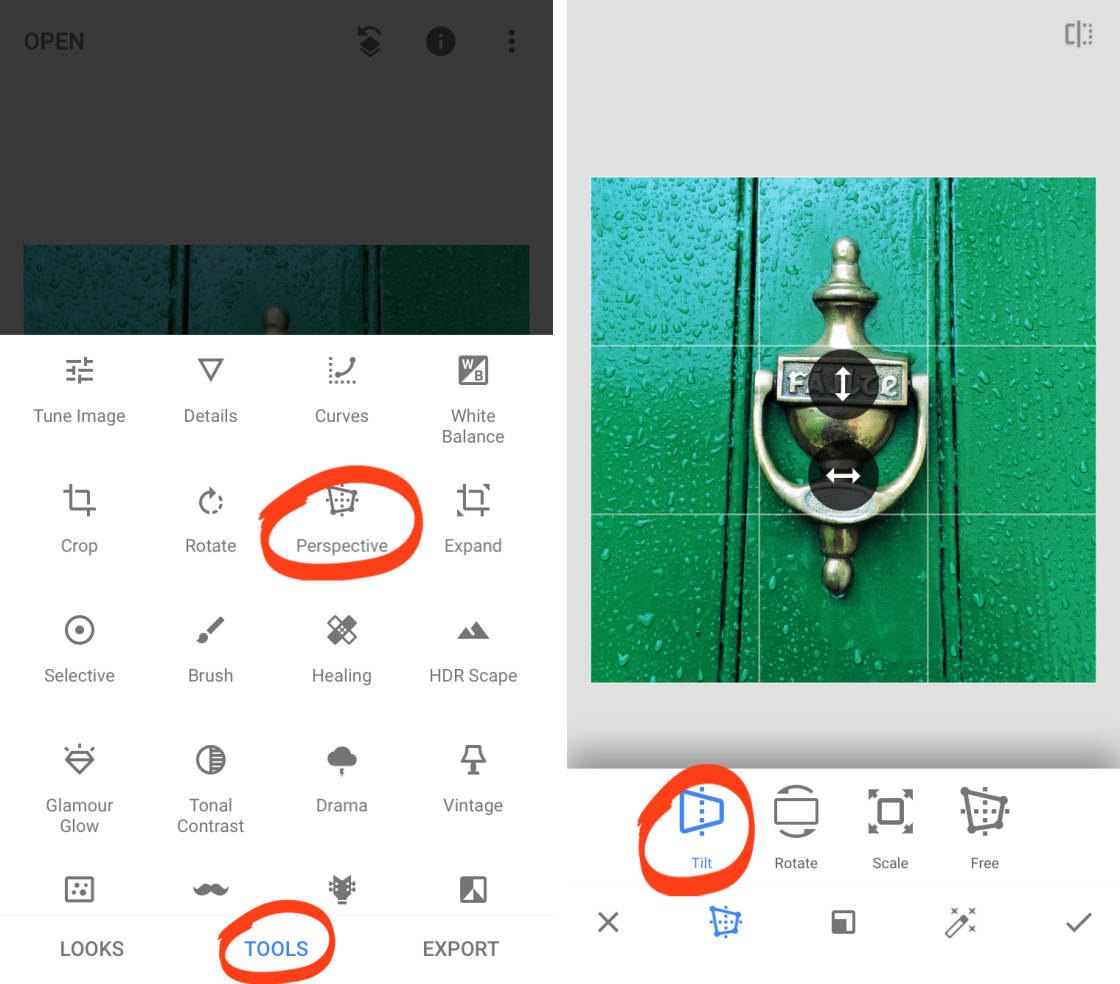
To correct the vertical perspective, drag down over your photo until the lines become parallel. To correct horizontal perspective, drag left or right. Tap the checkmark when you’re done.
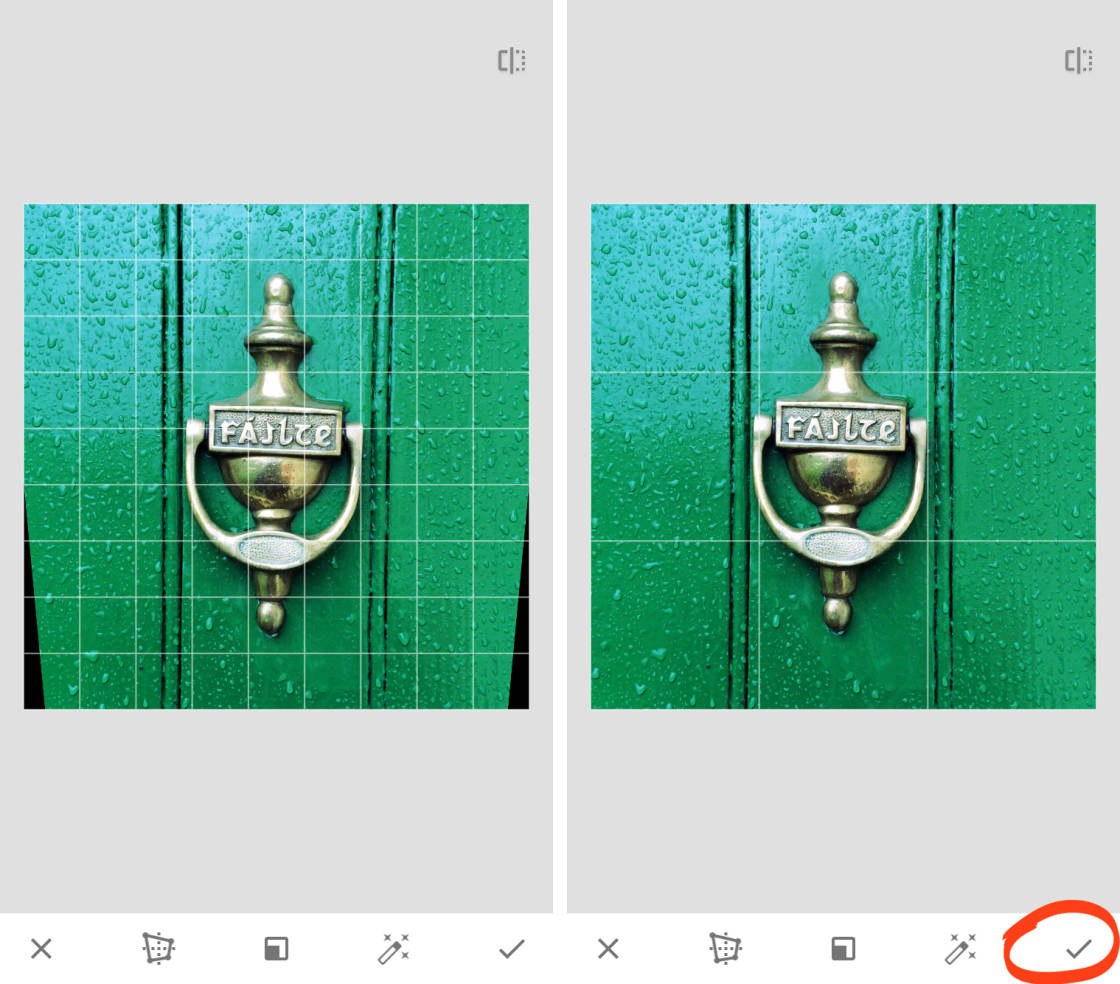
When adjusting perspective, be aware of the black areas that appear around the edges. Snapseed will automatically fill in these empty space. It uses pixels from the surrounding area to fill in the gaps.
If the edges of your image are fairly plain, such as sky, grass or sea, it usually does a good job of filling these gaps. But if the edges have a lot of detail, you may not get good results.
So when applying perspective correction, always check the edges of your image. If the results aren’t good, undo the edit and try again. Or crop the edges of your photo using the Crop tool.
5. Clean Up Your Photos For Flawless Edits
In this section, you’ll discover two Snapseed photo editing tools for creating flawless images.
The Healing tool removes unwanted objects from your photos. And the Portrait tool is perfect for enhancing your portrait photos.
5.1 Healing
The Healing tool in the Snapseed app lets you easily remove unwanted objects from your photos.
It’s perfect for removing small objects, spots, and blemishes. You’ll get the best results when the object you want to remove is surrounded by plain detail, such as skin, sky or sea.
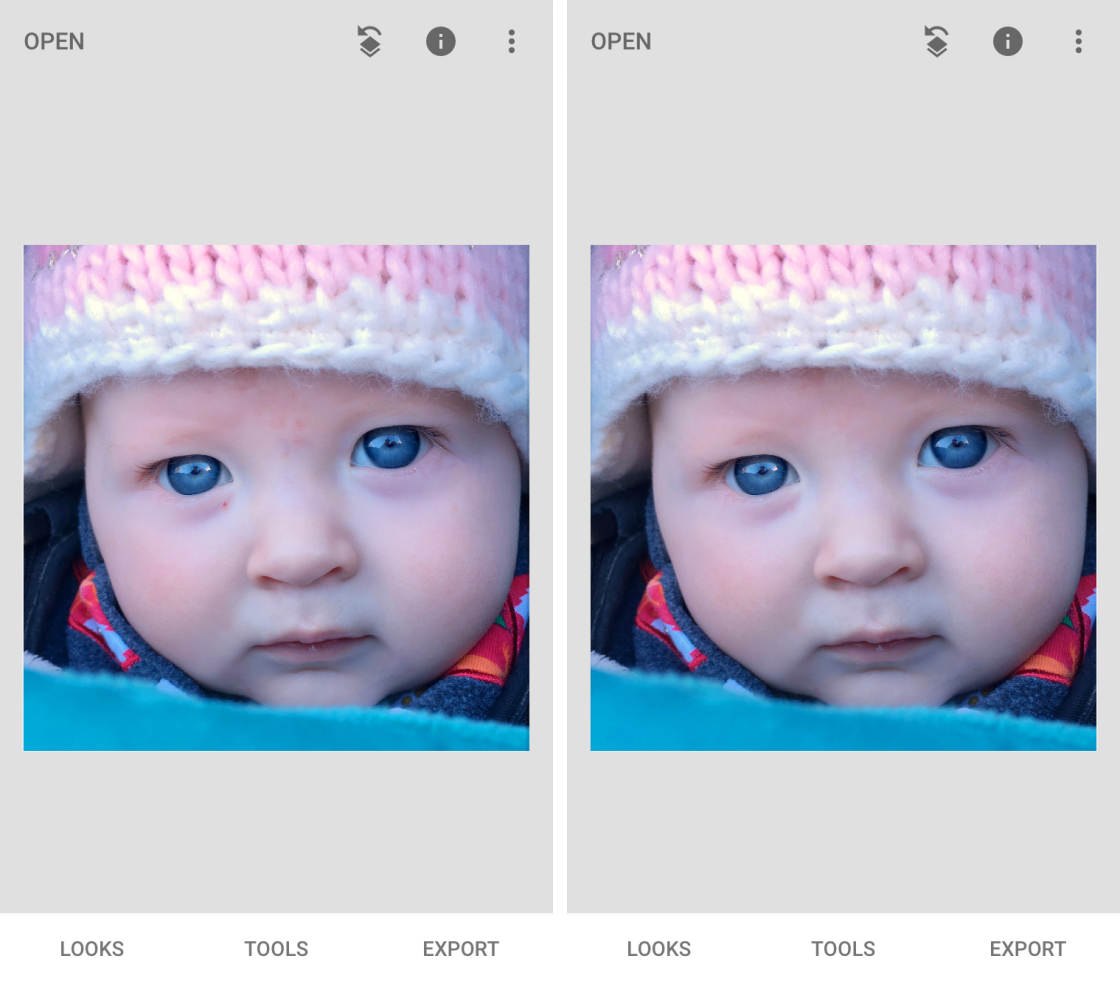
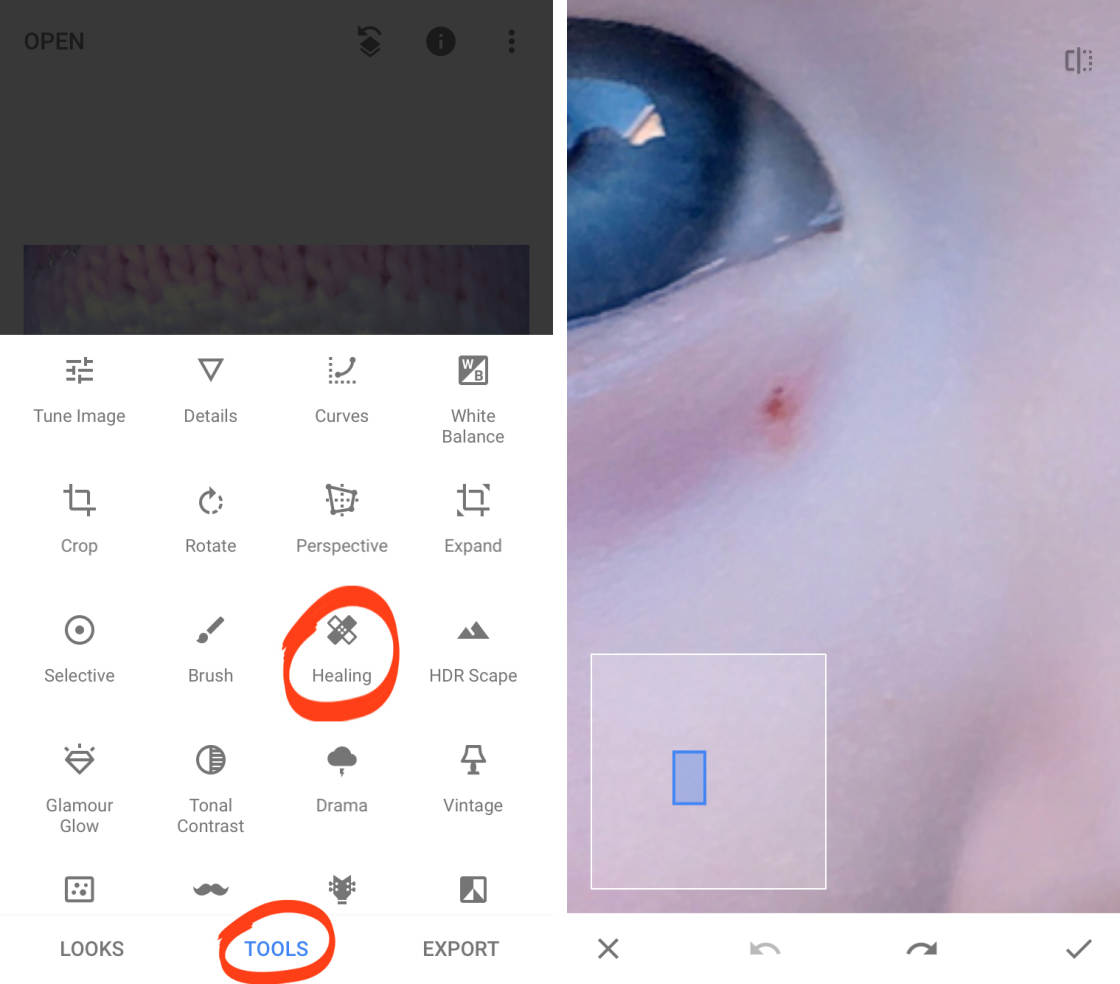
In the Snapseed Tools, tap Healing. Pinch outwards with two fingers to zoom in on the object you want to remove.
Use your finger to brush over the object. The area you brush over appears highlighted in red. When you release your finger, the highlighted object gets replaced with pixels from the surrounding area.
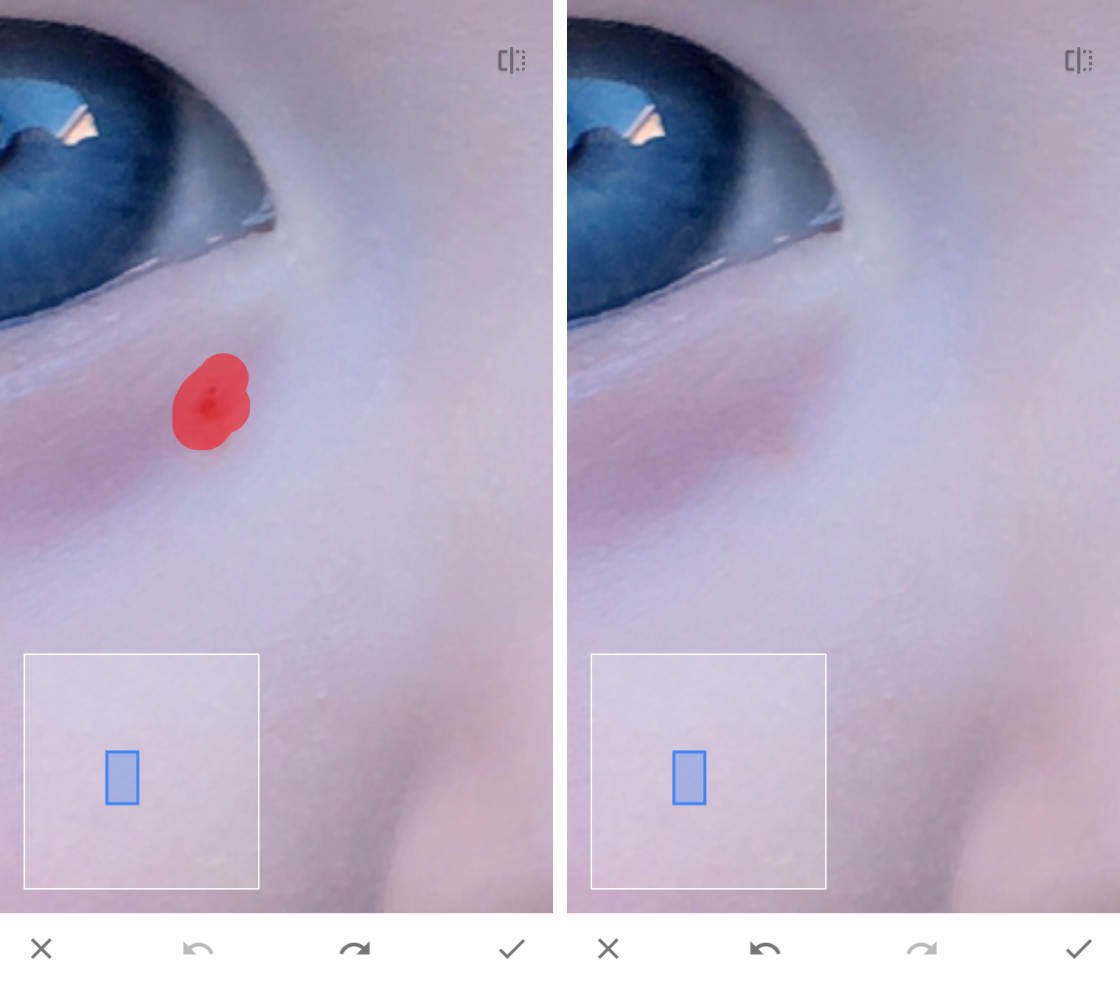
If the result isn’t perfect, tap Undo (curved back arrow) at the bottom of the screen. Then try brushing over the object again. Sometimes it can take a few attempts to get a great result.
5.2 Portrait
You’ve seen how the Healing tool can remove blemishes in portrait photos. But you can take your portrait photo editing further in the Snapseed app.
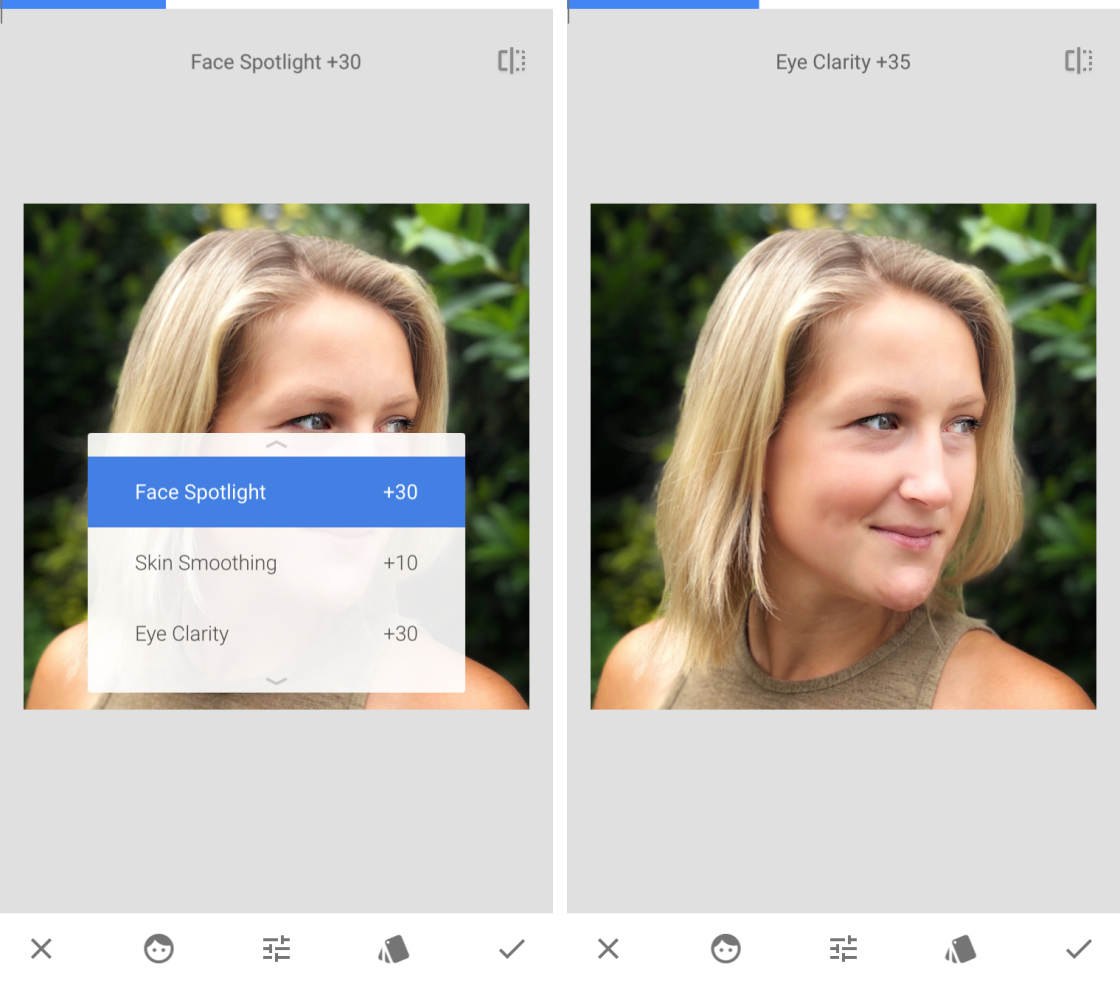
The Portrait tool is an amazing tool for enhancing your portrait photography. Use it to brighten faces, create smoother skin, and make eyes sparkle.
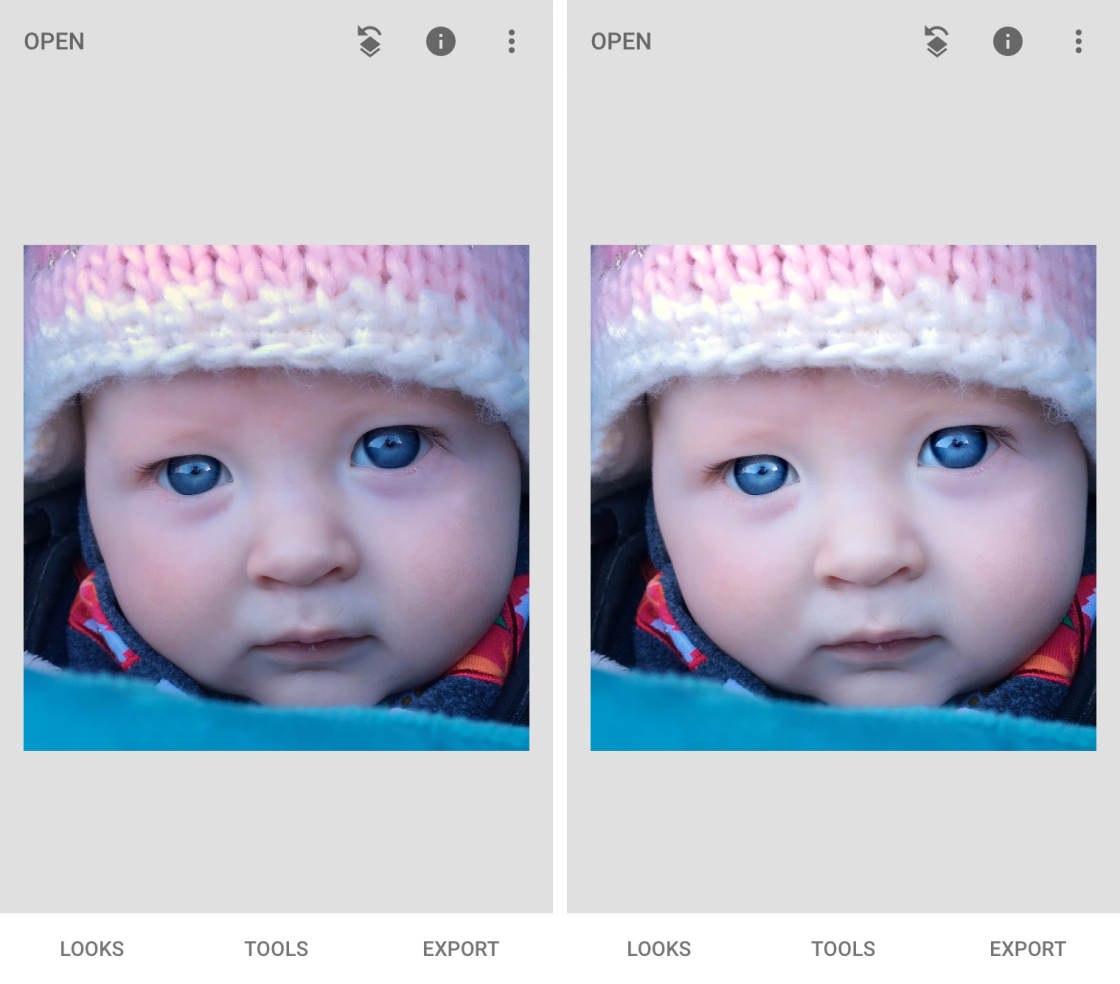
In the Snapseed Tools, tap Portrait. Select a preset beneath your image, e.g. Spotlight 1, Smooth 1, etc. This is only a starting point for your edit, so don’t worry if your image doesn’t look perfect yet.
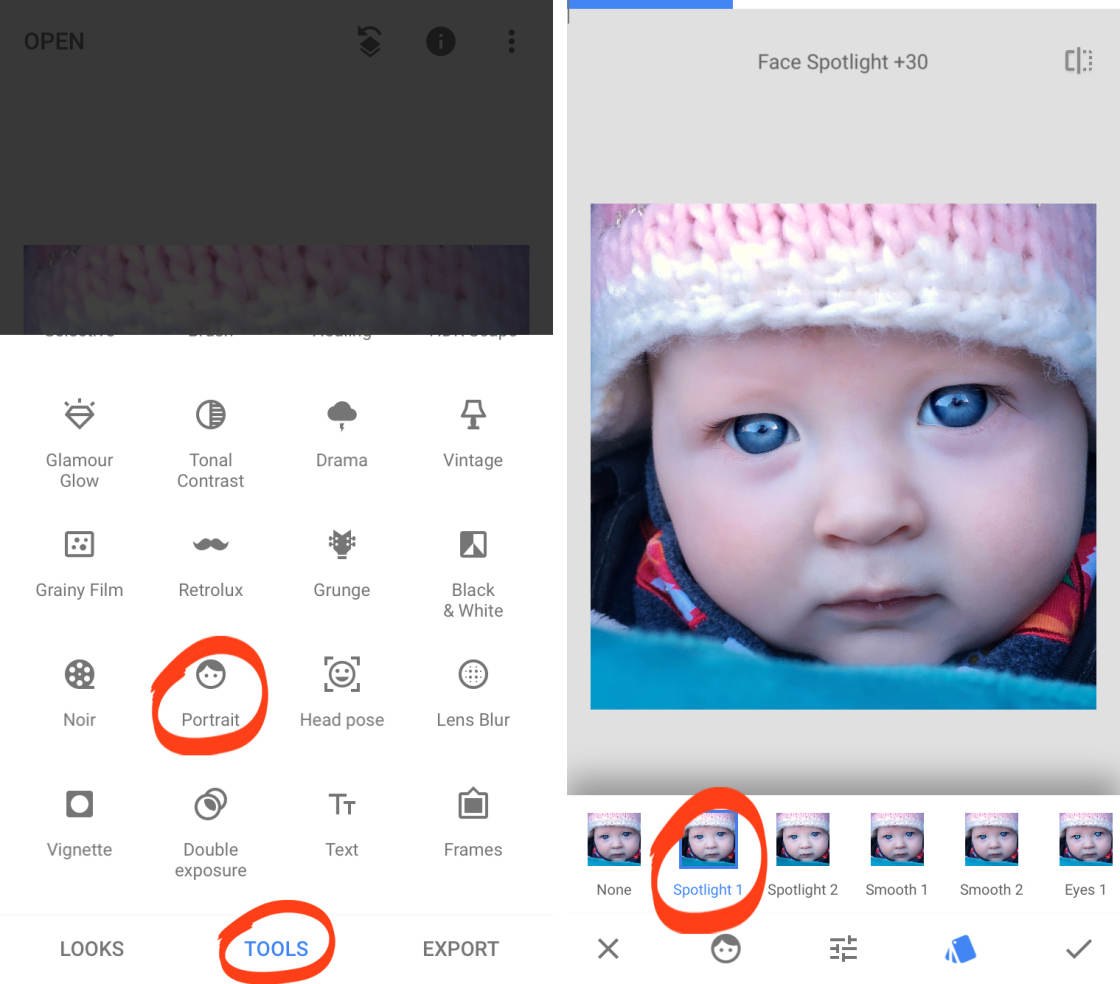
Next, swipe up or down to access the Portrait tools: Face Spotlight, Skin Smoothing, and Eye Clarity.
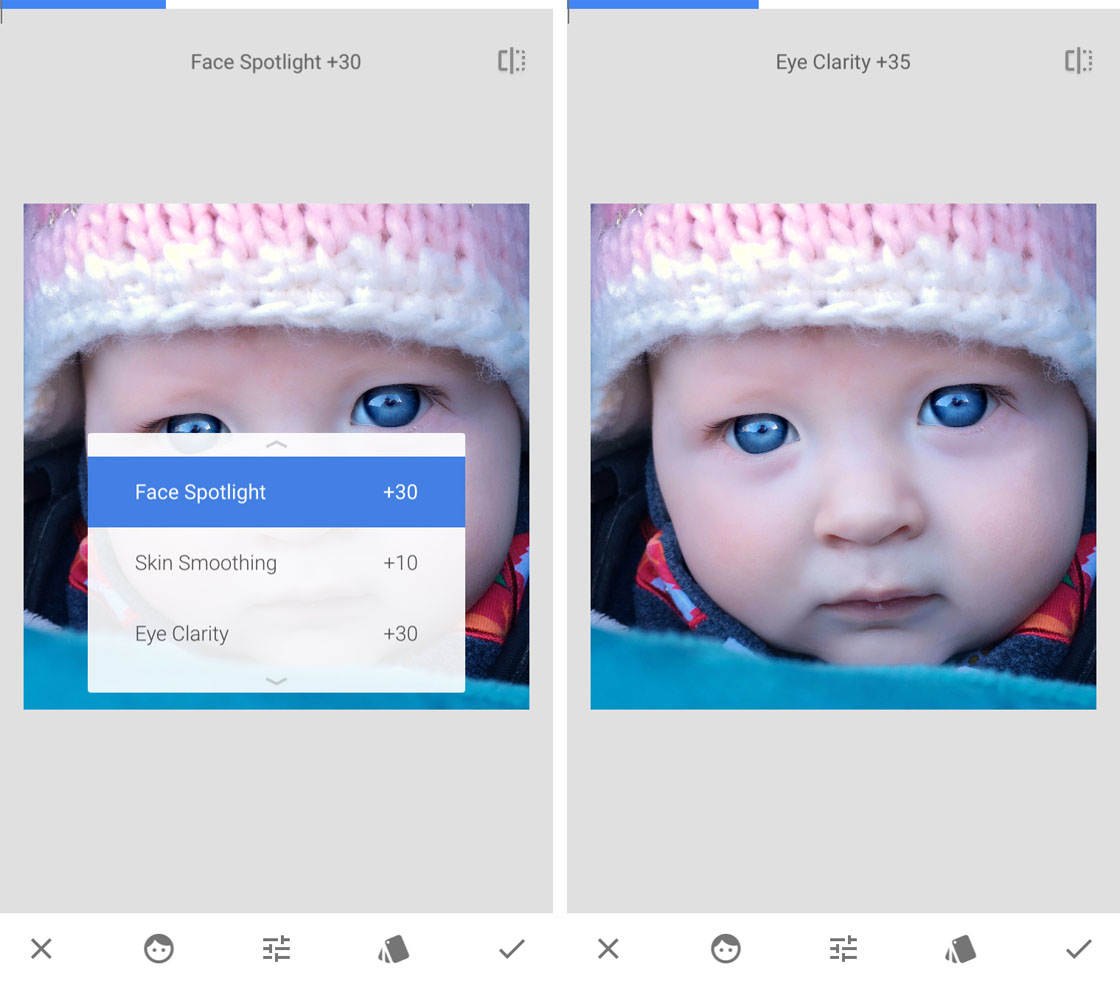
Select the option you want to change, then drag left or right to adjust the setting. Here’s what each setting does:
- Face Spotlight: Brighten your subject’s face, while making their surroundings slightly darker.
- Skin Smoothing: Make your subject’s skin appear smooth and flawless.
- Eye Clarity: Make your subject’s eyes sparkle.
Be especially careful not to overdo the skin smoothing and eye clarity. You still want your subject to look natural after editing.
6. Use Selective Editing Tools
In this section, you’ll discover the hidden power of selective photo editing. Selective editing tools let you edit different parts of your photo separately.
The ability to edit your photos selectively is incredibly powerful. Mastering these tools will take your Snapseed editing to a whole new level.
6.1 Brush
The Brush tool gives you ultimate control over selectively adjusting brightness and color. It’s perfect for photos where different parts of the scene need brightening or darkening.
In the example below, the original image (left) was edited using the Brush tool (right). The rocks were brightened, the clouds darkened, and the sunset colors made more vibrant.
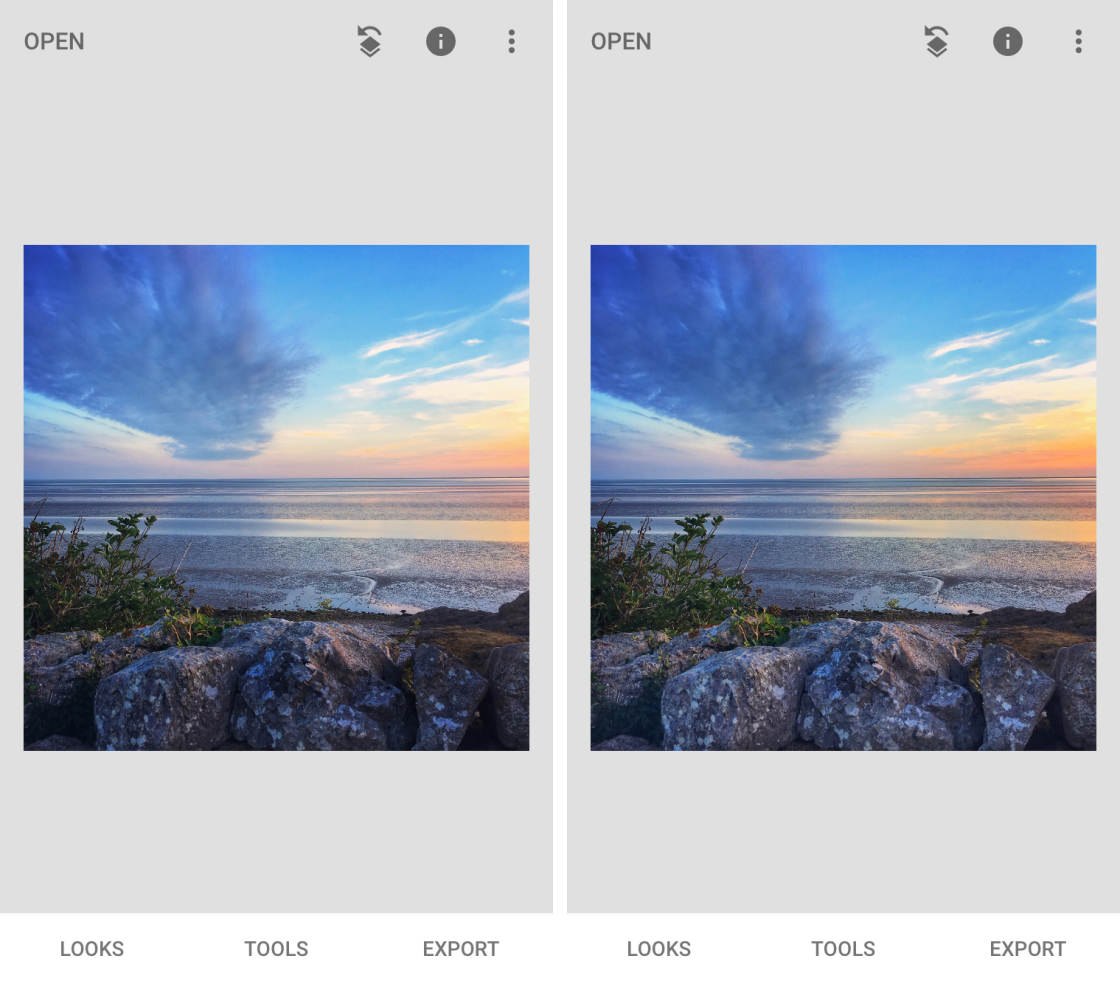
In the Snapseed Tools, tap Brush.
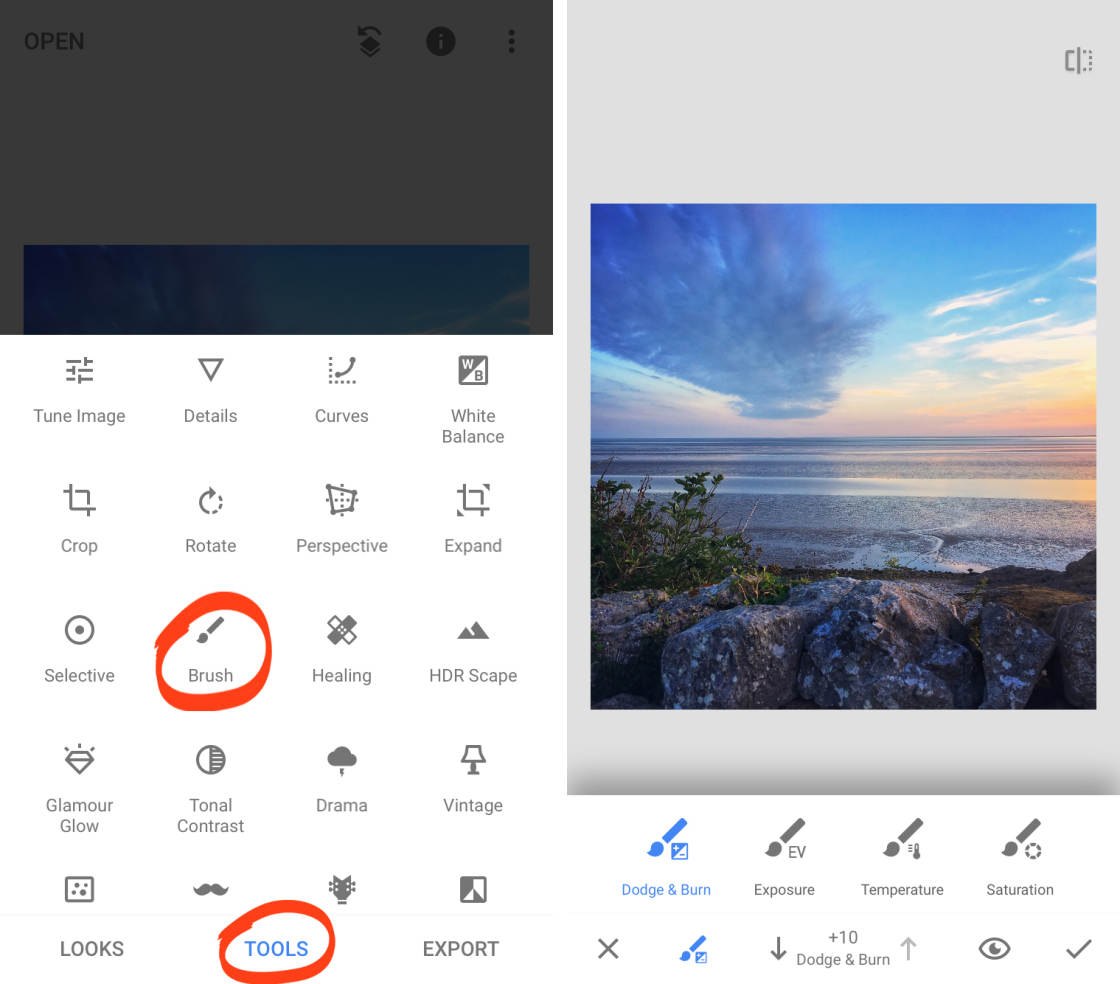
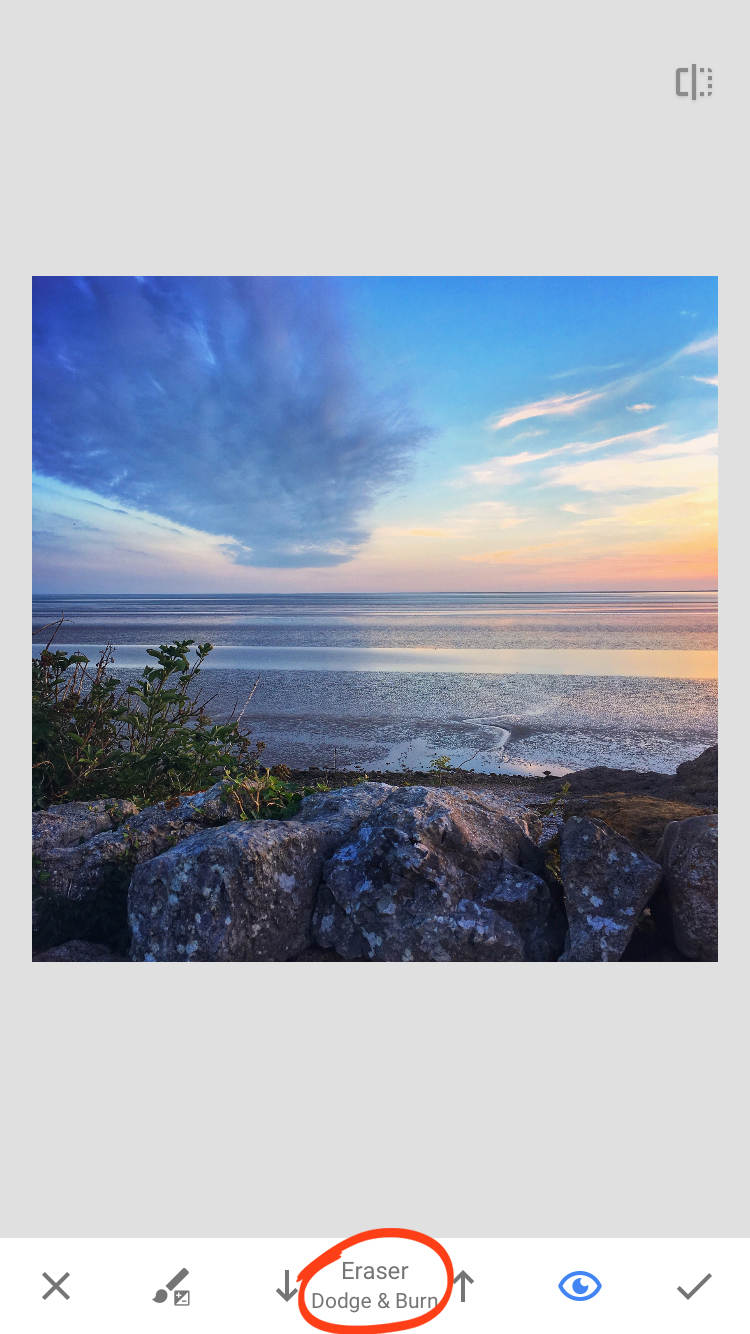
If you don’t see the brush tools beneath your image, tap the Brush icon at the bottom of the screen. Select the Dodge & Burn brush to brighten or darken certain areas of your photo. Tap the up or down arrows to adjust the tool’s value.
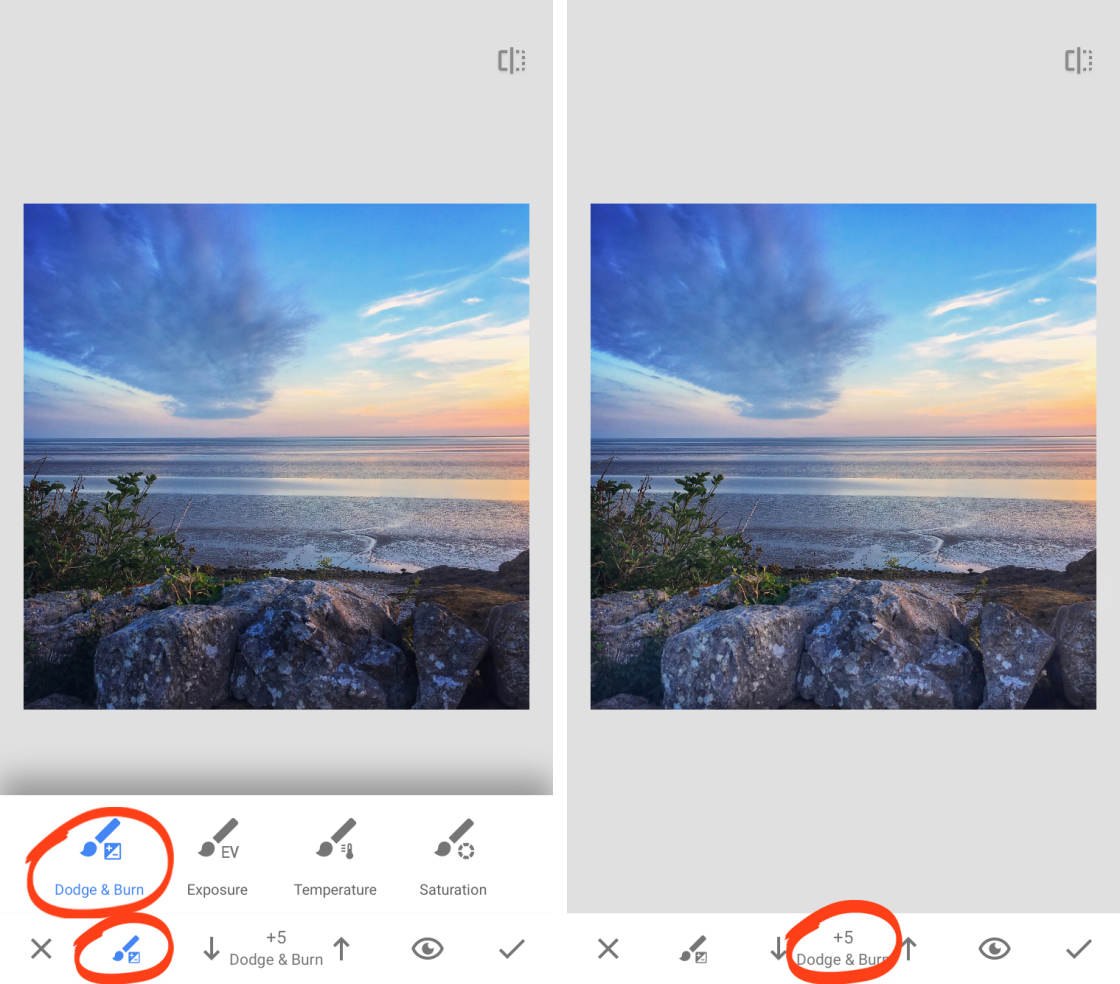
A minus value darkens the image, while a plus value brightens it. Use your finger to brush over the areas you want to adjust. In the example above, +5 was used to brighten the rocks in the foreground.
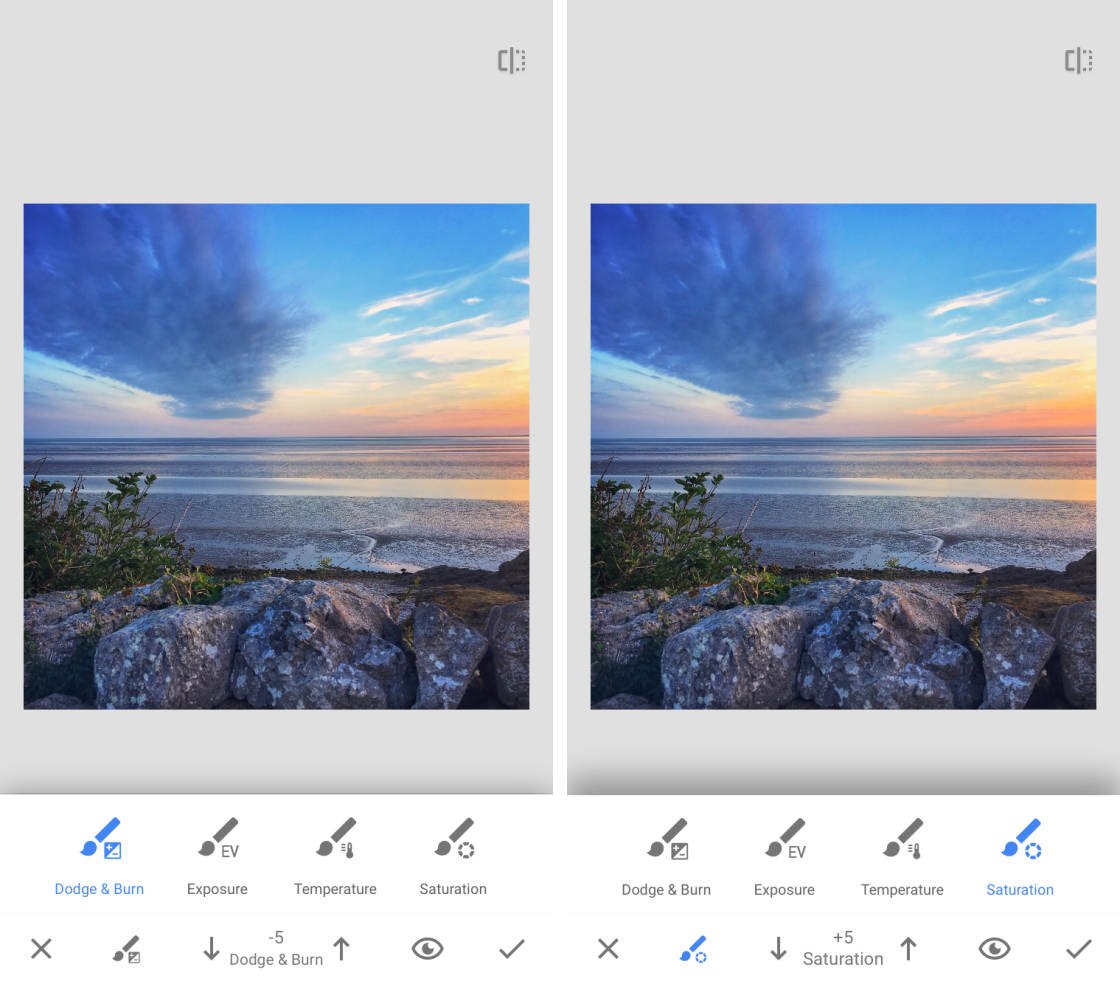
In the examples below, I used the Dodge & Burn brush at -5 to darken the clouds. Then I used the Saturation brush at +5 to make the orange colors slightly more vibrant.
To see which areas you’ve adjusted, tap the Eye icon. Any areas that you’ve brushed over appear highlighted in red.
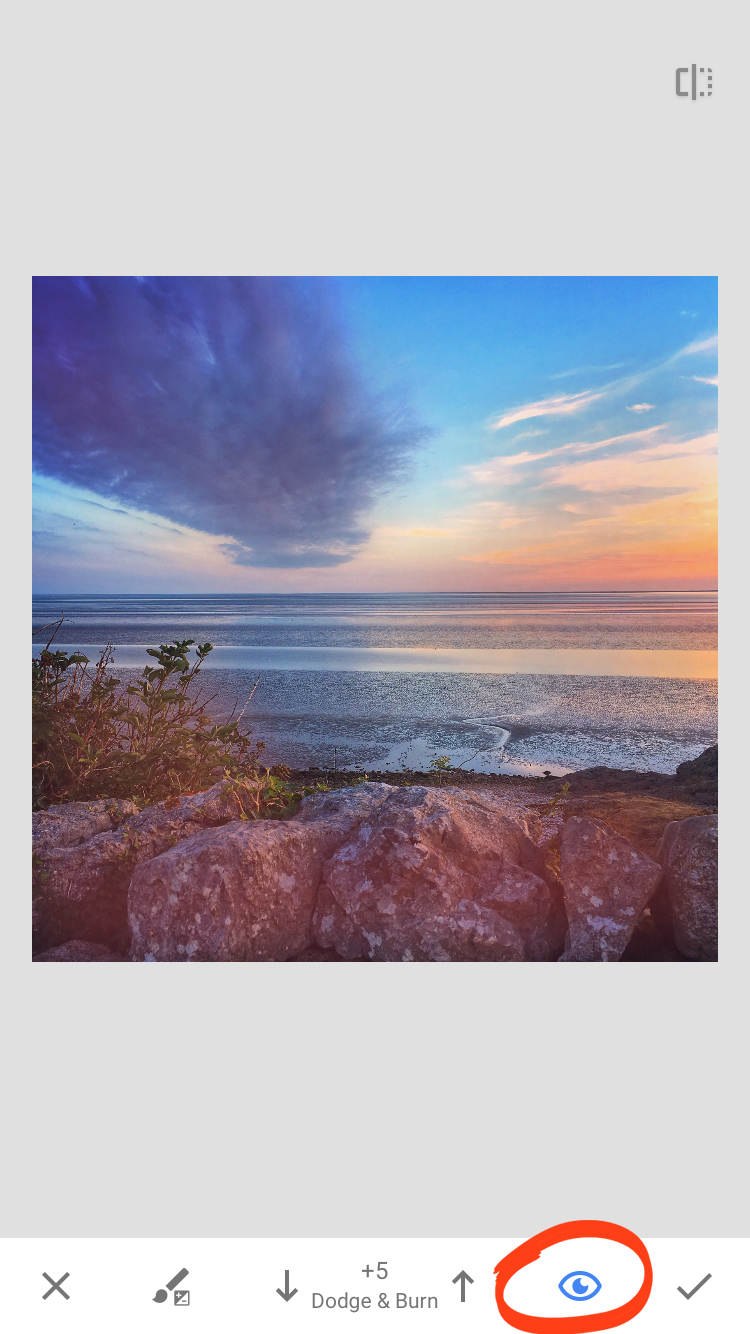
If you made a mistake, you can erase your edits. Tap the up or down arrows until the value is set to Eraser. Then brush over the red areas to remove your edits. Switch off the Eye icon to hide the red highlight.
This video from my iPhone Editing Academy course shows you how to use the Brush tool to add dramatic clouds to your photos.
Join iPhone Editing Academy to discover how to make full use of Snapseed’s professional selective editing tools.
6.2 Selective
The Selective Tool lets you edit different colors in your photo individually. After selecting a particular area of color, you can adjust its brightness, contrast, saturation or structure.
This tool is useful when you want to apply different types of adjustment to different colored areas.
In the Snapseed Tools, tap Selective. Tap on the area of color you want to adjust. This adds an adjustment point (small circle) to your image. In the example below, the adjustment point is on the orange roof tiles.
Pinch in or out with two fingers to adjust the scope of the selection. The areas that will be affected by your edits appear highlighted in red.
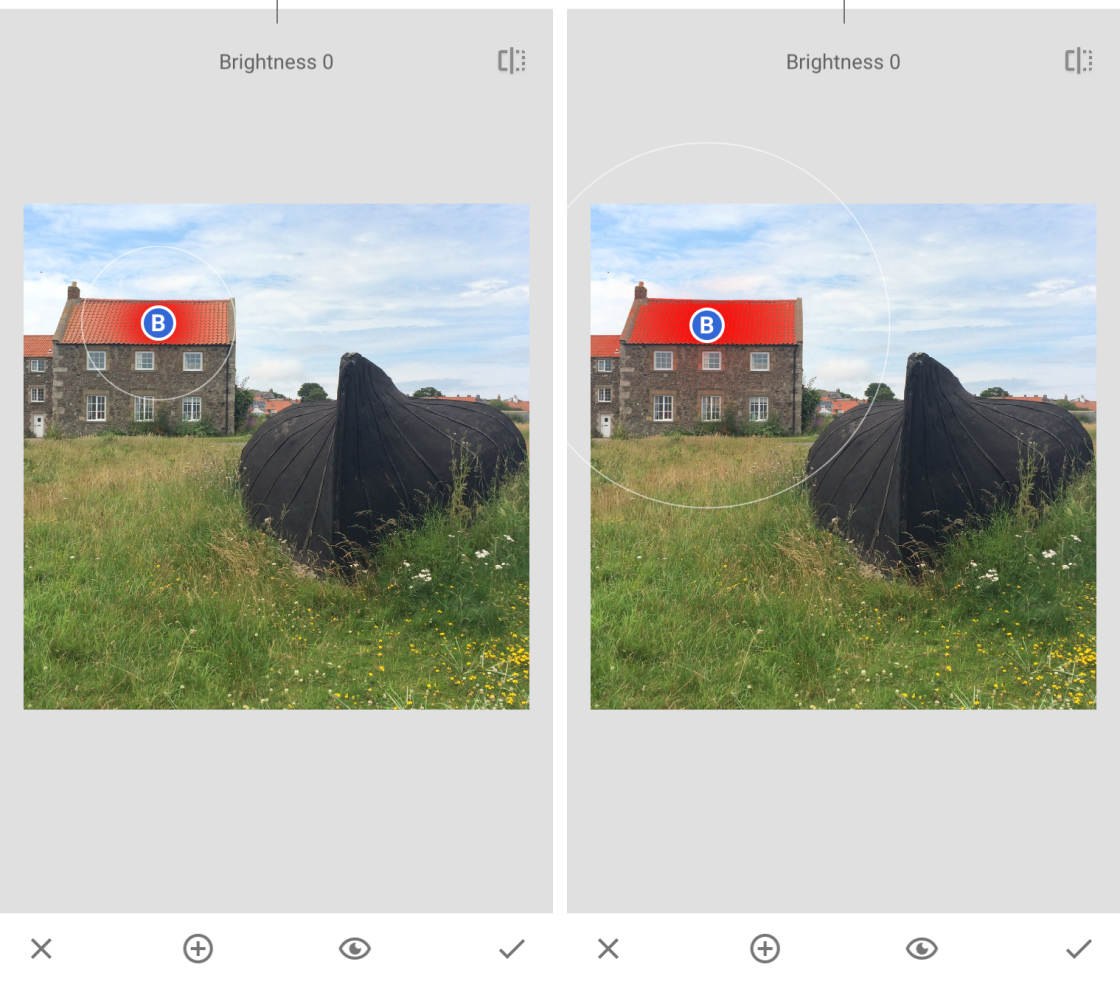
Now, swipe up or down to access the four adjustment tools. From top to bottom, the letters stand for Brightness, Contrast, Saturation, and Structure. Select a tool, then drag left or right to adjust the setting.
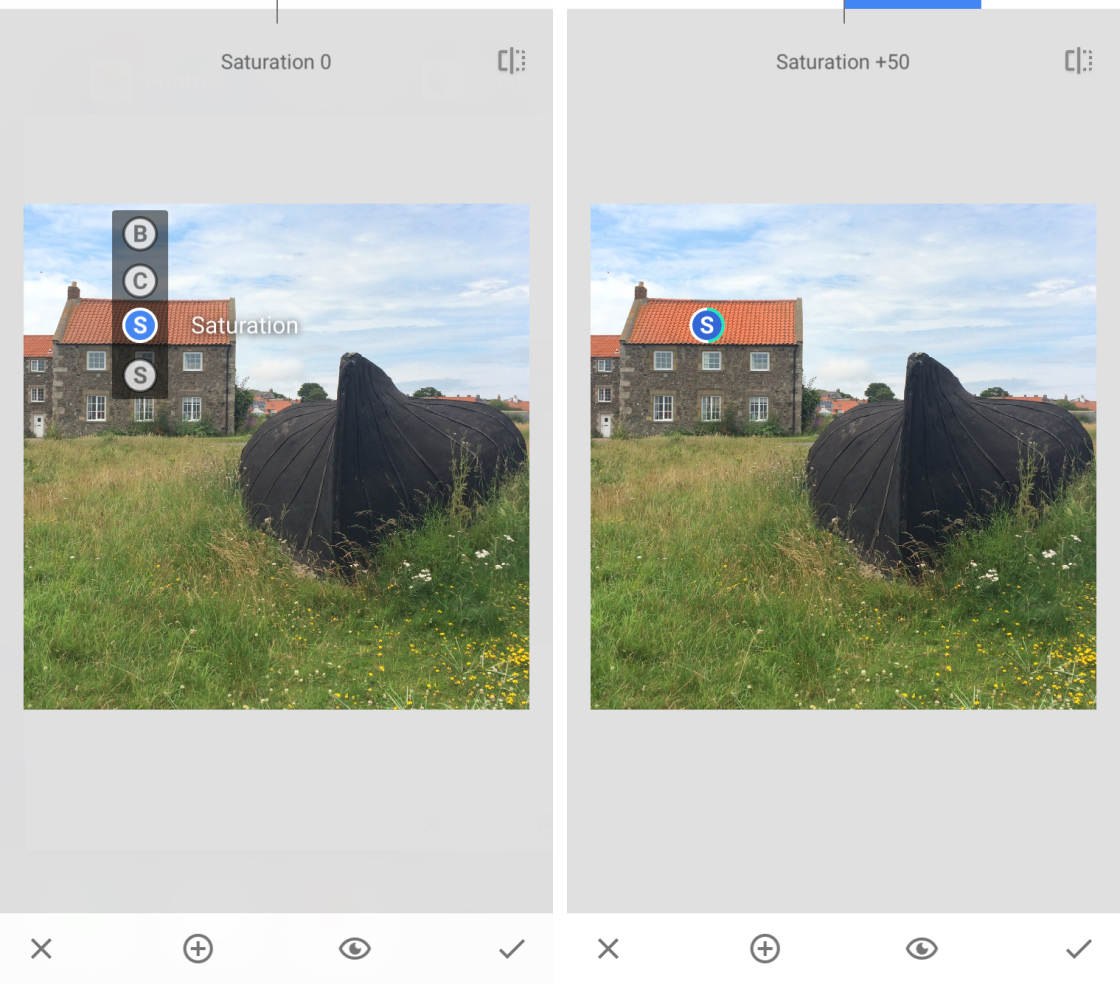
Only the area of the color you that you selected will be affected by the edit.
To edit a different colored area, tap the + icon at the bottom of Snapseed. Then tap on the image to position your new adjustment point.
Pinch to change the size of the selected area. Swipe up or down to choose a tool. Then swipe left or right to adjust the setting.
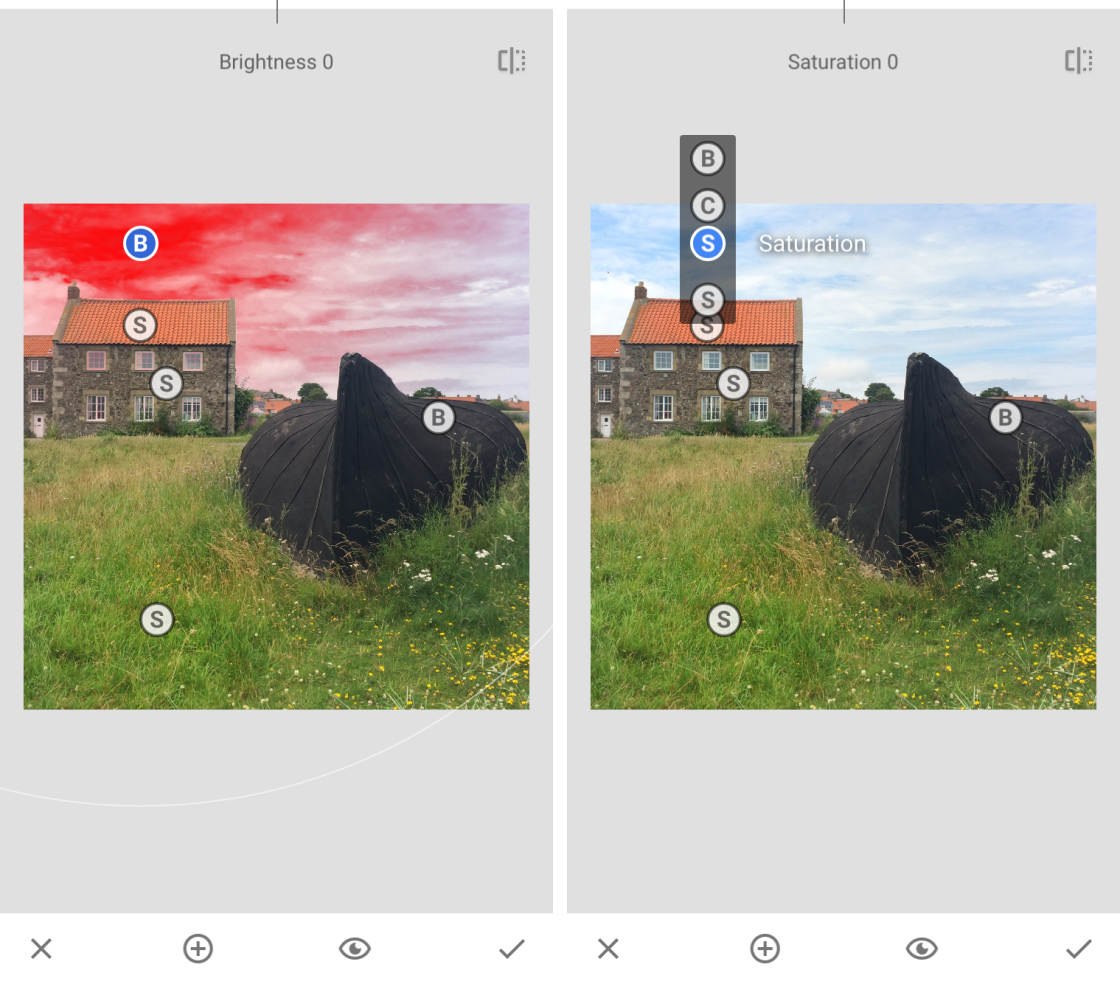
You can add as many adjustment points to different colored areas as you like. Tap the Eye icon to view your image without the adjustment points. When you’re happy with your Snapseed edit, tap the checkmark.
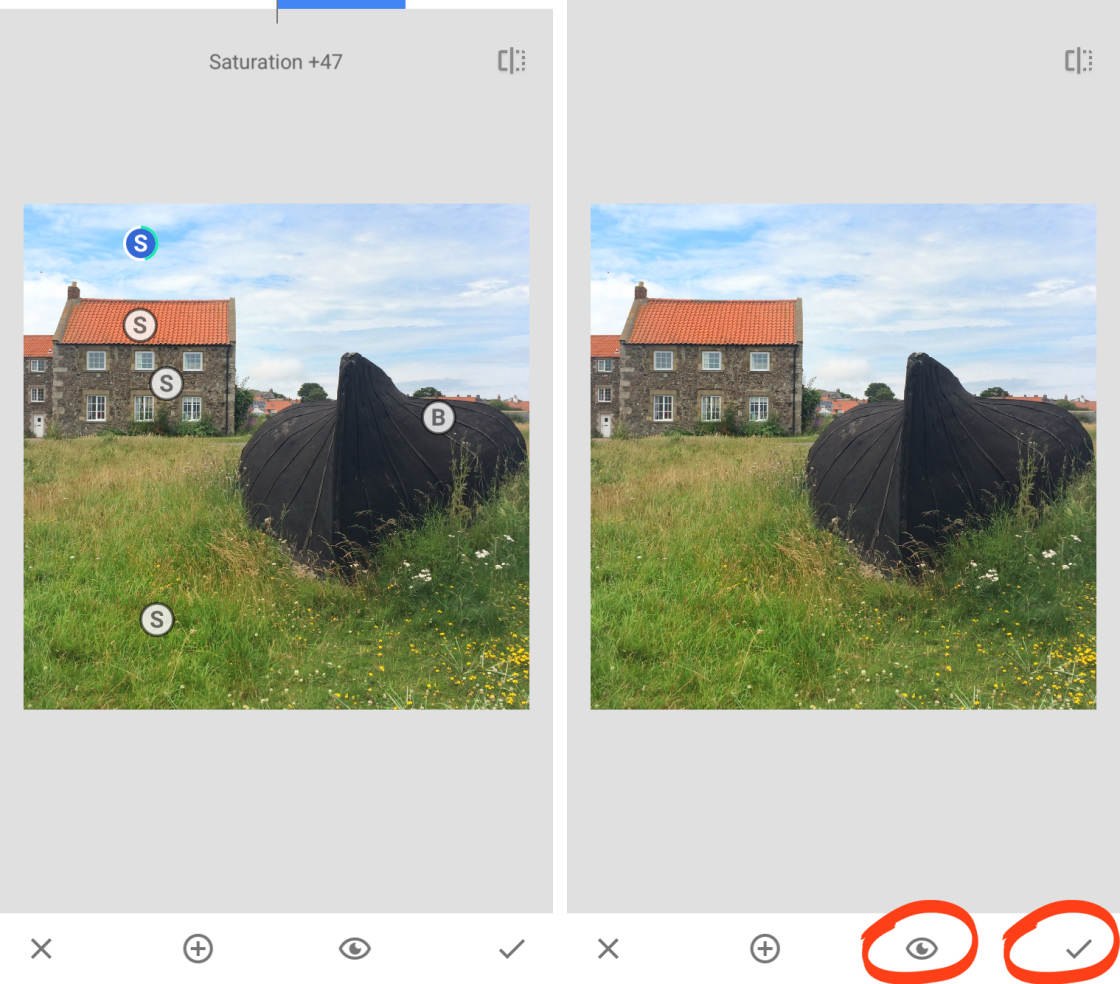
6.3 Masking
Masking allows you to apply any Snapseed edit selectively.
With masking, you could apply saturation, brightness, or warmth to only certain areas of your photo.
You could bring out detail in a textured subject, while leaving the rest of the image untouched.
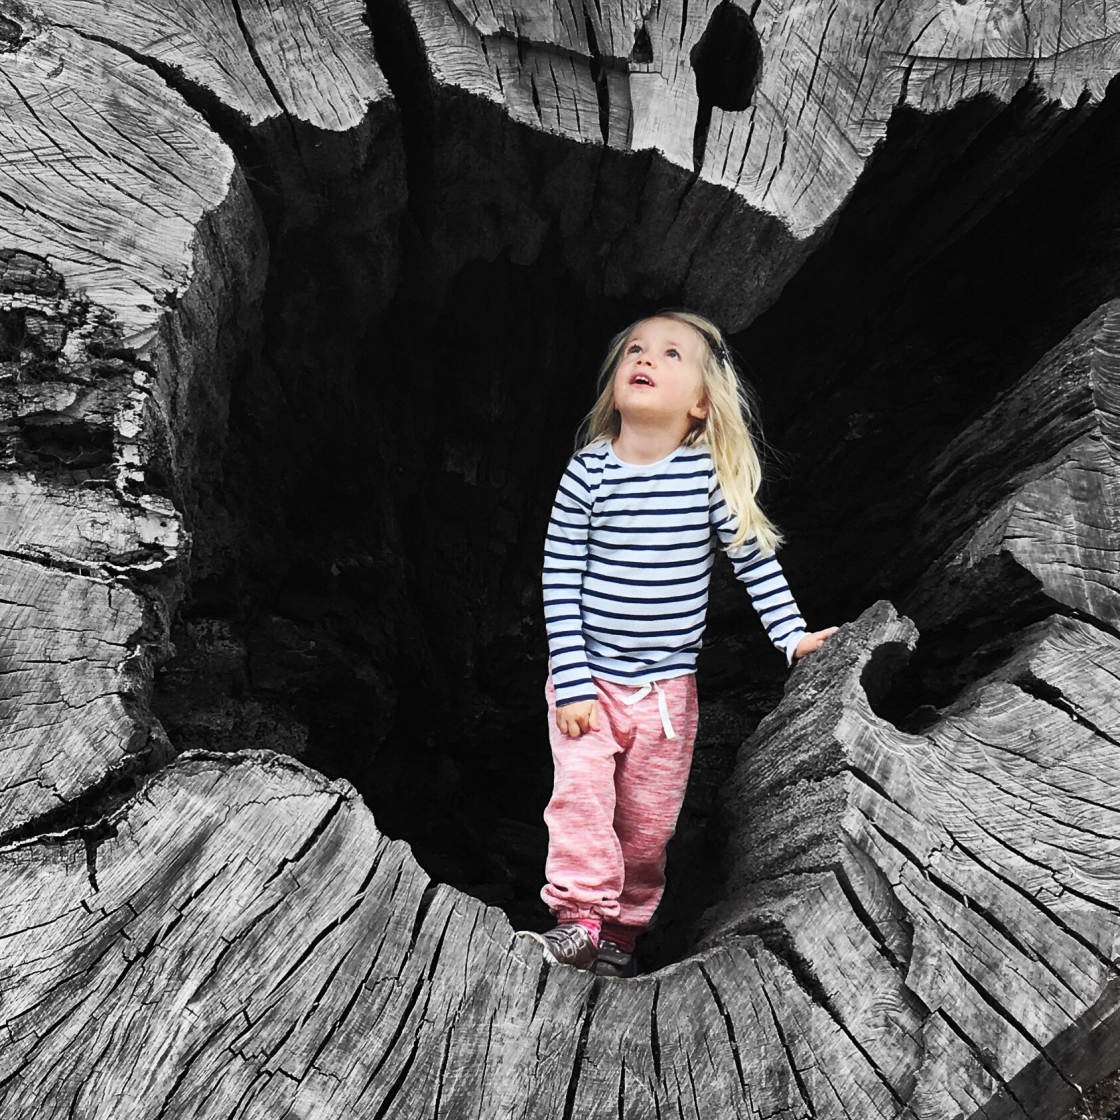
Or you could turn a photo black and white, while keeping the main subject in color.
So how does masking work in the Snapseed photo editor? It’s actually very simple.
First, you apply your adjustment to the entire image. Then you use the Mask tool to apply that edit selectively.
In the video below, you’ll learn how to use Snapseed’s Mask tool for ultimate control over selective editing.
Join my iPhone Editing Academy online course to discover how to harness the full power of the Snapseed photo editing app.
In the example below, you’ll discover how to use masking to create a black and white image with a pop of color.
In the Snapseed Tools, select Tune Image. Set the Saturation to -100, then tap the checkmark.
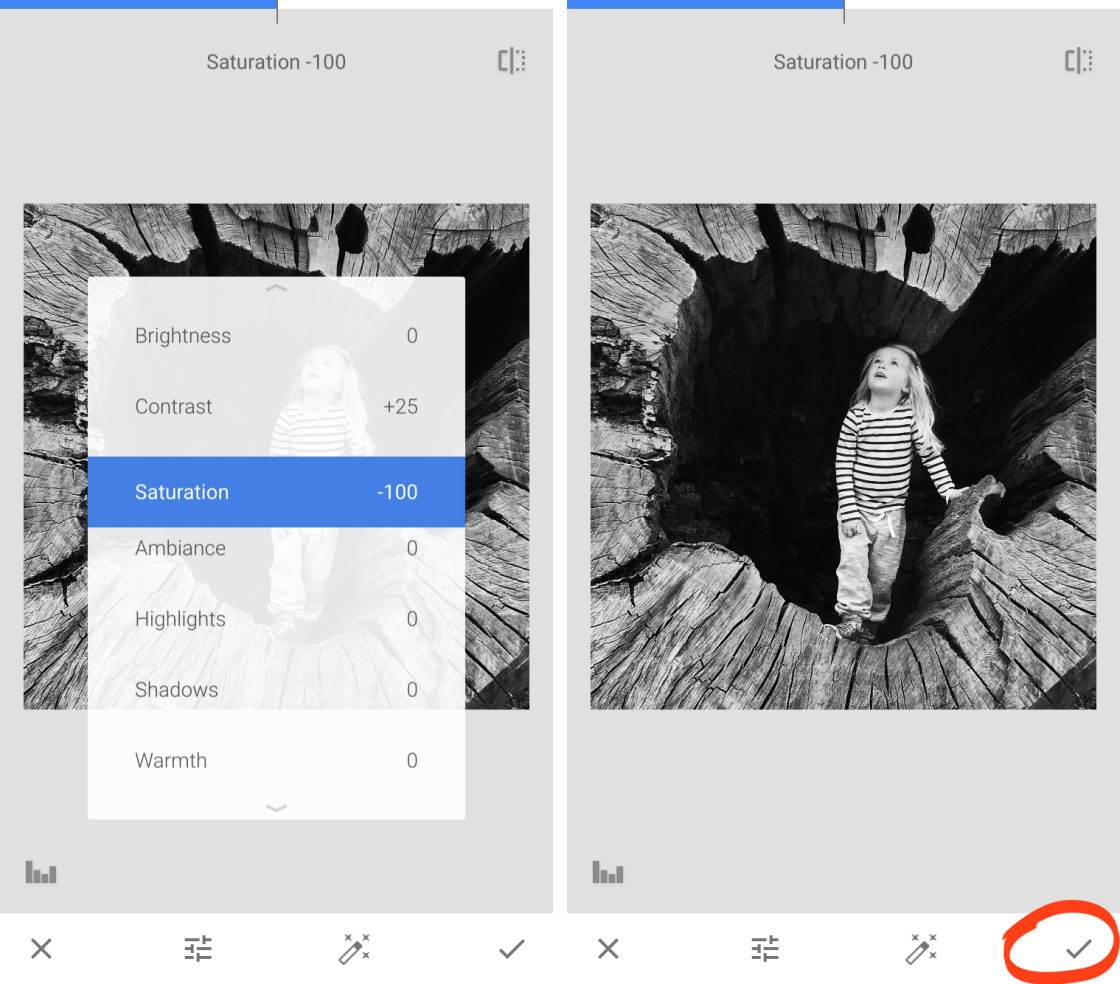
Don’t worry that the entire image is black and white. You’ll now use the Mask tool to apply the effect selectively.
Tap the Edit History icon (square with a curved arrow) at the top of Snapseed. Select View Edits.
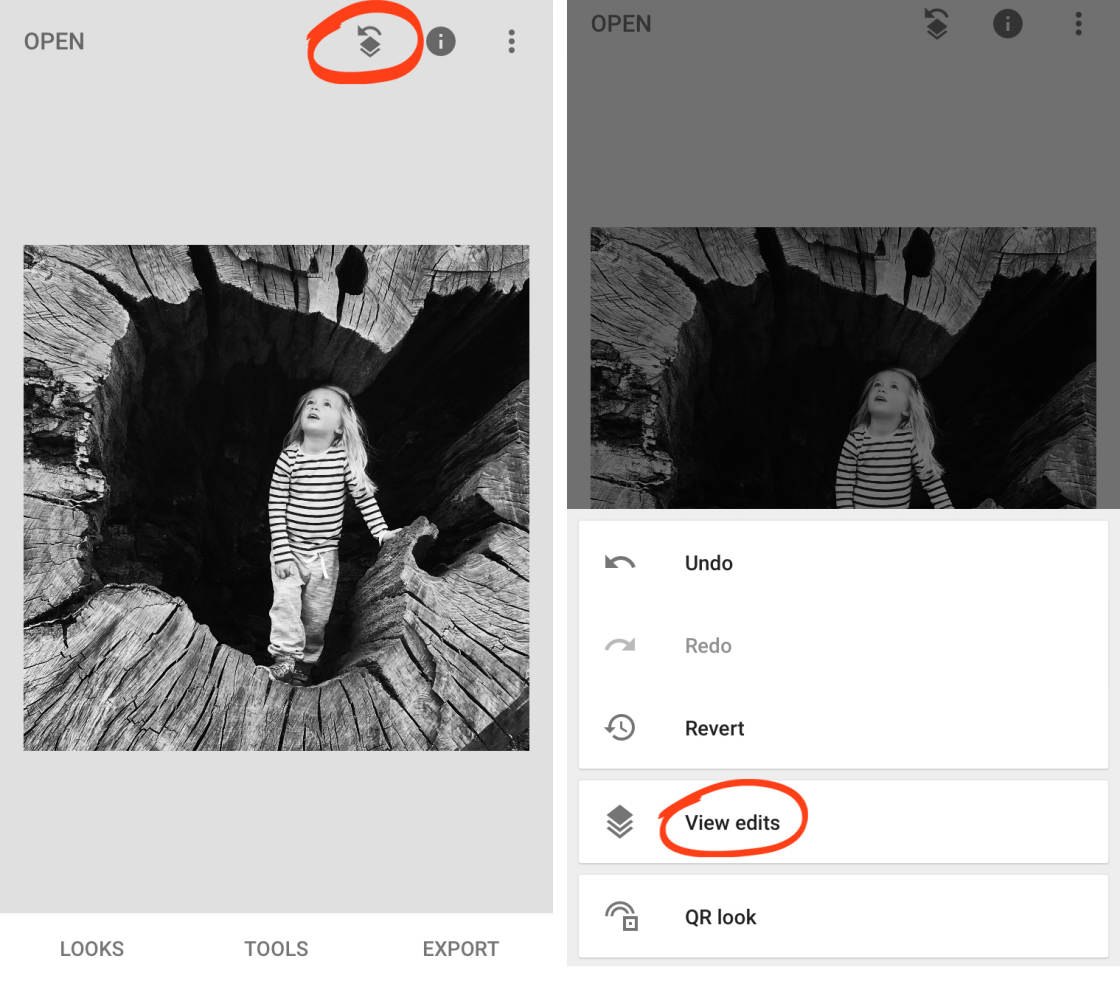
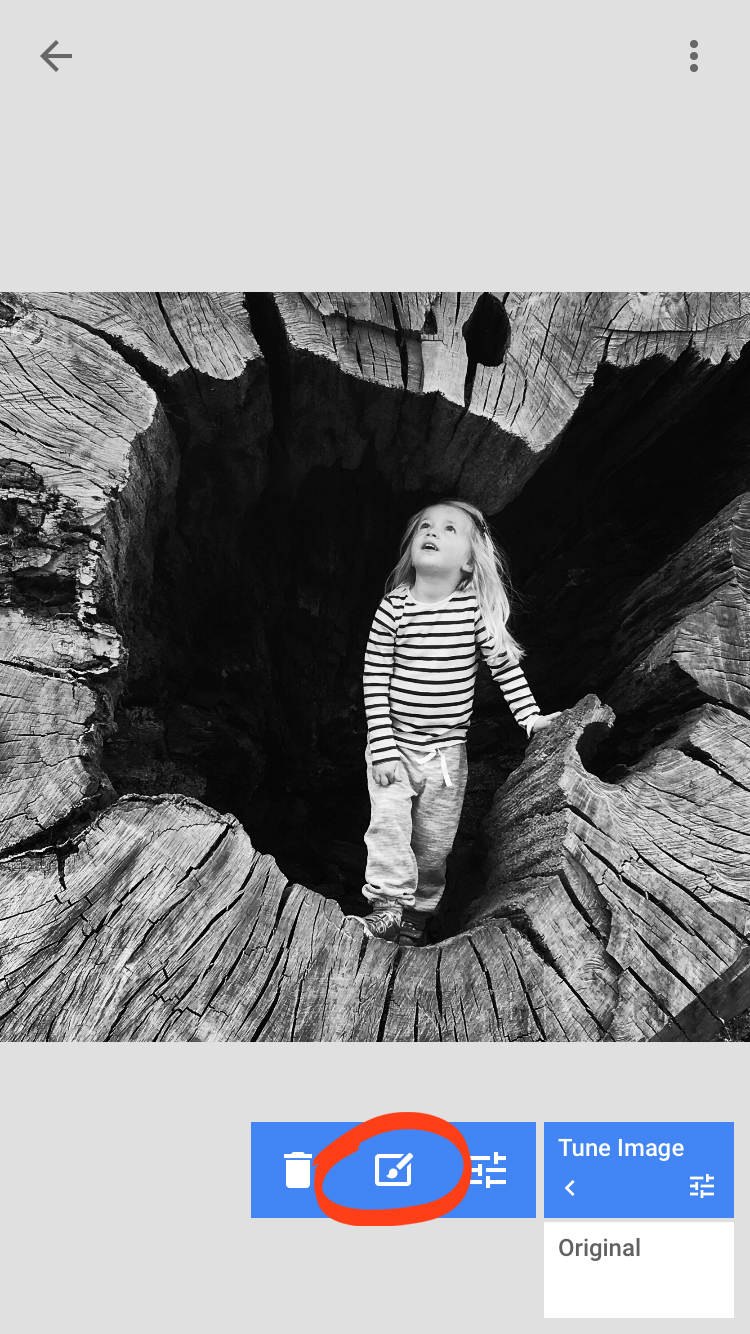
In the edit stack, tap Tune Image, then tap the Mask tool (brush icon).
In the masking window, ensure the Eye icon is switched on. This helps you see which areas you’ve selected by turning them red.
Brush over the area that you want in black and white. In this case, we want everything to be black and white, except for the girl. Zoom in to ensure you make an accurate selection around the edges of your subject.
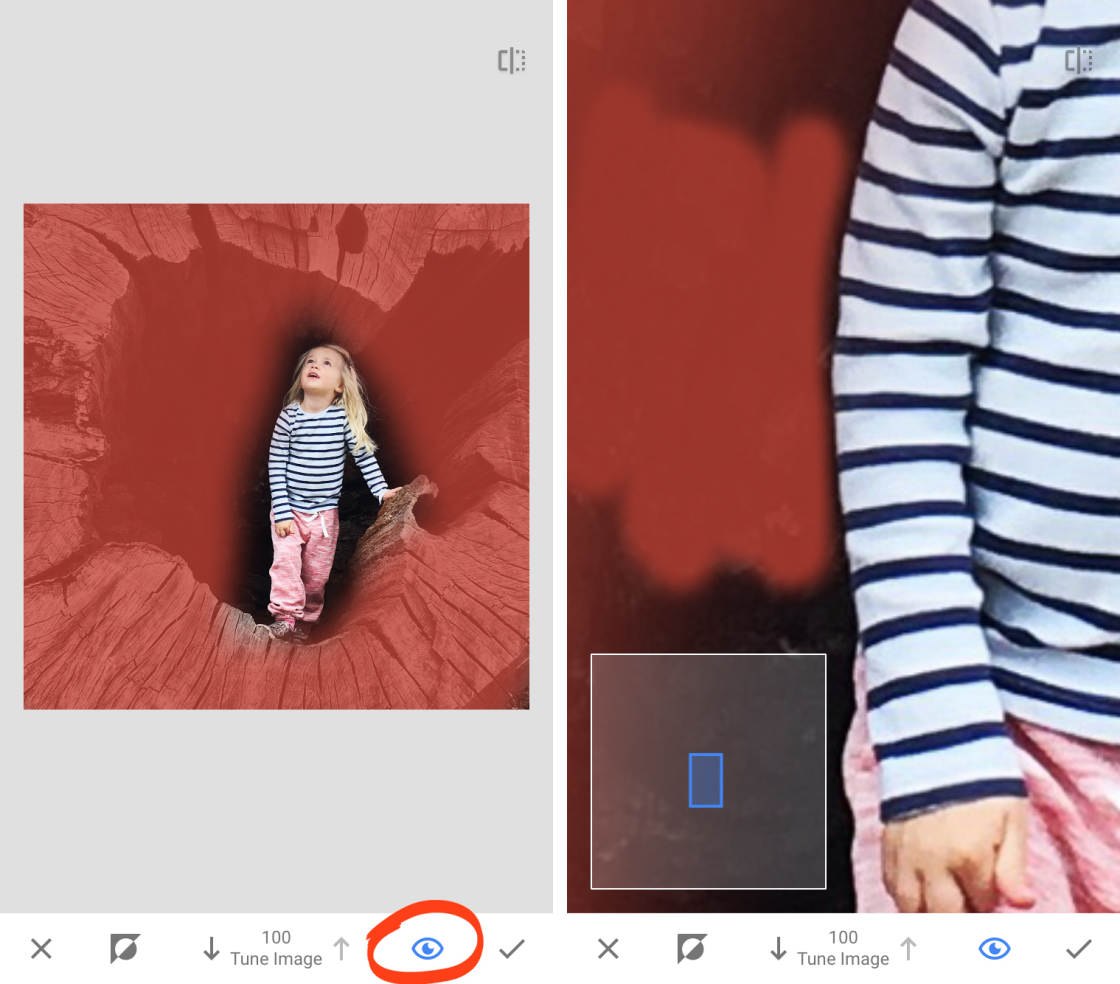
If you make a mistake, you can erase it. Tap the down arrow at the bottom of the screen to set the value to zero. The Mask tool then works as an eraser. Brush over the red highlight to remove it.
When you’re done, tap the Eye icon to remove the red highlight. The areas you selected will appear black and white. Tap the checkmark to apply the edit. Then tap the back arrow to exit the Edit History screen.
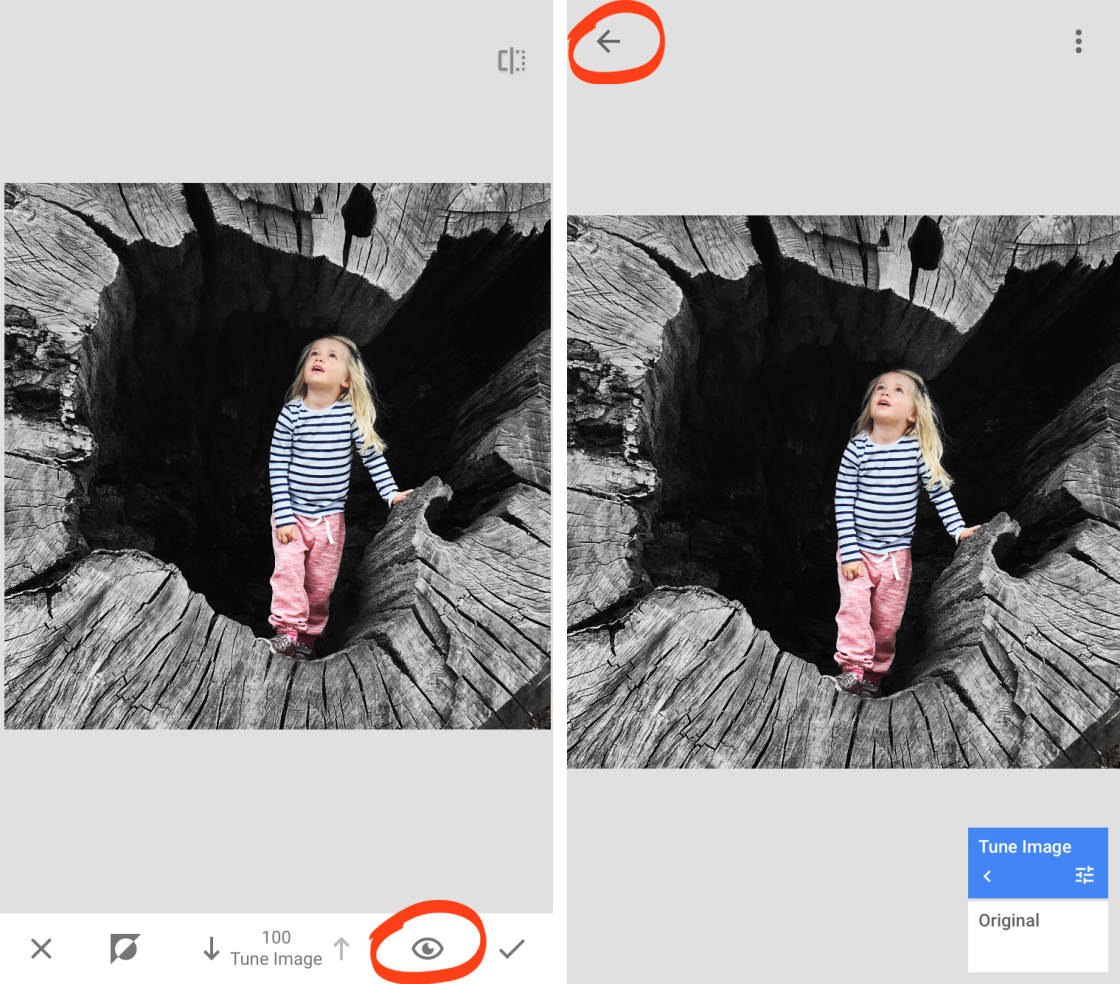
You can use this technique to apply any edit or effect to selected parts of your photo.
6.4 Vignette
The Vignette tool allows you to subtly darken or brighten the inner or outer parts of your image. It’s most commonly used to darken the outer edges of a photo.
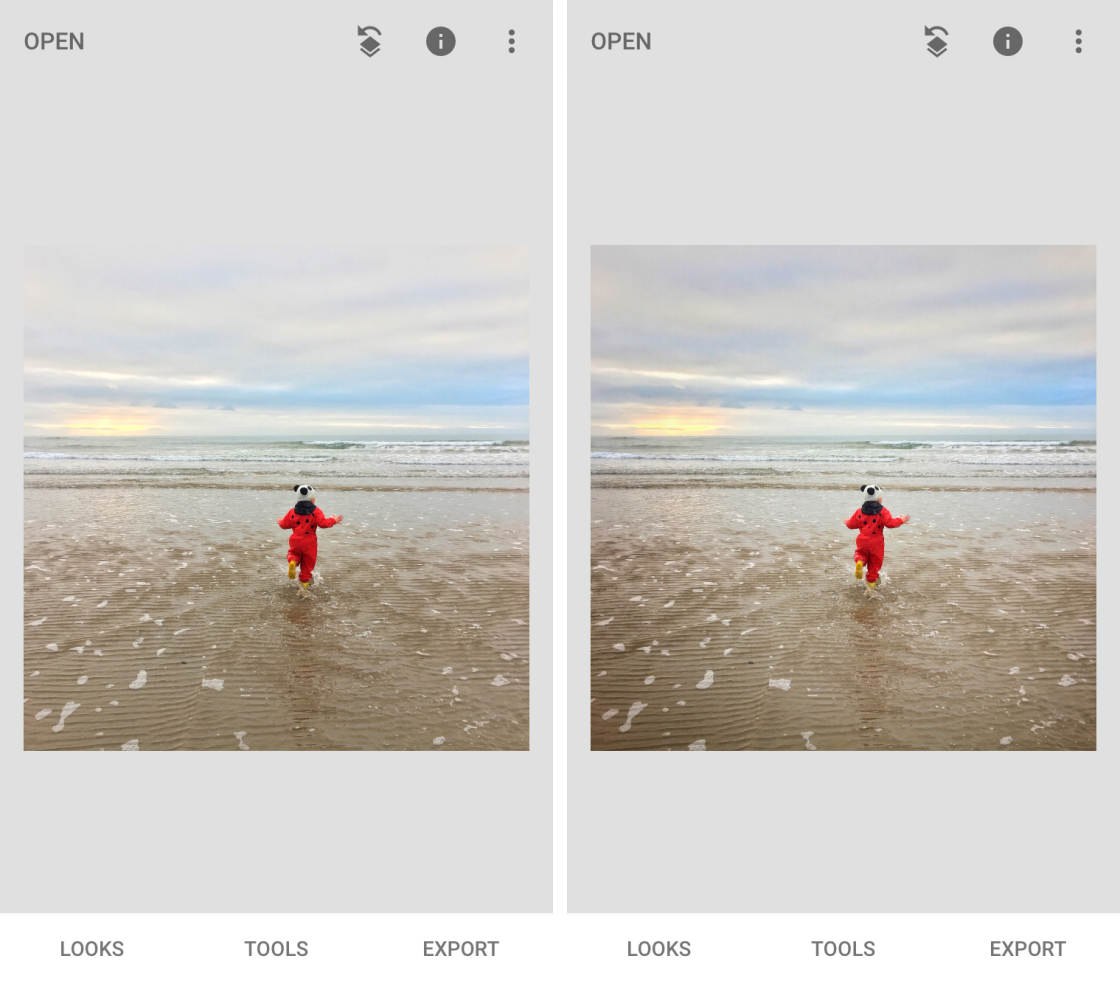
If vignetting is overdone, it can ruin a photo. But when used carefully, a vignette helps to draw the viewer into the image and toward the main subject.
In the Snapseed Tools, tap Vignette.
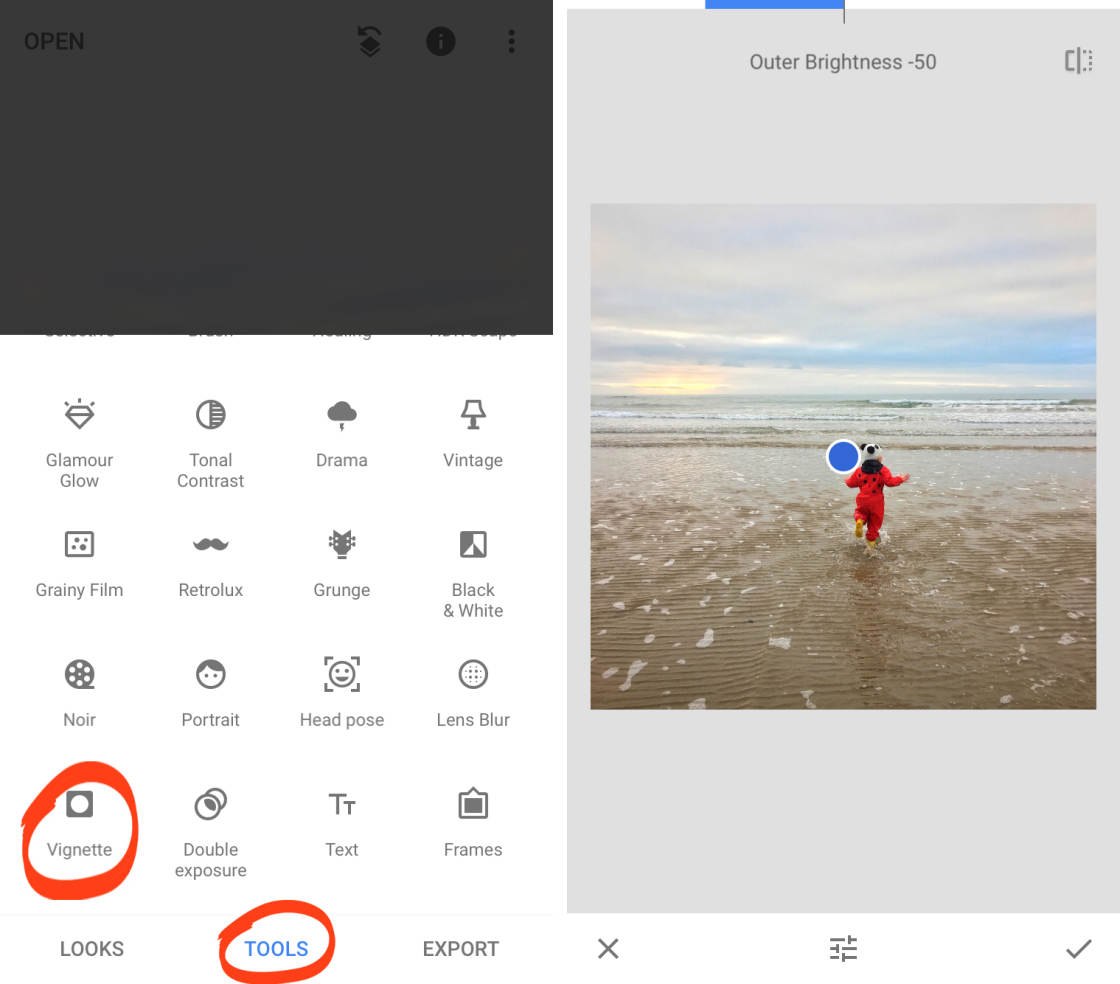
Drag the blue circle to the area you want to keep bright. You can change the size of the vignette area by pinching in or out with two fingers.
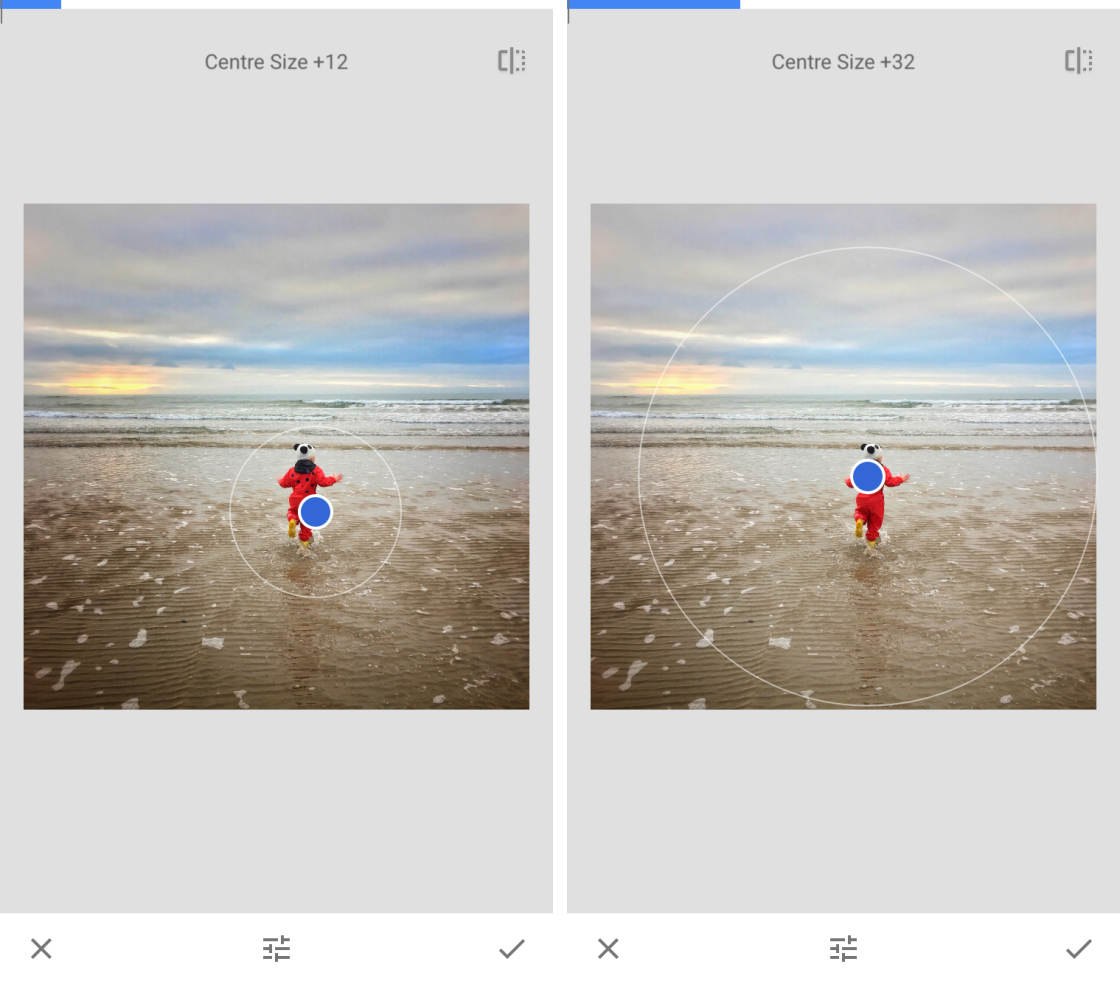
Swipe up or down to open the vignette tools: Outer Brightness and Inner Brightness. These let you control the brightness of the areas inside and outside the vignette area.
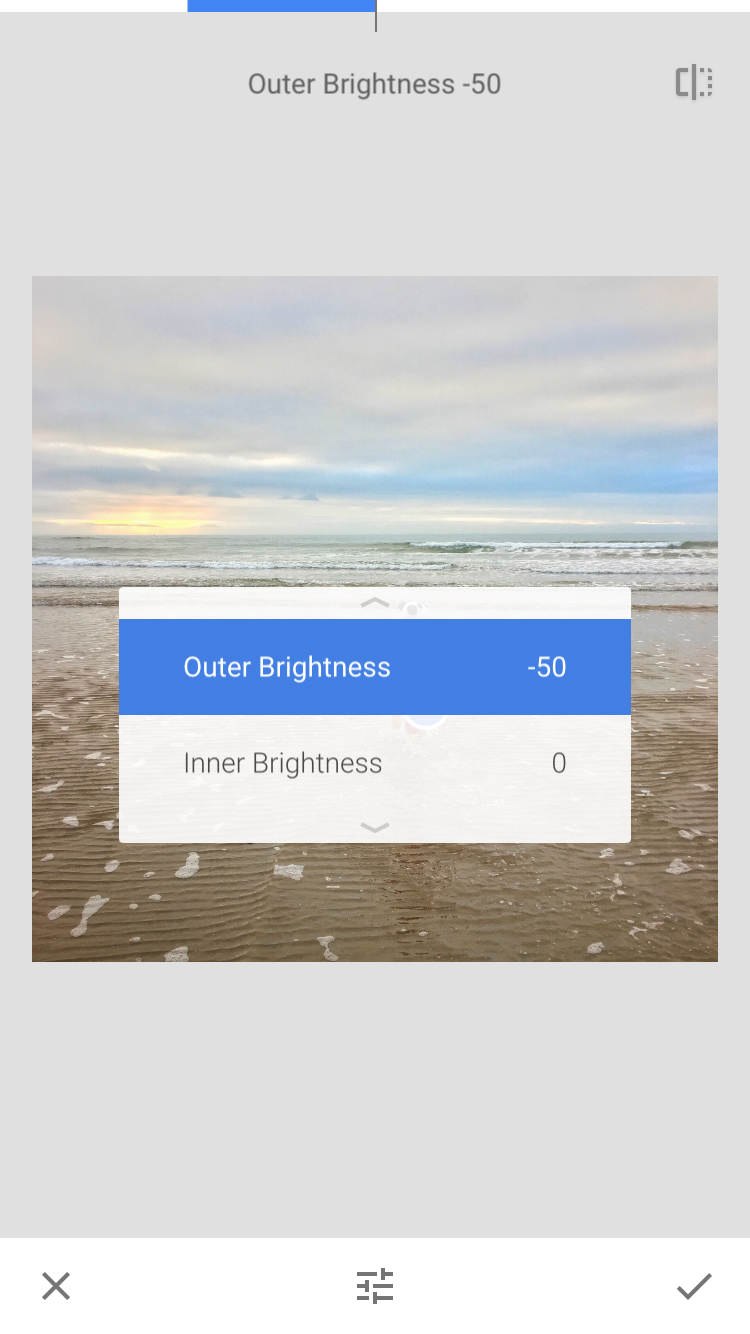
By default, Outer Brightness is set to -50. A minus number darkens the image, while a plus number brightens it. To adjust brightness, swipe left or right. The brightness value appears at the top of the screen.
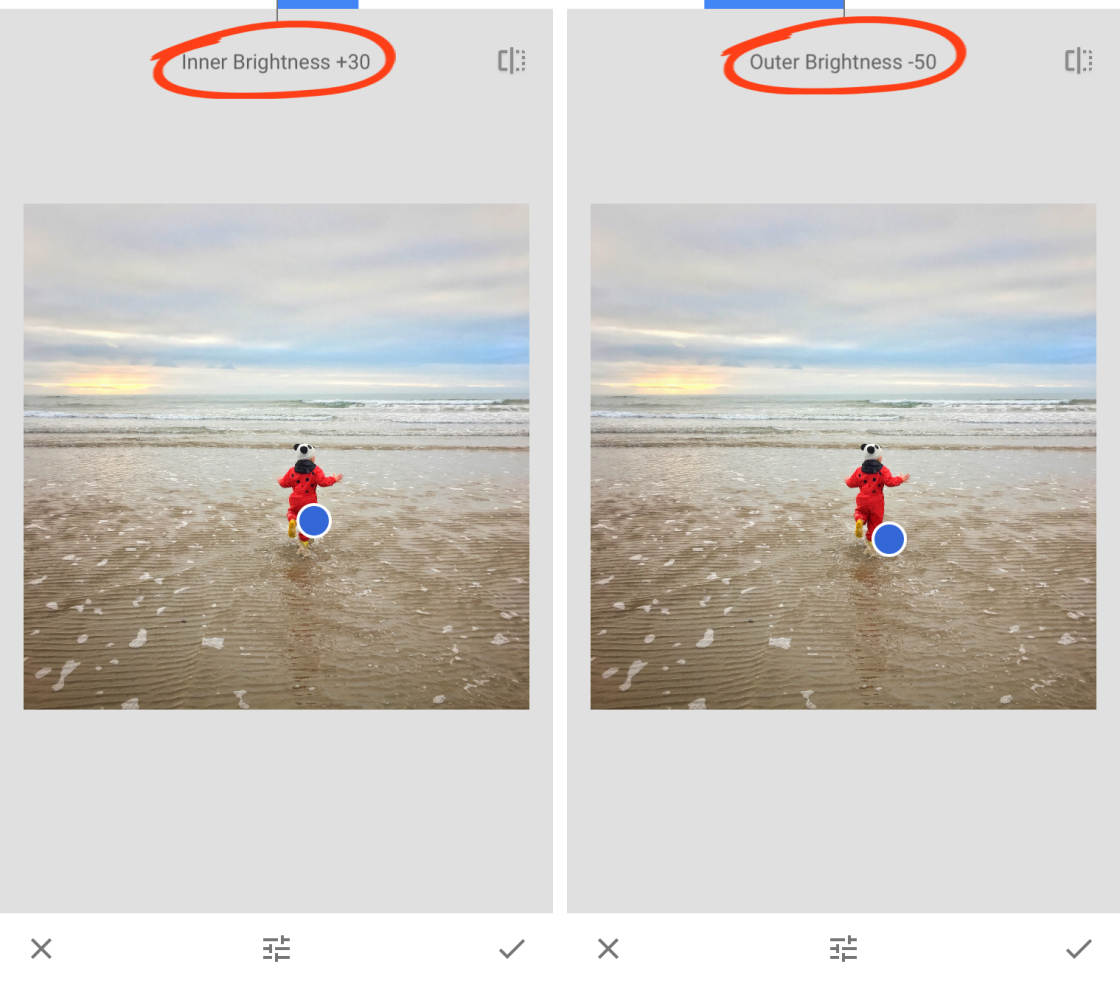
In the example above, the Inner Brightness is set to +30 to brighten the area around the child. The Outer Brightness is set to -50 to darken the edges of the image.
This combination draws the viewer’s eye to the more important, brighter part of the scene. It also darkens the sky, making it more dramatic.
7. Change The Mood With Snapseed Filters
Snapseed filters let you quickly change the look and feel of your photo. With a single tap, you can change the mood of your image or add an artistic touch.

Each filter is fully customizable, making Snapseed one of the best filter apps for iPhone.
Let’s take a look at the Vintage filters for this demonstration. These filters offer an easy way to create faded, vintage-style edits. In the Snapseed Tools, tap Vintage.
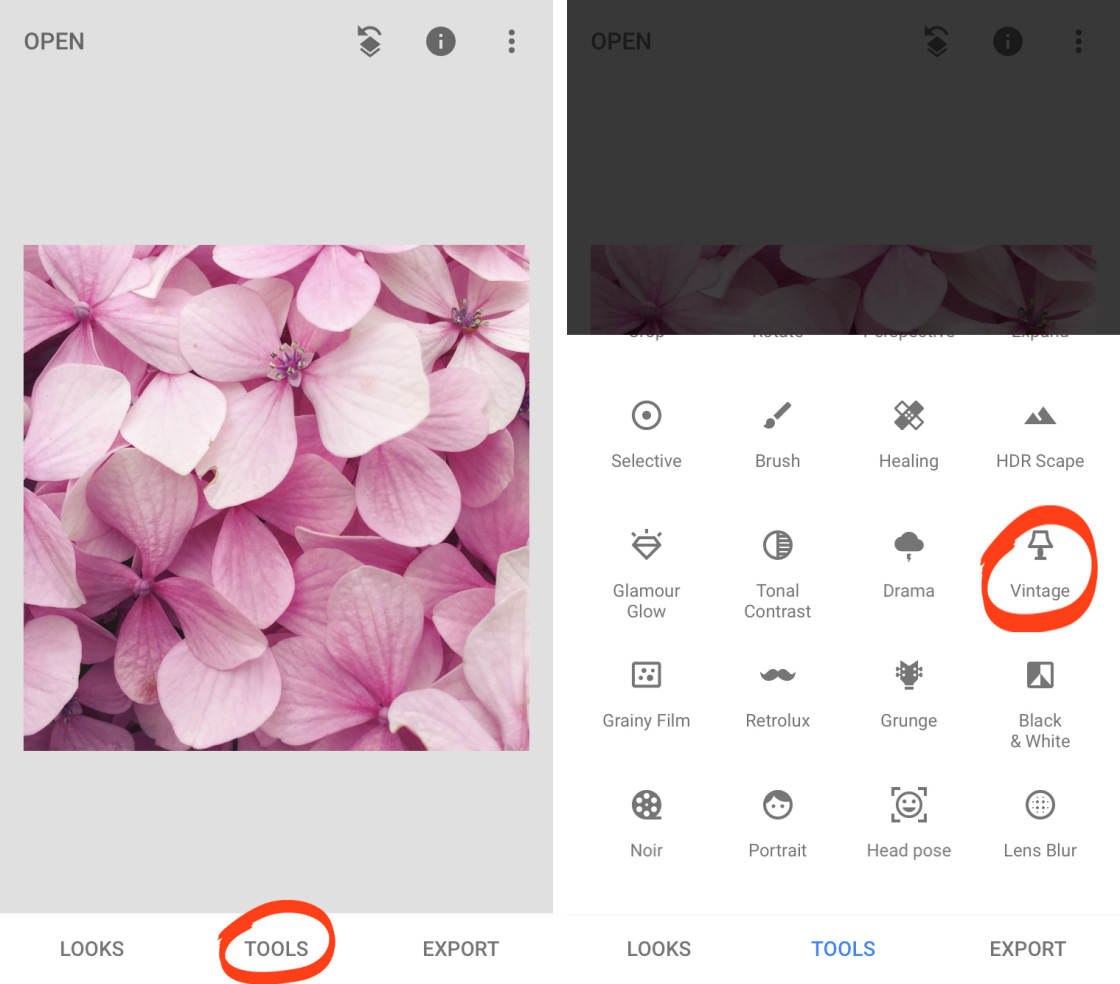
Tap on the different colored gradients beneath your image to try out the range of vintage filters. To customize the filter, swipe up or down, then select a tool from the menu. Swipe left or right to adjust the setting.
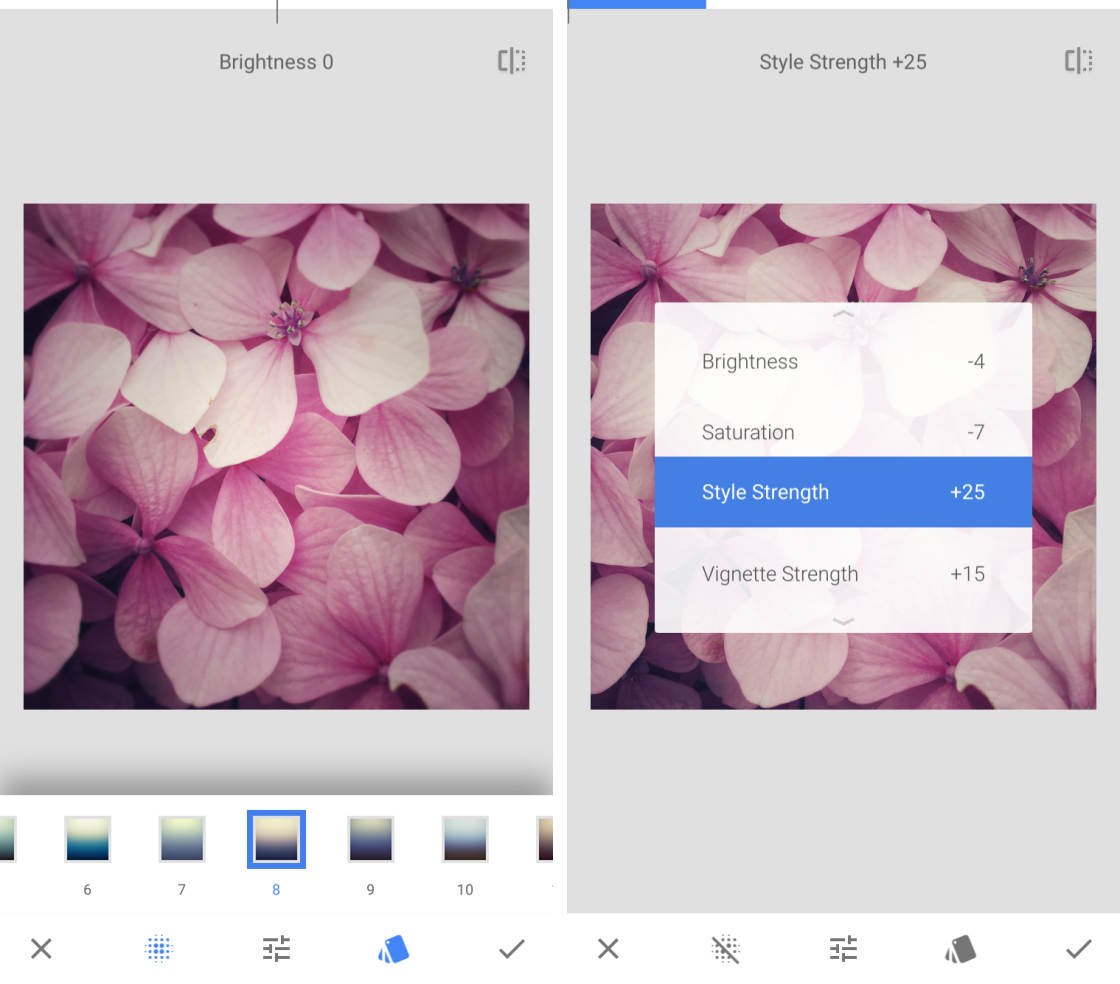
To add a subtle blur around the edge of your image, tap the Blur icon at the bottom of the screen.
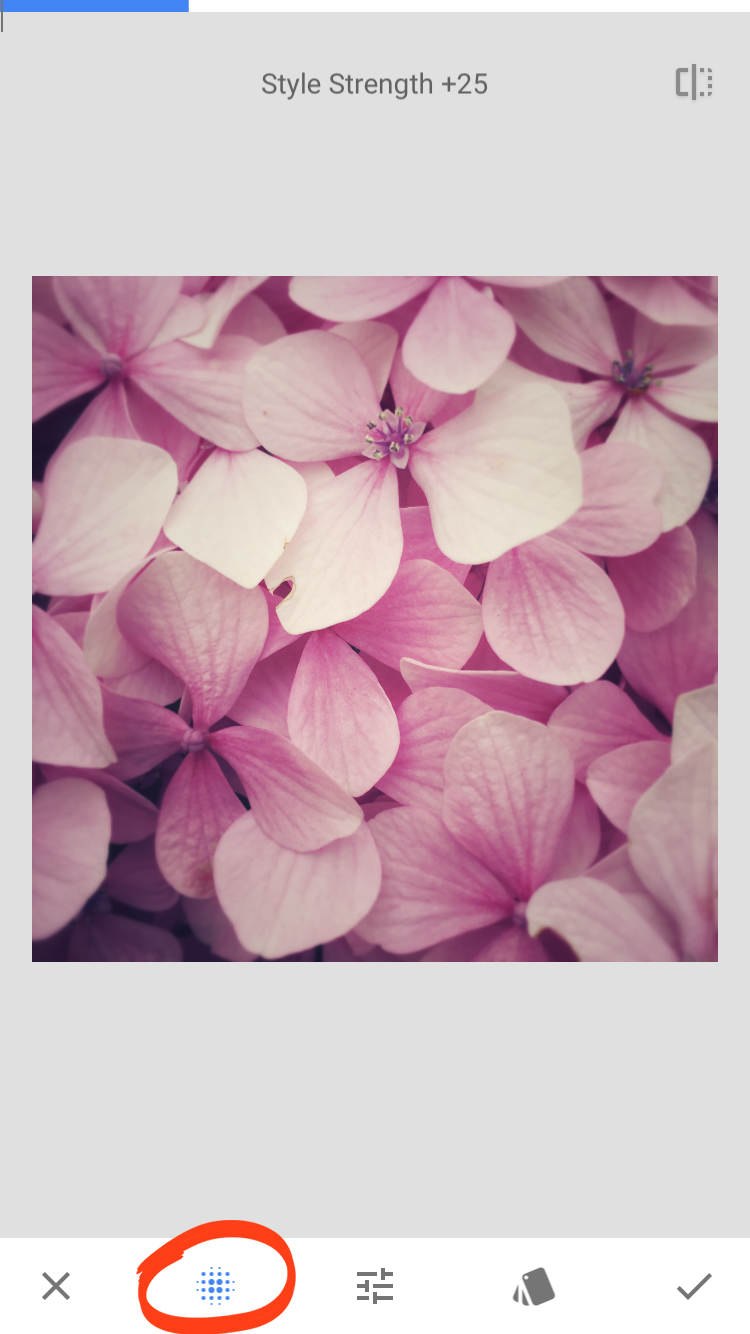
Other filter categories to try out include Black & White, Retrolux, Grunge, Noir, and Glamor Glow.
The Grunge filters are particularly unique as they add grungy textures to your image. You wouldn’t want to apply these filters to every image. But they’re worth experimenting with if you want to get creative.
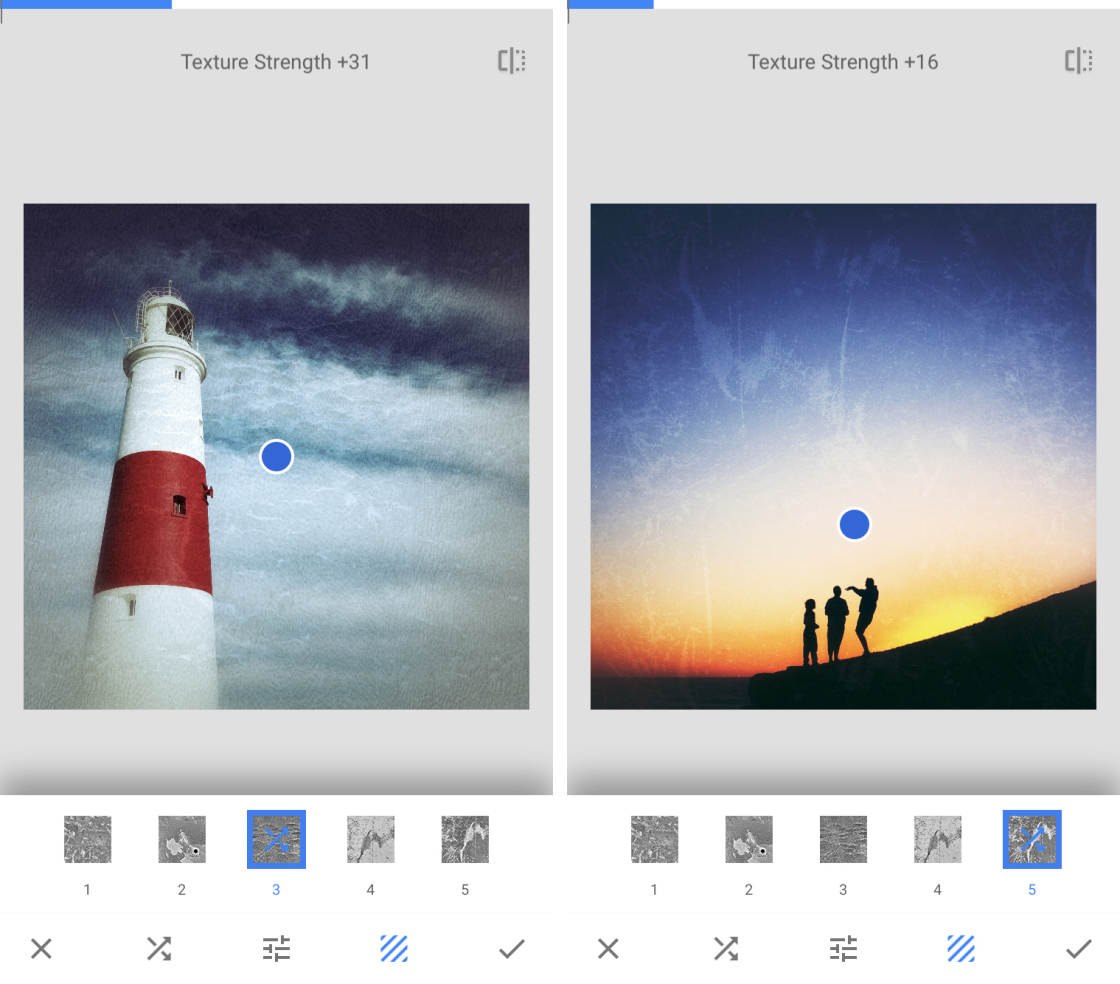
All of the filters work in a similar way. Select the filter you want to use, then swipe up or down to access the customizable settings. Use the icons at the bottom of the screen to access more filter options.
8. Use Looks As A Starting Point For Your Edits
The Looks section of Snapseed contains a collection of preset edits that you apply with a single tap.
If you’re not sure how to edit an image, trying out some different Looks is a good way to get started. You can then modify the Look to fine-tune the edit.
You can even create your own Looks based on edits that you’ve made. This is useful if you want to edit several photos using the same or similar effects.
8.1 Apply A Look To Your Photo
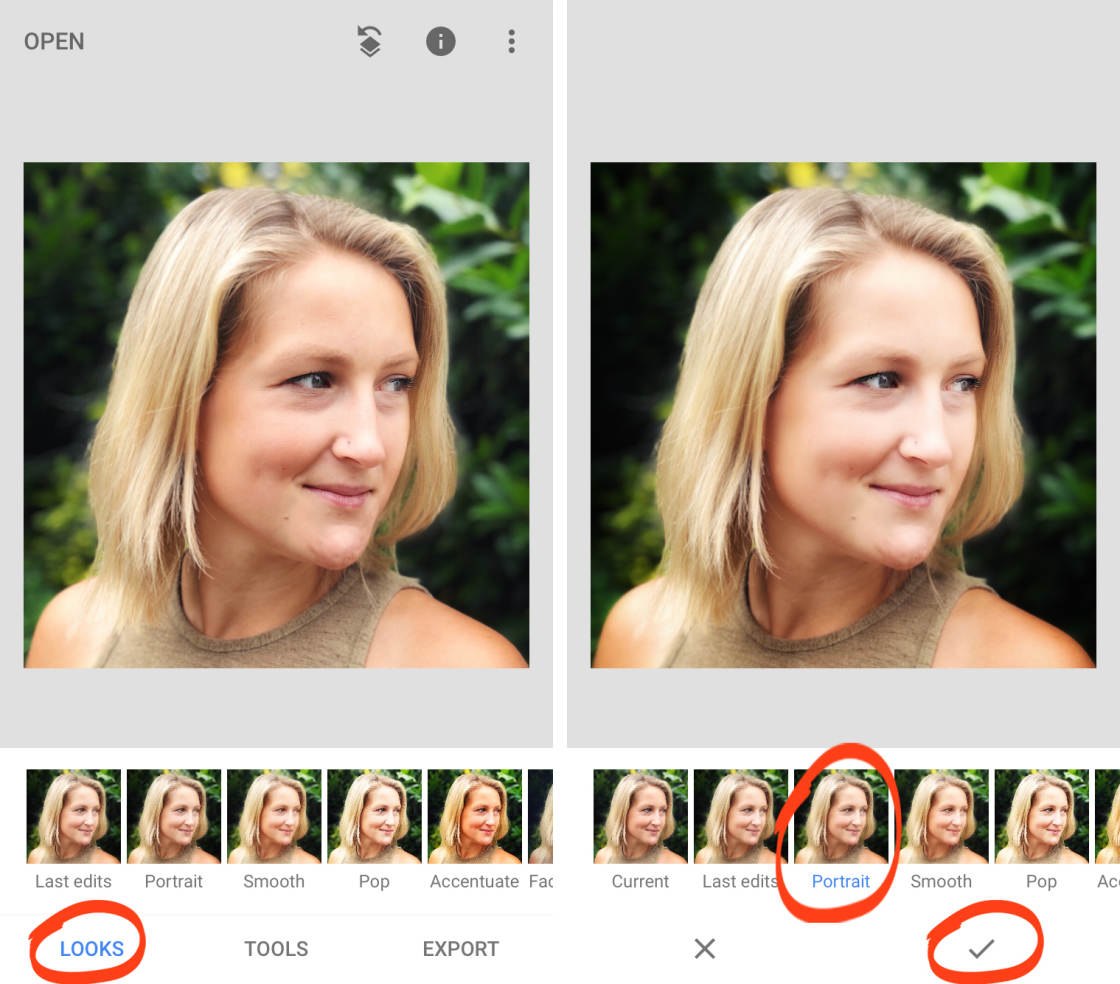
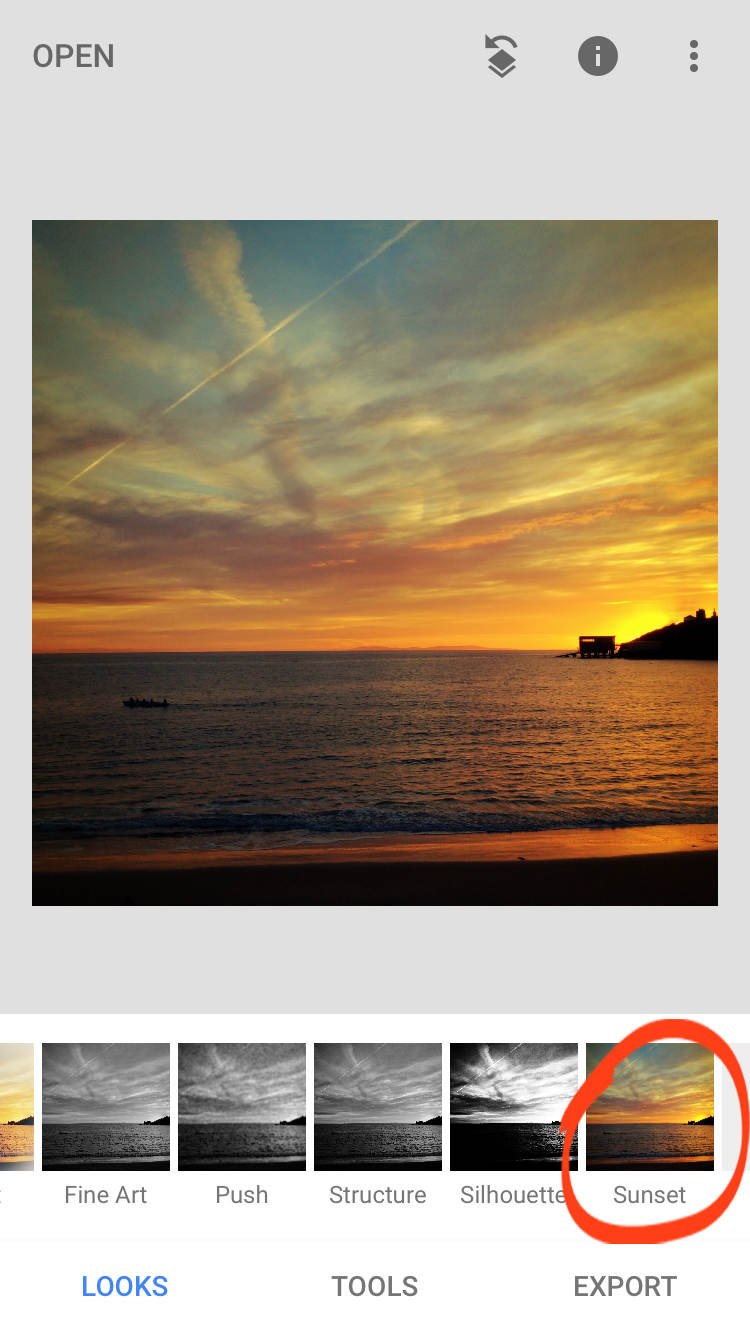
Tap Looks at the bottom of the screen.
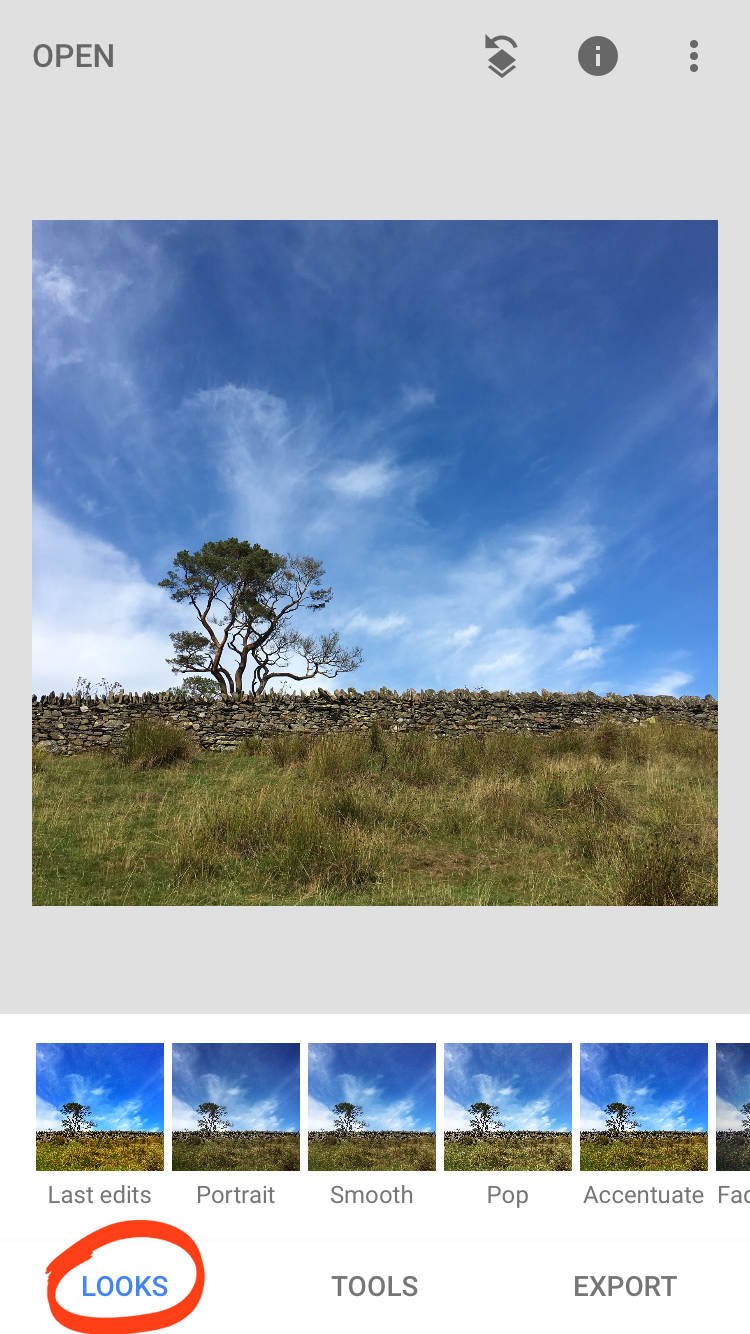
Tap on the different Looks beneath your photo to see how they alter the image.
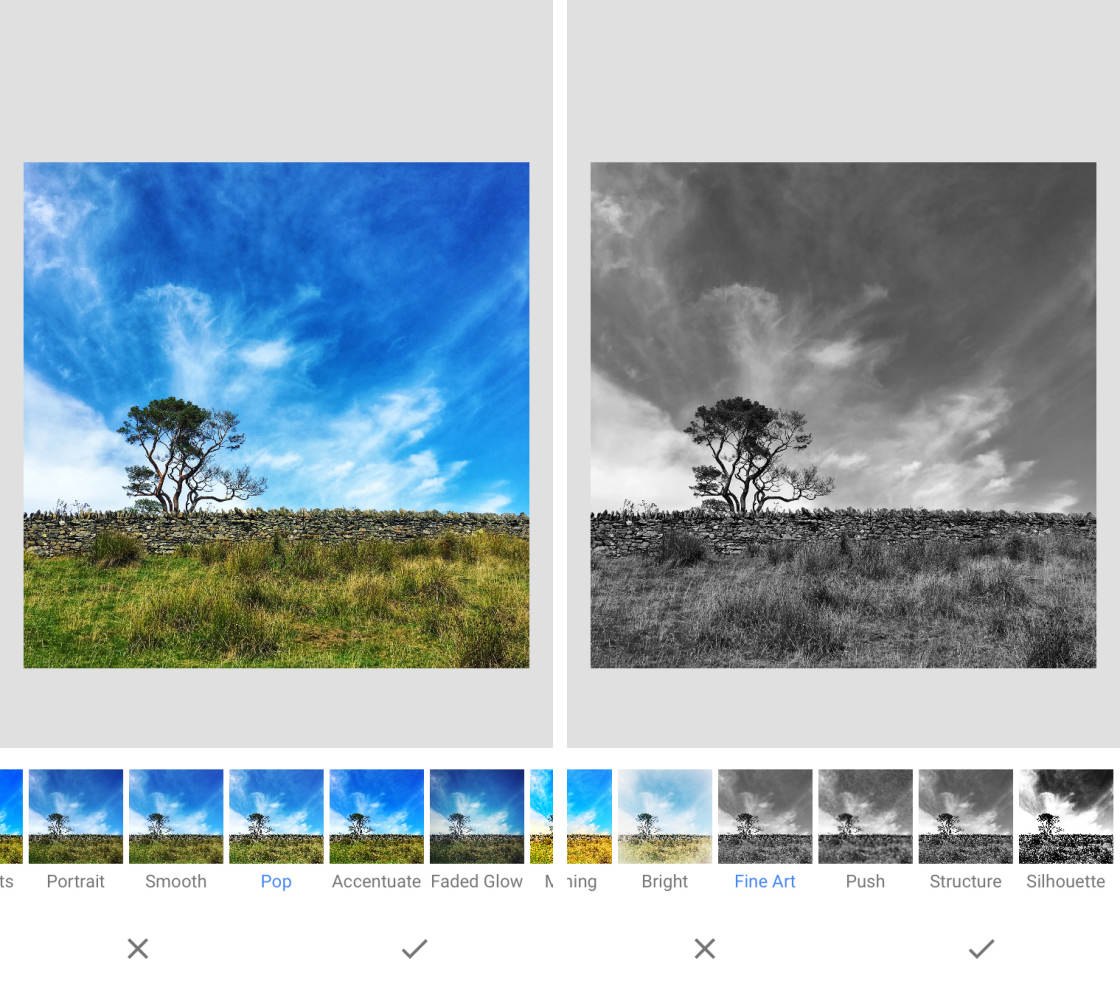
If you’re happy with the edit, tap the checkmark. To cancel the edit, tap the X. Or customize the Look using the instructions below.
8.2 Customize A Look
To customize a Look, first apply it to your photo and tap the checkmark.
Tap the Edit History icon (square with a curved arrow) at the top of the screen. Select View Edits.
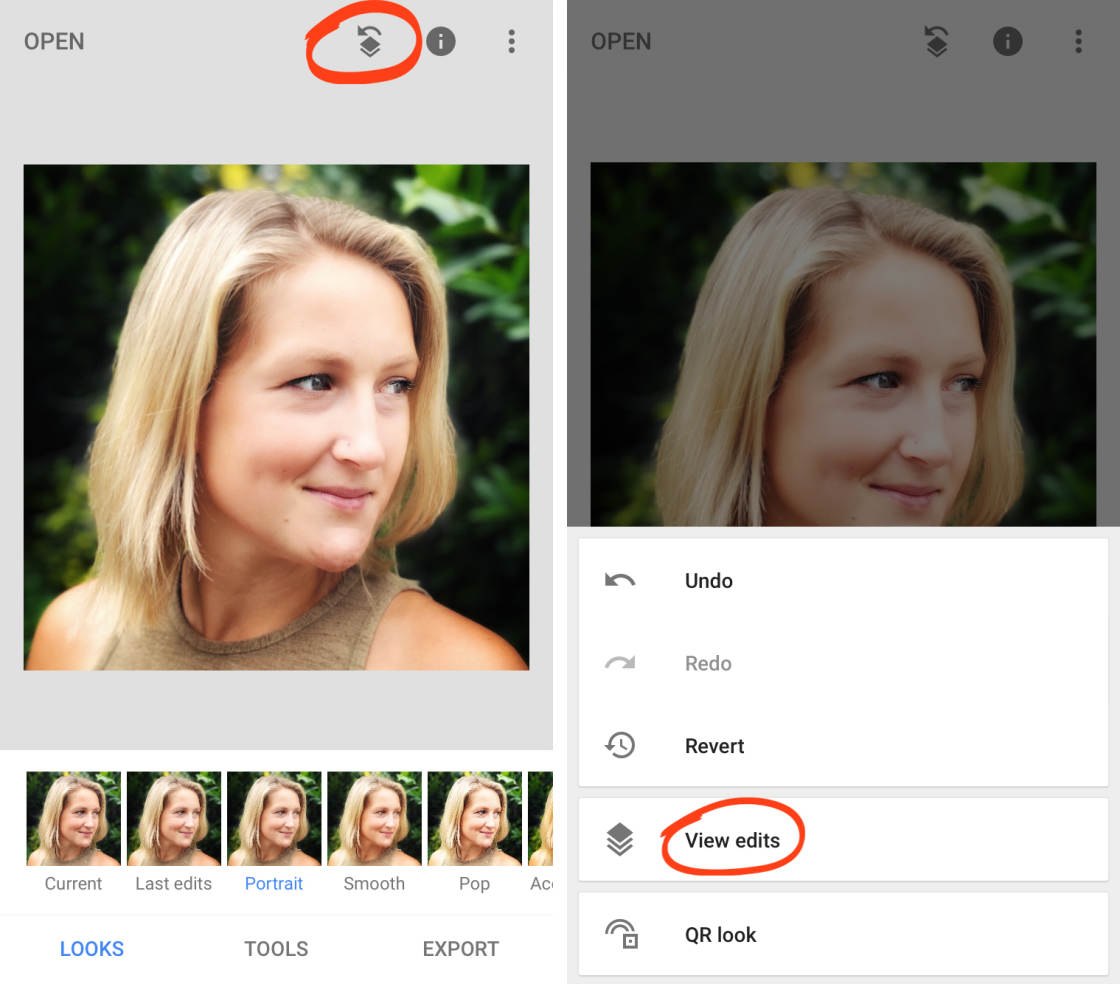
The edits that make up this Look appear in the edit stack at the bottom of the screen. Tap any edit in the stack for more options.
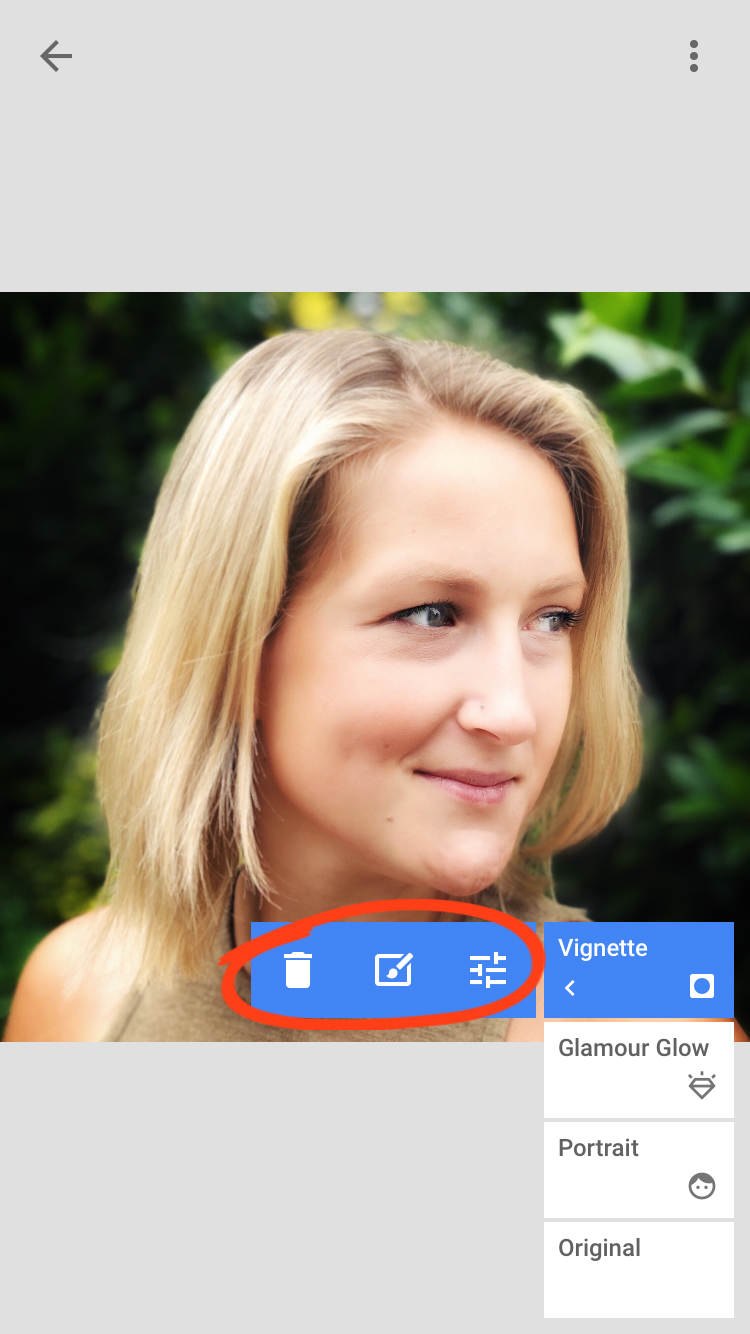
Use the Trash icon to delete the edit. Tap the Sliders icon to modify the edit. Or tap the Brush icon to apply the edit selectively using masking.
8.3 Create Your Own Custom Looks
Do you often find yourself editing multiple photos using very similar edits? If so, you can save time by creating your own unique Looks.
Creating your own Looks is also a great way to come up with new ideas for editing your photos. You can quickly apply them to new images to see which edit looks best. This is an easy way to test out different edits that you might not have thought of otherwise.
This video from my iPhone Editing Academy course shows you how to create your own Looks to generate new editing ideas.
Join my iPhone Editing Academy course and discover fresh ideas for creating spectacular Snapseed edits.
To create your own Look, first edit your photo using any combination of Snapseed editing tools. When you’re done editing, tap Looks at the bottom of the screen.
Swipe across to the far right of the Looks, then tap the Add Look (+) icon. Type a name for your Look, then tap OK.
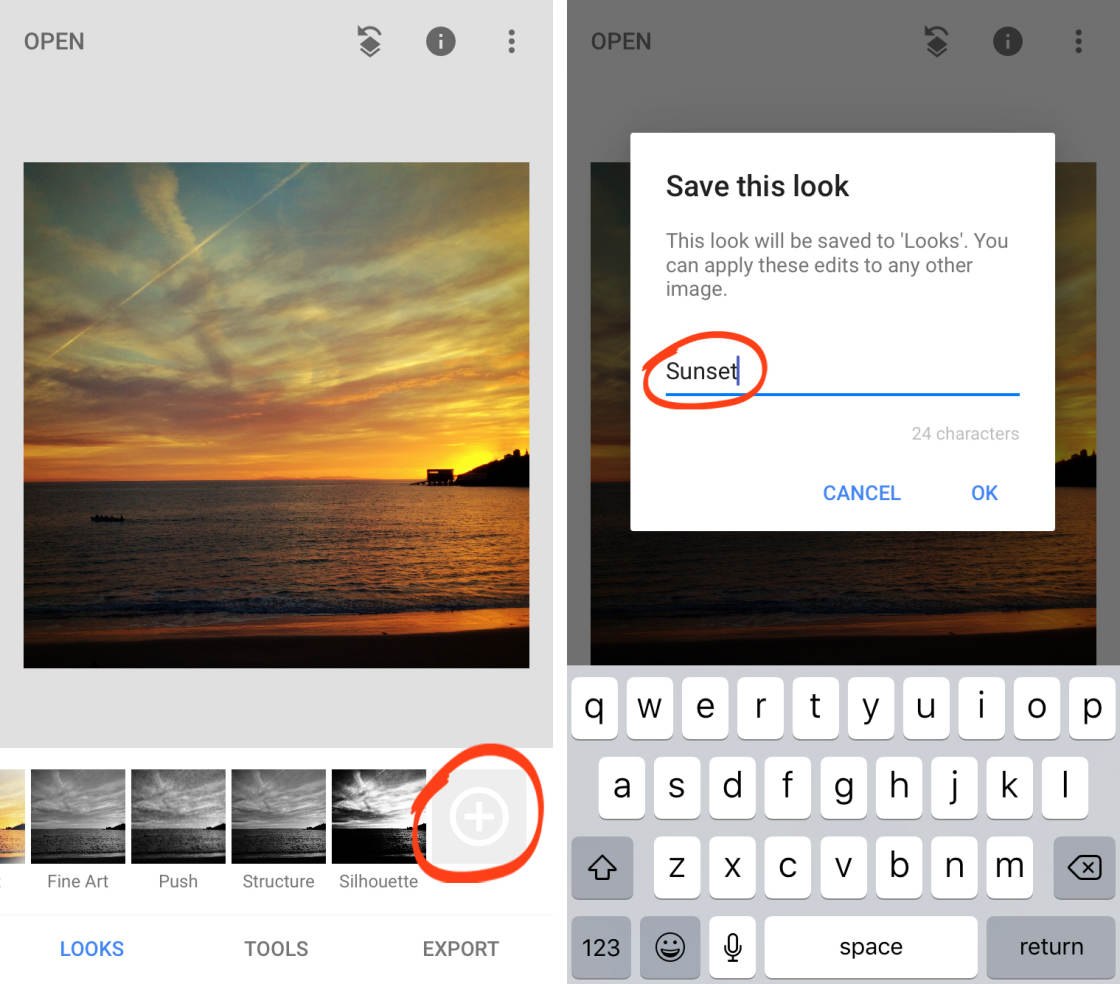
Your new custom Look appears in the Looks at the bottom of the screen. You can apply this Look to any photo that needs similar editing in the future.
9. Save Your Snapseed Edit
When you’ve finished editing your photo, you’ll need to save it. Saving your Snapseed edit ensures the image gets stored in your iPhone’s built-in Photos app.
Tap Export at the bottom of the screen. Snapseed has three saving options: Save, Save A Copy, and Export.
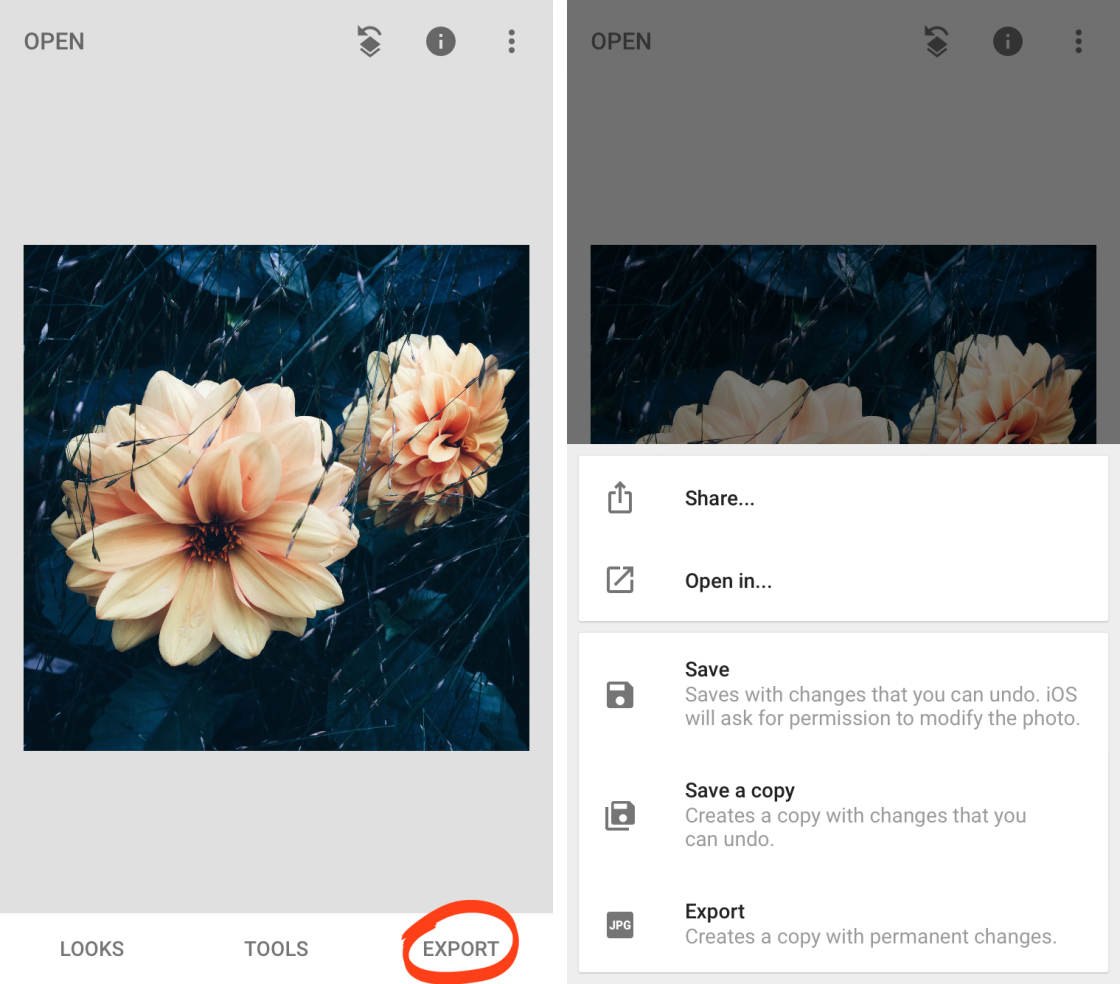
Save overwrites your original photo with the edited version. You’ll no longer see the original unedited image in your Photos app. The photo saves with “non-destructive editing,” so your edits can be removed or modified at any time.
Save A Copy saves your edit as a separate photo. You’ll have both the original and edited versions of the image in your Photos app. The image saves with “non-destructive editing,” so your edits can be removed or modified in the future.
Export saves your edit as a separate photo with permanent changes. Your edits can’t be undone or changed after saving.
The best option is to Save A Copy. Your original unedited image will remain in the Photos app. And the edited version is saved with non-destructive edits. These edits can be removed or modified at any point in the future.


Thanks Paul – another great tutorial in our Snapseed photo editing series! I look forward to the next one about using Filters 🙂
Thanks very much Kate. I am looking forward to writing it 🙂
Great tutorial Paul
Thanks Tracy. Glad you enjoyed it.
amazing tutorial!
Thanks very much Lucas. Delighted you enjoyed it.
Thank you Paul. Wonderful tutorial on an amazing app. Look forward to your next on Snapseed’s filters.
Thanks Rosa. I have just started the filters article. Is there anything in particular you would like to see covered.
Tonal Contrast. I think images can be greatly enhanced by using tonal contrast. Are there any horrors or things to be aware of when using tonal contrast?
Although I have used Snapseed before I now realise that I was not making use of 80% of its abilities – thanks Paul for a great tutorial!
You’re more than welcome Patrick. Glad you enjoyed it.
I really enjoy these tutorials, without them I would probably lose my enthusiasm for editing.
I have one question, where do I find the spot repair tool?
I have ‘fat finger’ syndrome, can you recommend a suitable stylus or tool to use?
How do I delete?
Hi Tony! Do you mean deleting selective adjustment tool? Tap on the adjustments indicator circle and then tap on the delete option.
I want to put text behind the object of a picture but I can’t find the invert icon. Where is it?
I am using Snapseed already, this tutorial certainly show up a lot more features using Snapseed . Thanks Paul
Great to hear you learnt some new features of Snapseed 🙂
How to go one step back in snapseed
?
Tap the curved arrow at the top right of the screen, then tap Undo.
Great article! i’d like to know if it is possible to blur an image wherever i want, using my finger. to give a portrait mode effect. the circle or linear options leave small areas around the subject unblurred
The portrait mode effect is achieved with dual lens. I doubt if you can get that much of an effect using software.
How do I get one photo off Snapseed so I can get another one on. Is there not a delete
What app gives you the option to create a swirl effect with your photo?
What app for the I phone gives you the option for the “swirl” effect on your photo? Thanks!