Long exposure photography is one of the most interesting iPhone photography techniques that allows you to create unique photos where moving subjects are blurred out to create a beautiful dreamy look. While long exposure photography was traditionally limited to SLR cameras, in this article you’re going to find out how to take great long exposure photos with your iPhone.
Get A Tripod
You really need an iPhone tripod to do long exposure photography. Since long exposure photography captures movement in the scene over time, you have to make sure your iPhone remains steady during the capture to make sure you don’t take blurry photos. It’s one of the reasons a tripod features in our top 6 Essential iPhone Camera Accessories.
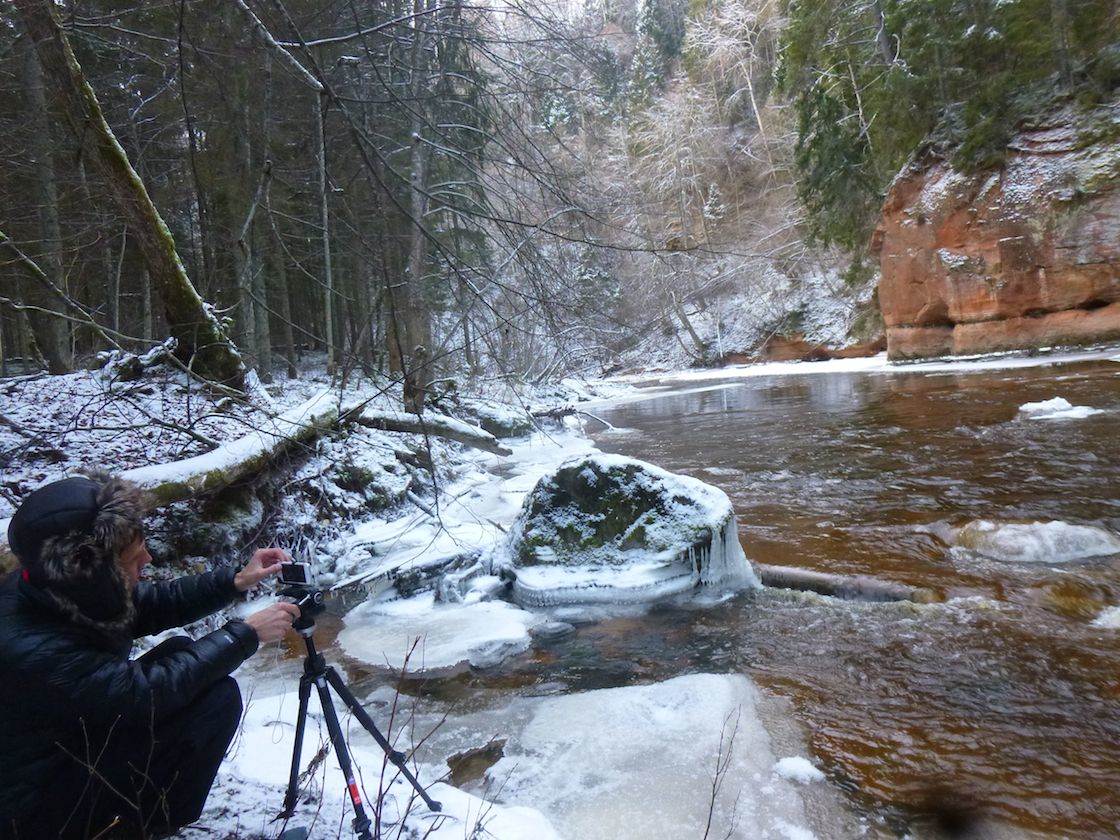
That’s me using the gear listed in this post
While any tripod can be used for long exposure photography, I prefer to use a relatively serious tripod that remains stable on slippery surfaces such as ice and wet rocks.
I use Manfrotto 190XPROB tripod with Manfrotto 804RC2 tripod head, which provide great stability and a lot of control for getting the composition and framing exactly right.
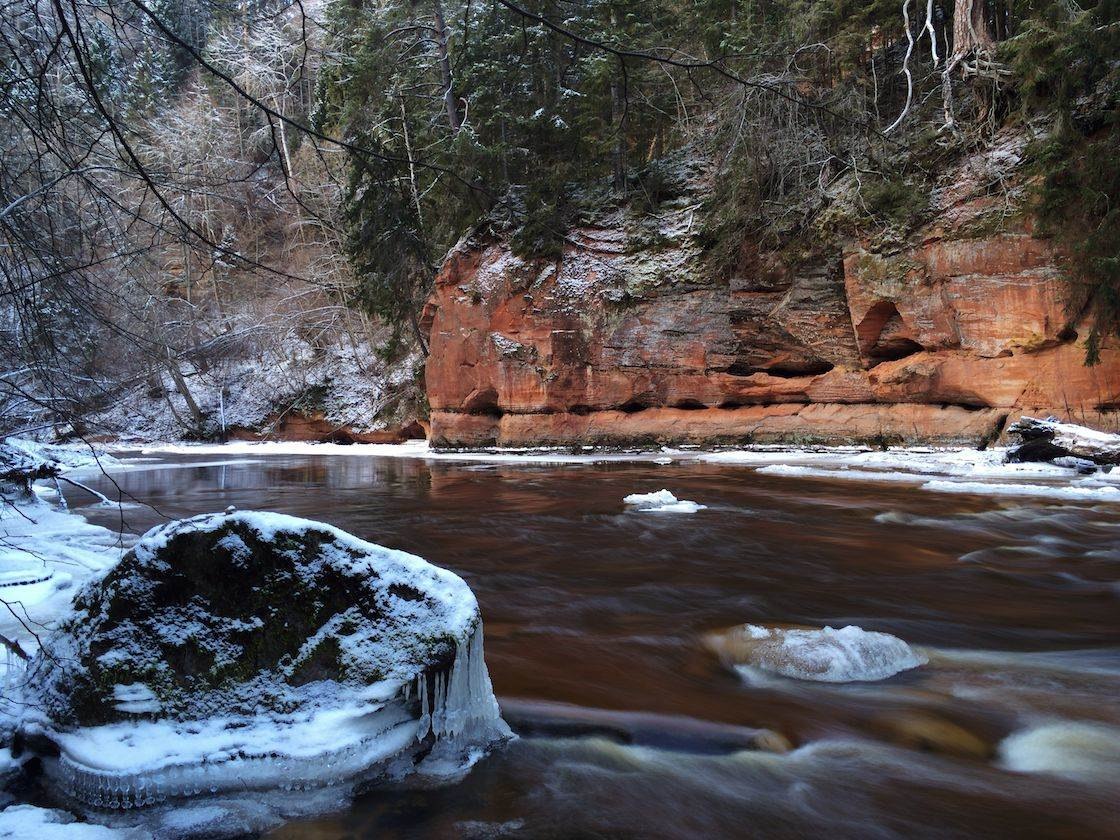
And this is the photo I was taking
You also need to attach your iPhone to the tripod. While there are many different tripod mounts for iPhone, nothing beats Glif in terms of how well the phone is attached. With Glif+ I can carry the tripod around with the iPhone attached and facing down – I don’t think that’s possible with any other tripod mount.
Finally, I recommend using your white Apple earbuds for shutter release. If you plug in the white earbuds that were included with your iPhone, open the Camera app and press the volume up button, you’ll be able to take photos without physically touching your iPhone. This trick is great for further reducing camera shake while using a tripod.
Download The Right App
The iPhone doesn’t support true long exposure photography (the shutter can’t stay open for a long period of time). However, clever app developers have found a way around this problem by digitally combining multiple exposures of the same scene to simulate long exposure photography.
While there are multiple apps that can achieve this effect, the one I use and recommend is called Slow Shutter Cam. When you first open Slow Shutter Cam, make sure you visit app settings to select the highest Picture Quality and turn on the Volume Shutter (or else the earphone trick won’t work).
Select The Best Exposure Settings
Once you’ve framed the shot, you have to select the right exposure settings which can be found under the exposure icon next to the shutter button. Once you tap there, the following dialog will appear.
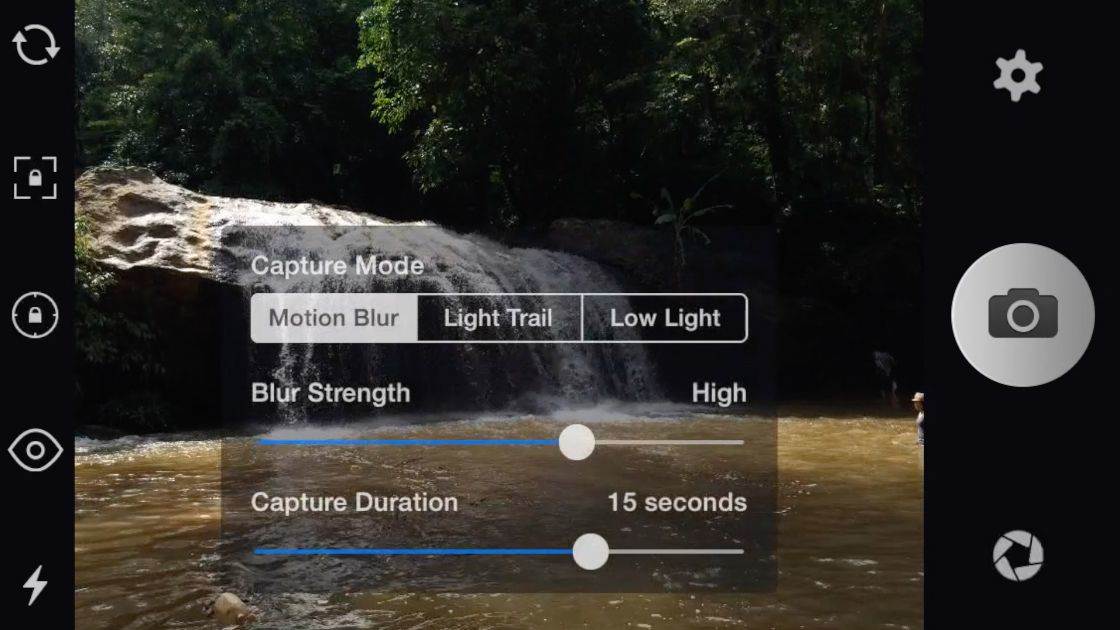
Here you can select Capture Mode, Blur Strength and Capture Duration. For most day-to-day shooting in good light conditions you should select Motion Blur capture mode.
I can’t give you the exact settings to use for the other two parameters since every photo is different. I generally use medium or high blur strength and a capture duration between 4 and 30 seconds. Experiment with different combinations of these settings until you find the ones that work best for each particular photo.
Slow Shutter Cam digitally combines multiple photos to create one long exposure, so you’ll get more natural results with longer shutter speeds since the app has more images to work with. However, if the shutter speed is too long, you risk blurring out your subjects altogether, which is why you should experiment with these settings for each photo.
Photograph Moving Water
Now that you have everything you need, it’s time to find the right conditions for long exposure photography. With varying success you can take long exposure photos of pretty much any moving subjects, but the one situation where it really makes sense to use long exposure is when capturing moving water.
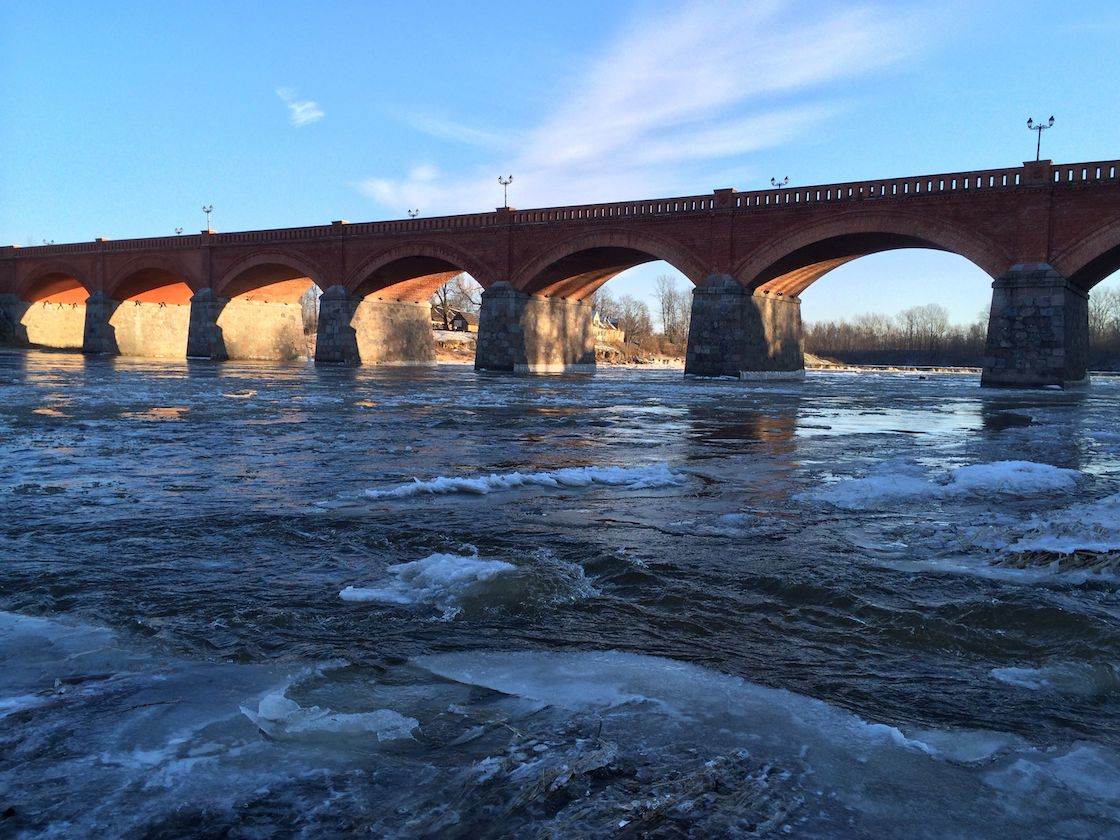
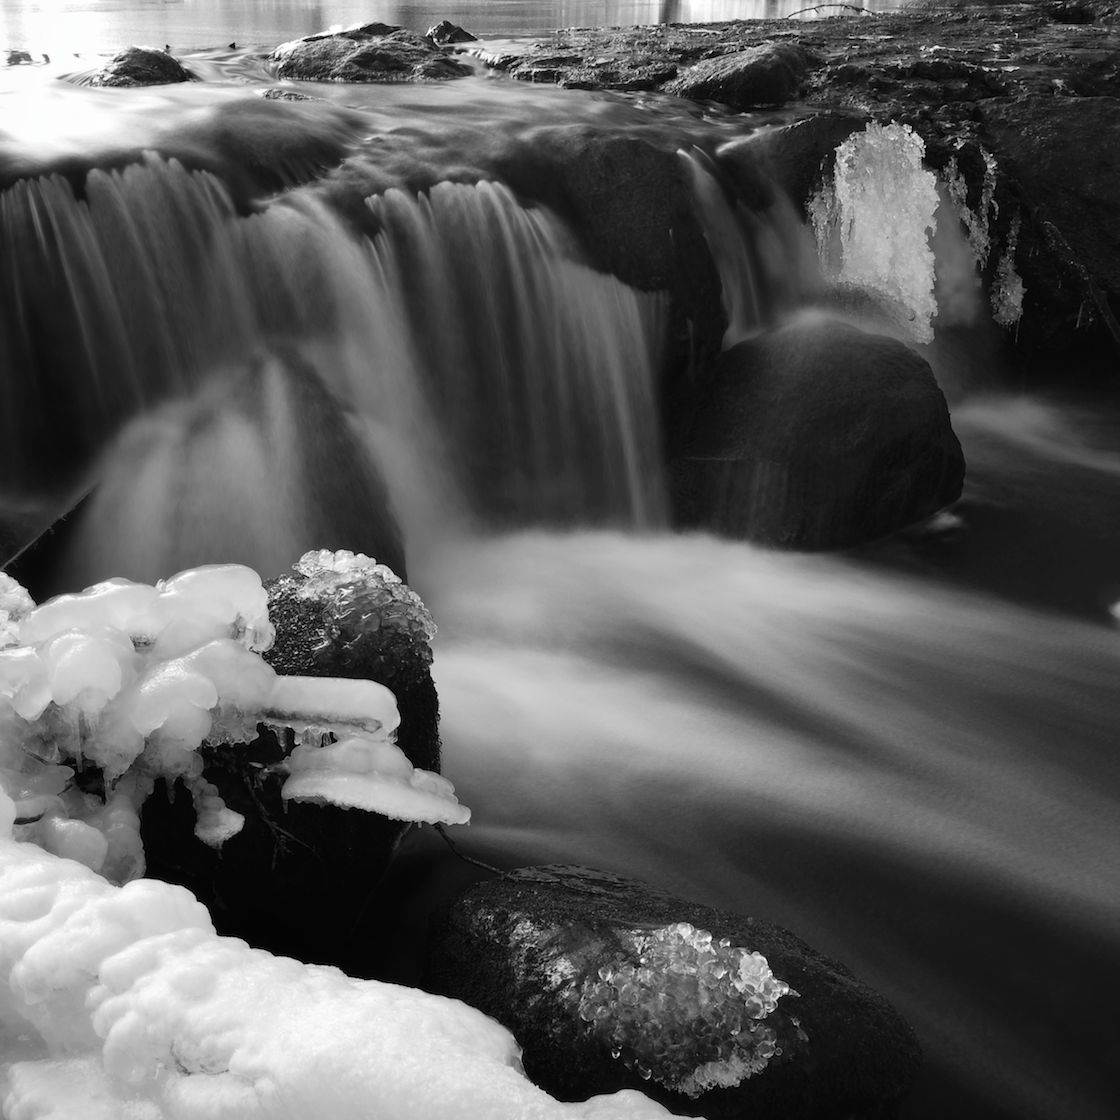
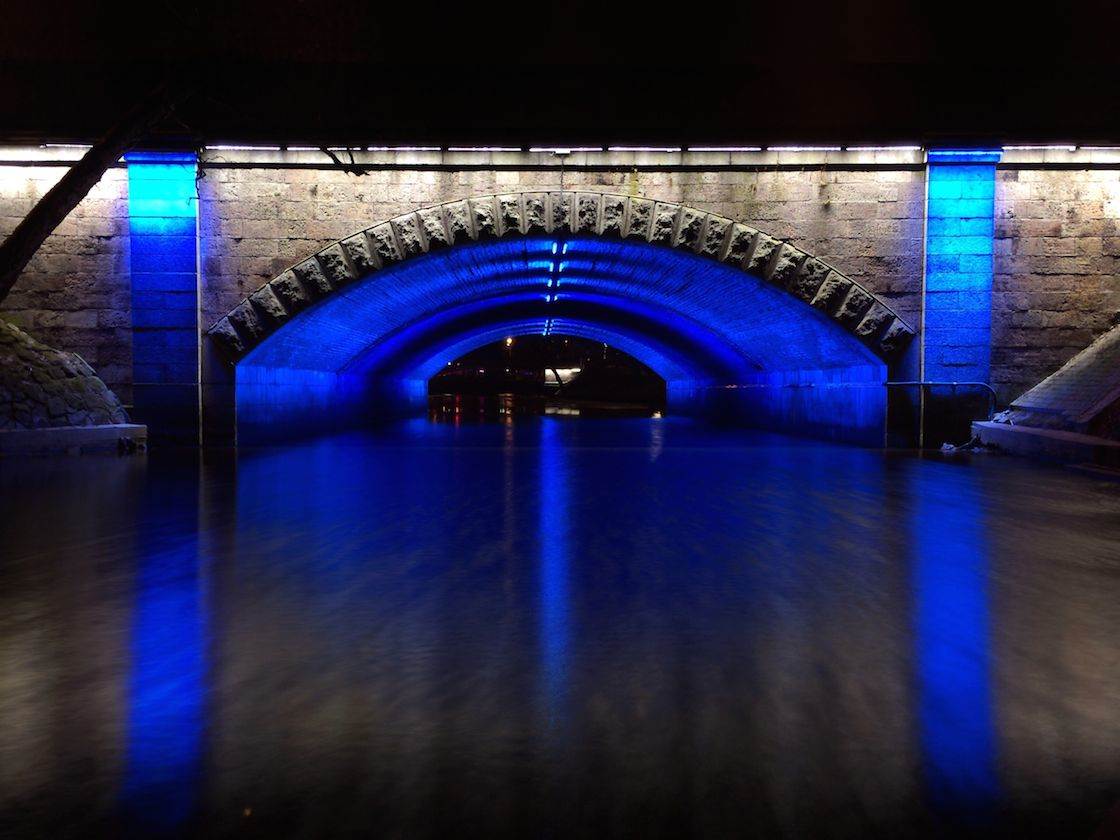
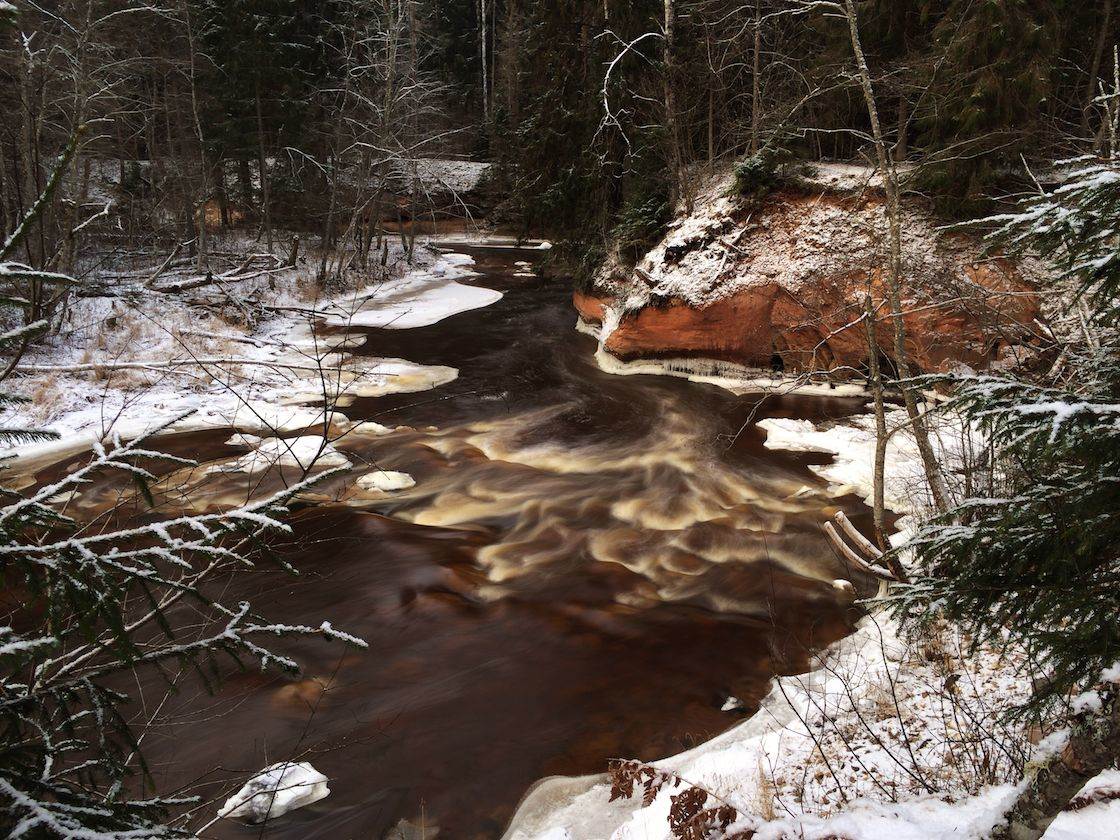
In this example you can see a river scene where the flowing water and ice are frozen in time using the iPhone’s native Camera app.
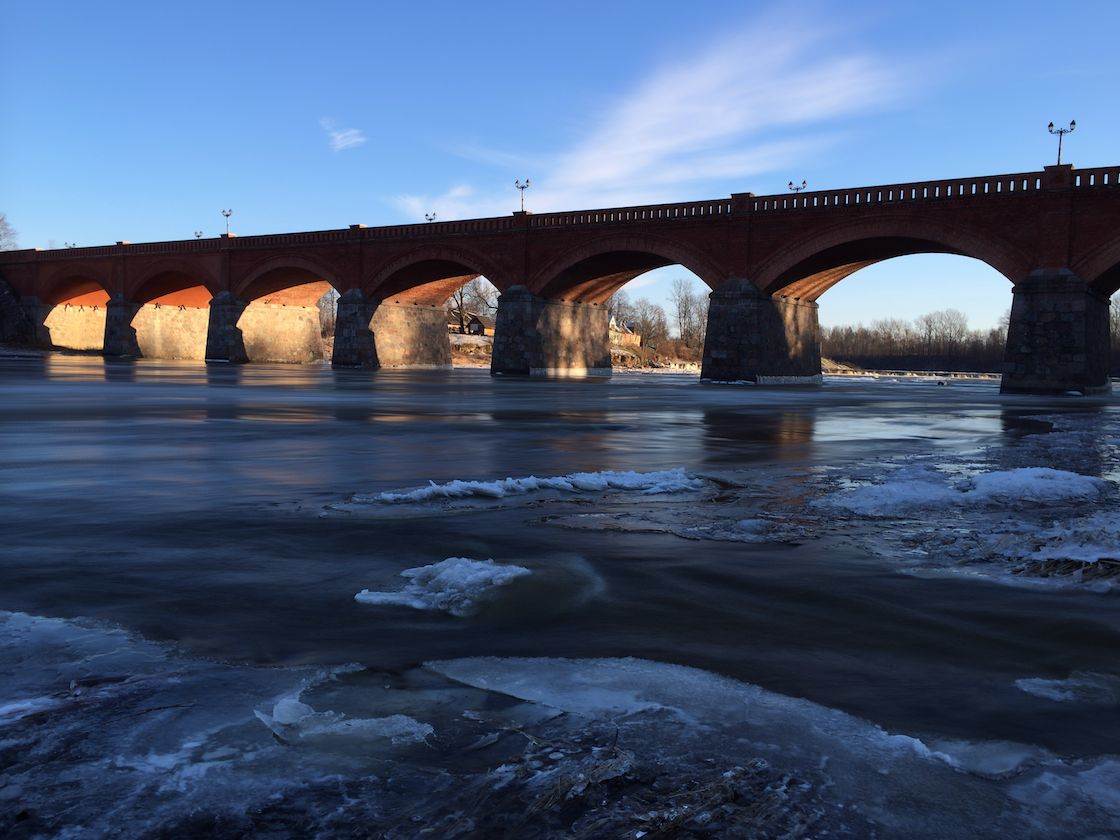
And here is the same scene captured using long exposure. As you can see, using long exposure allowed me to blur out all the moving water and ice to create a beautiful dreamy look in the river, while also emphasizing the speed at which the river is flowing.
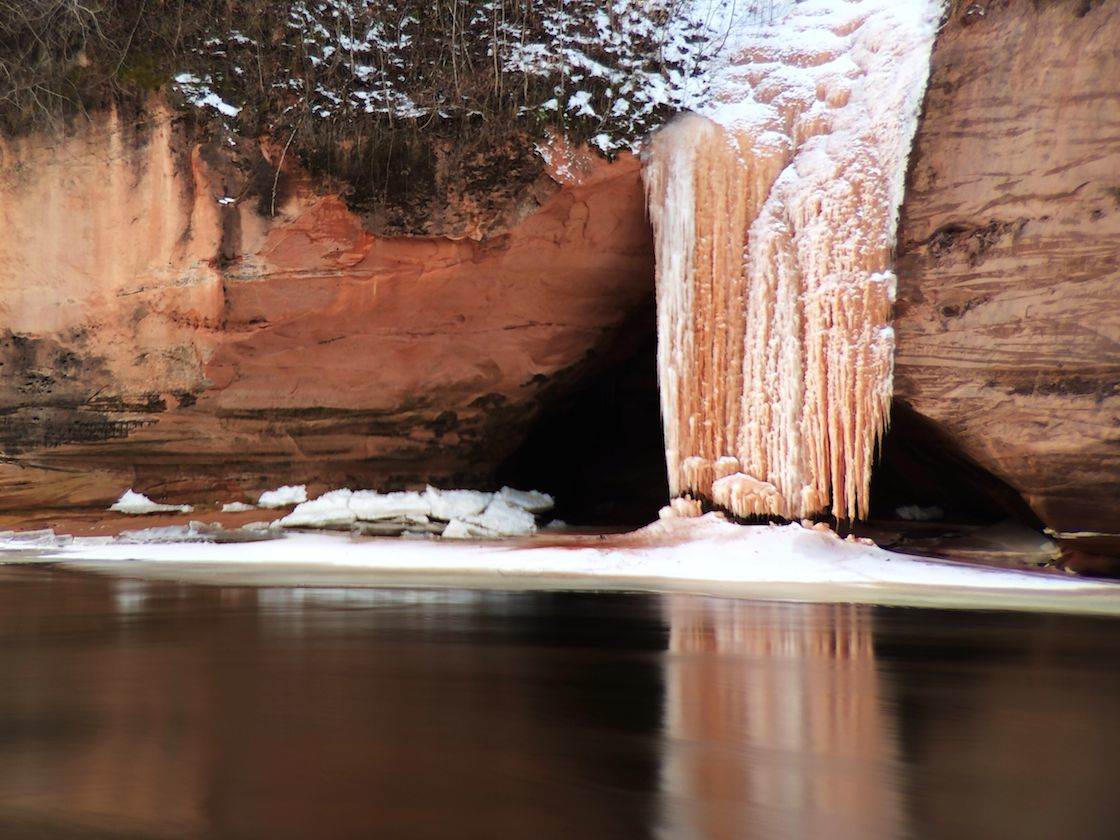
In a similar manner long exposure photography can be used to enhance any landscape photos that contain moving water, including rivers, lakes with waves on the surface, and even the shore of the ocean.
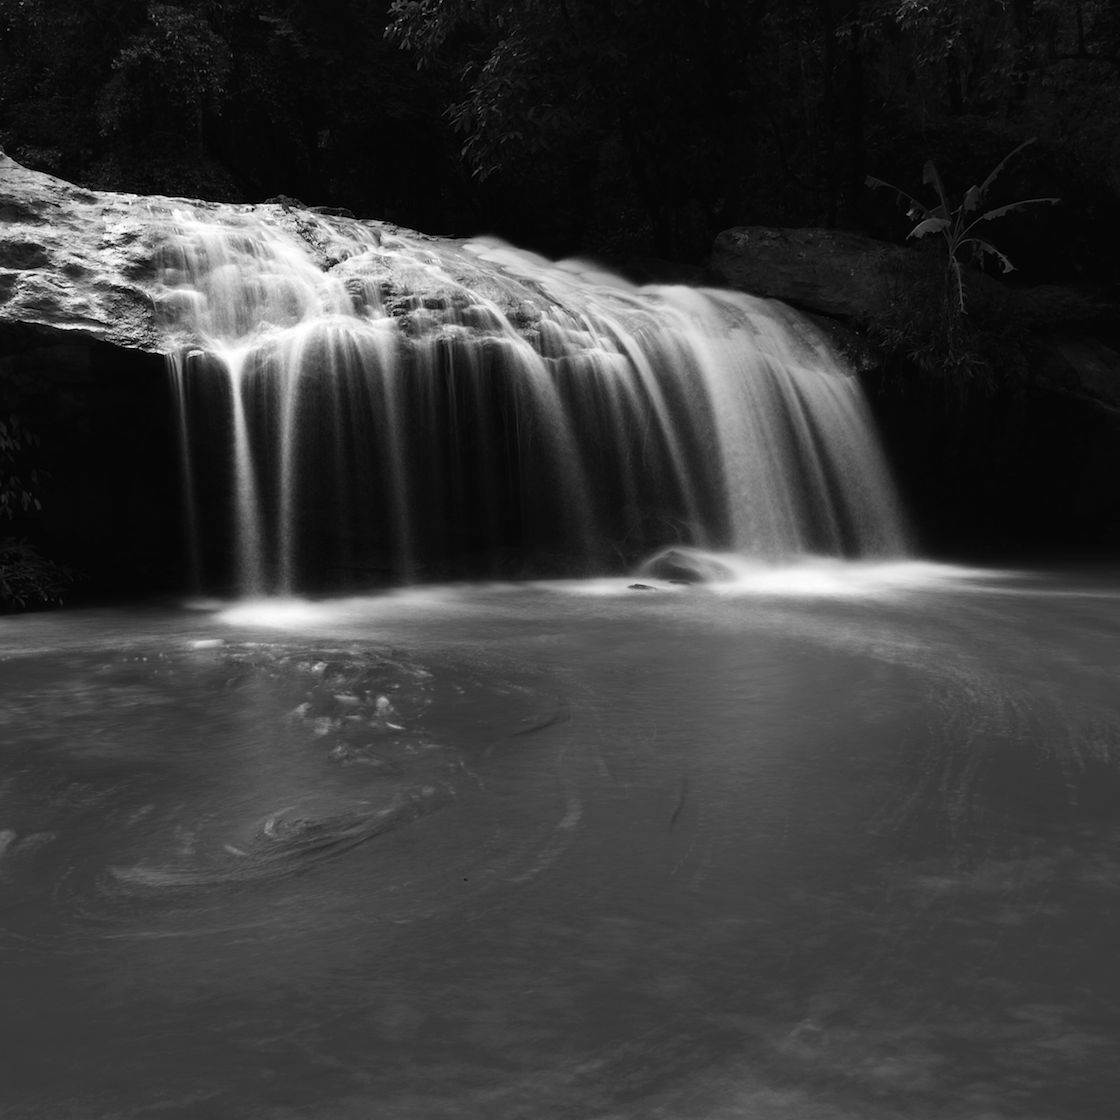
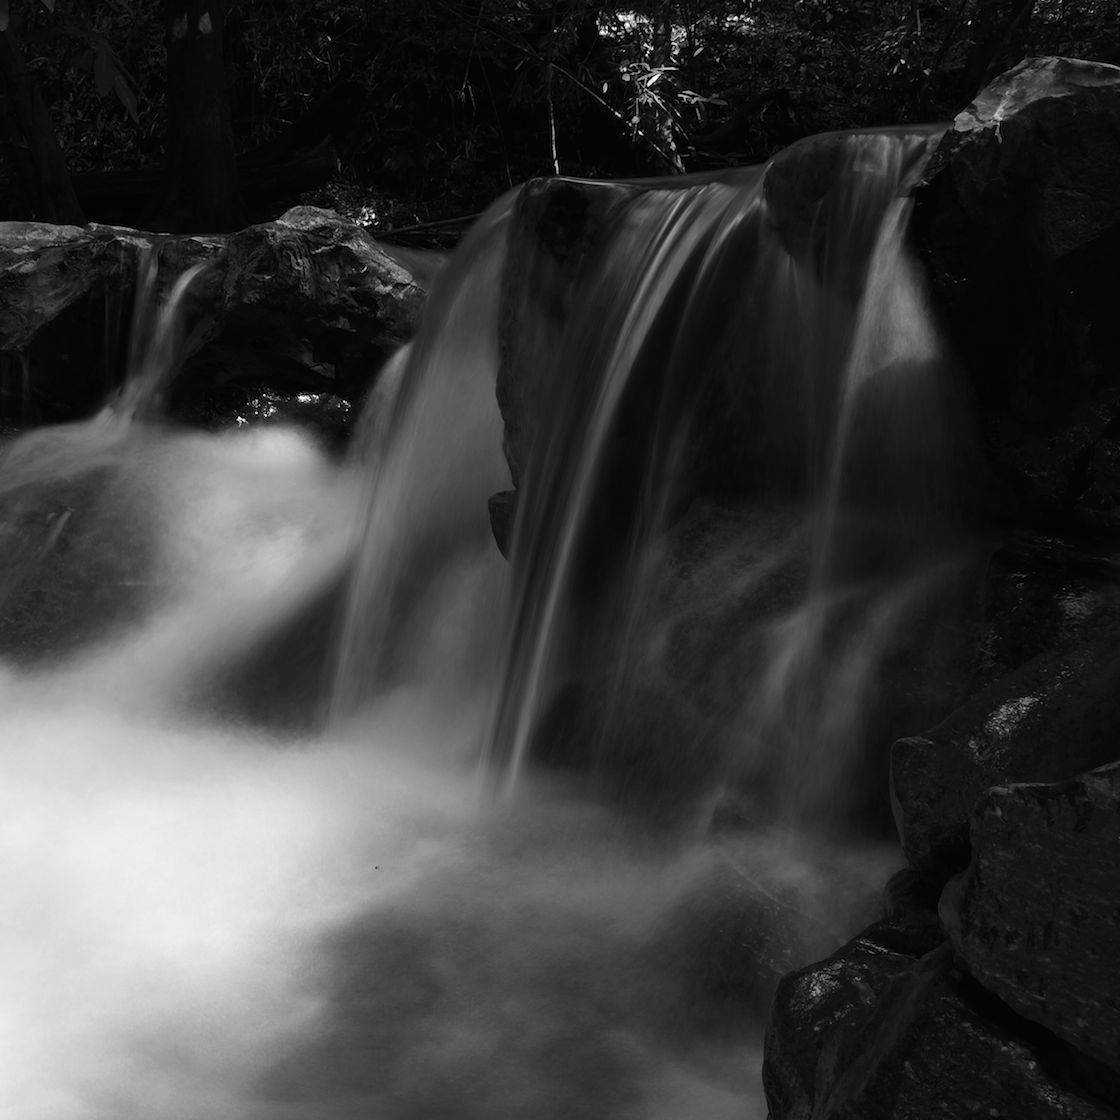
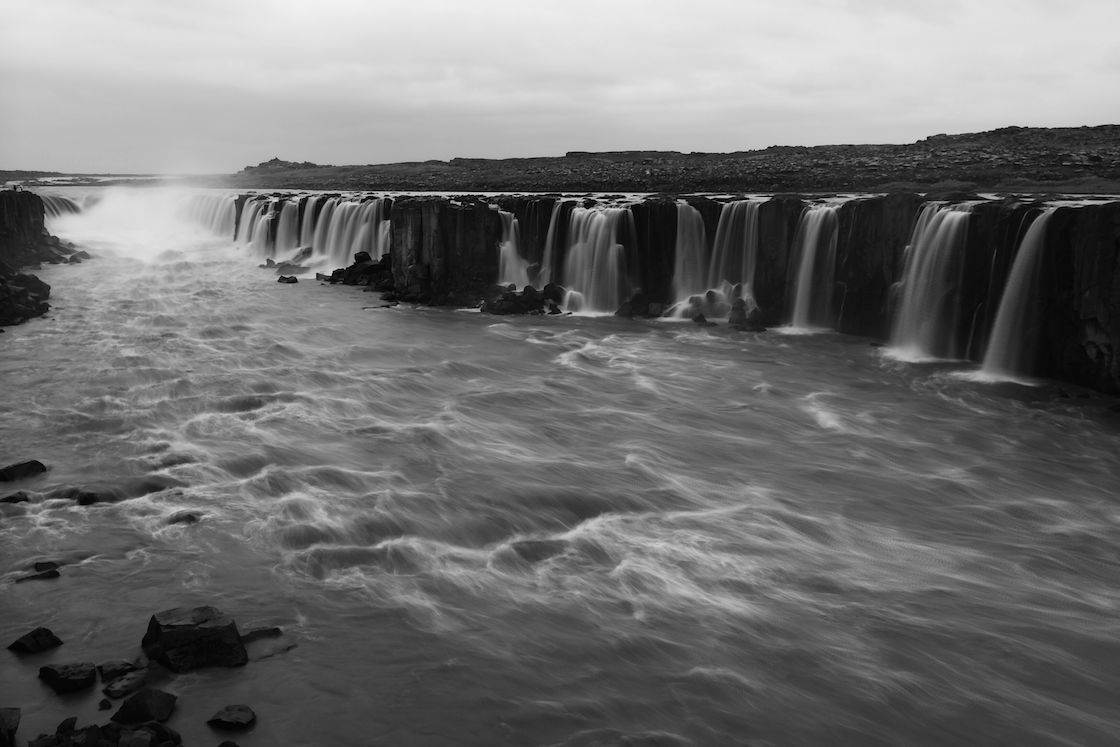
While long exposure photography is great for blurring out any moving water, it really works great when taking photos of waterfalls.
While blurred-out waterfalls can create wonderful photos, you have to be a little careful with exposure, particularly on sunny days when you should always set exposure on the brightest parts of the waterfall to avoid overexposing the white water.
Even if you don’t have any great waterfalls in your area, you can still get interesting results if you’re creative with the angle you take photos from. To give you an example, the following (artificial) waterfall is only about a foot (30cm) high, but thanks to the close-up angle it still results in an interesting and unique photo.
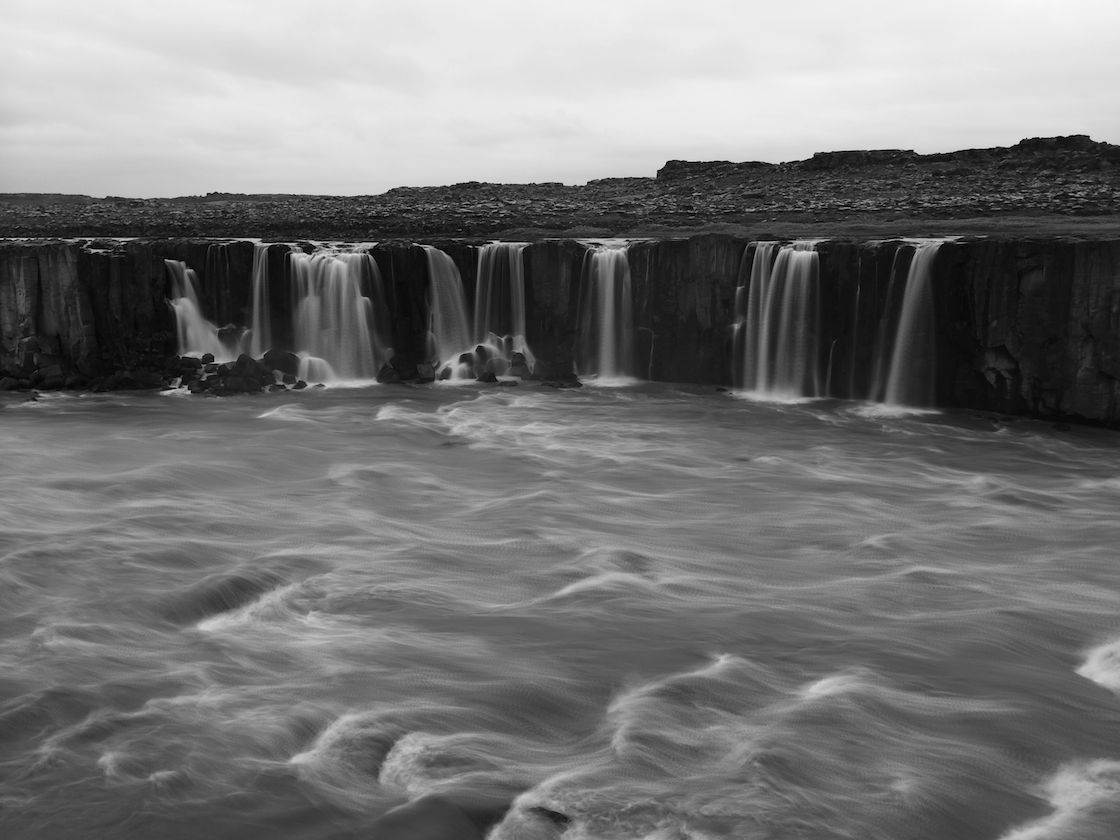
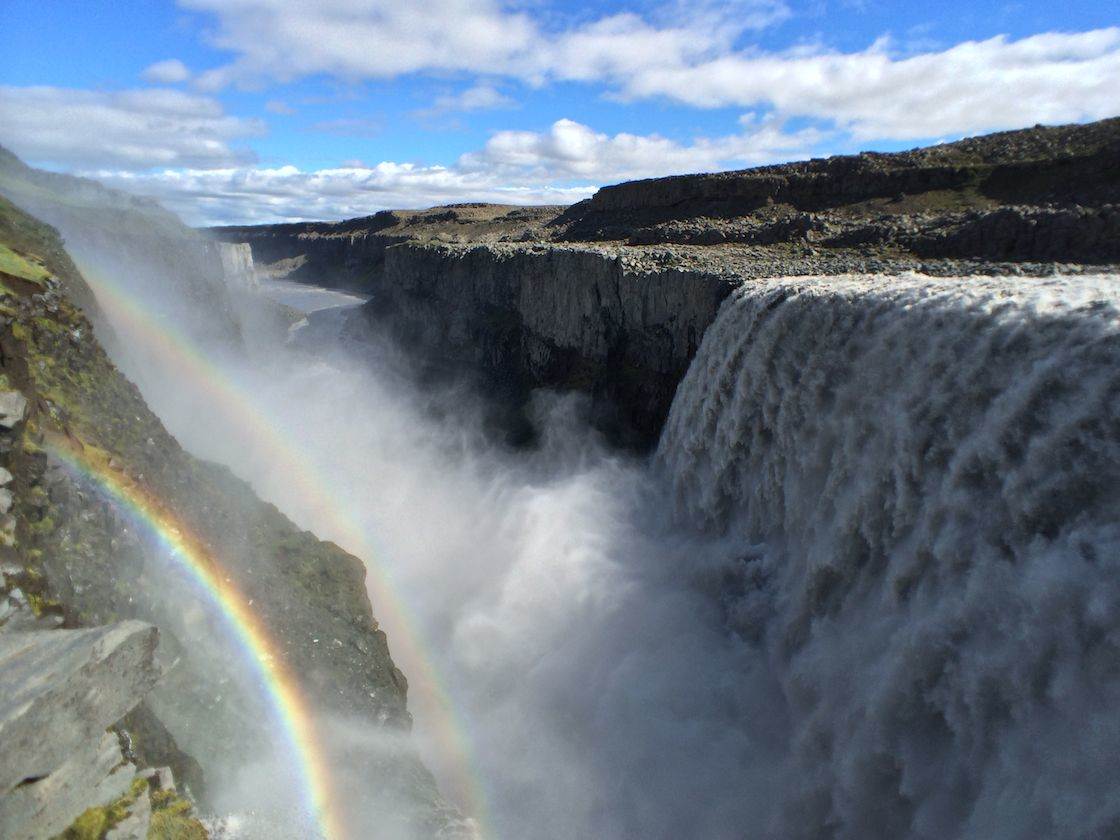
Finally, I don’t recommend using long exposure for huge waterfalls because the large volume of water will be blurred out excessively as seen on the left side of the following image.
So if your goal is to capture the power of a massive waterfall, you’ll get better results without using long exposure as that allows you to freeze the falling water in time.
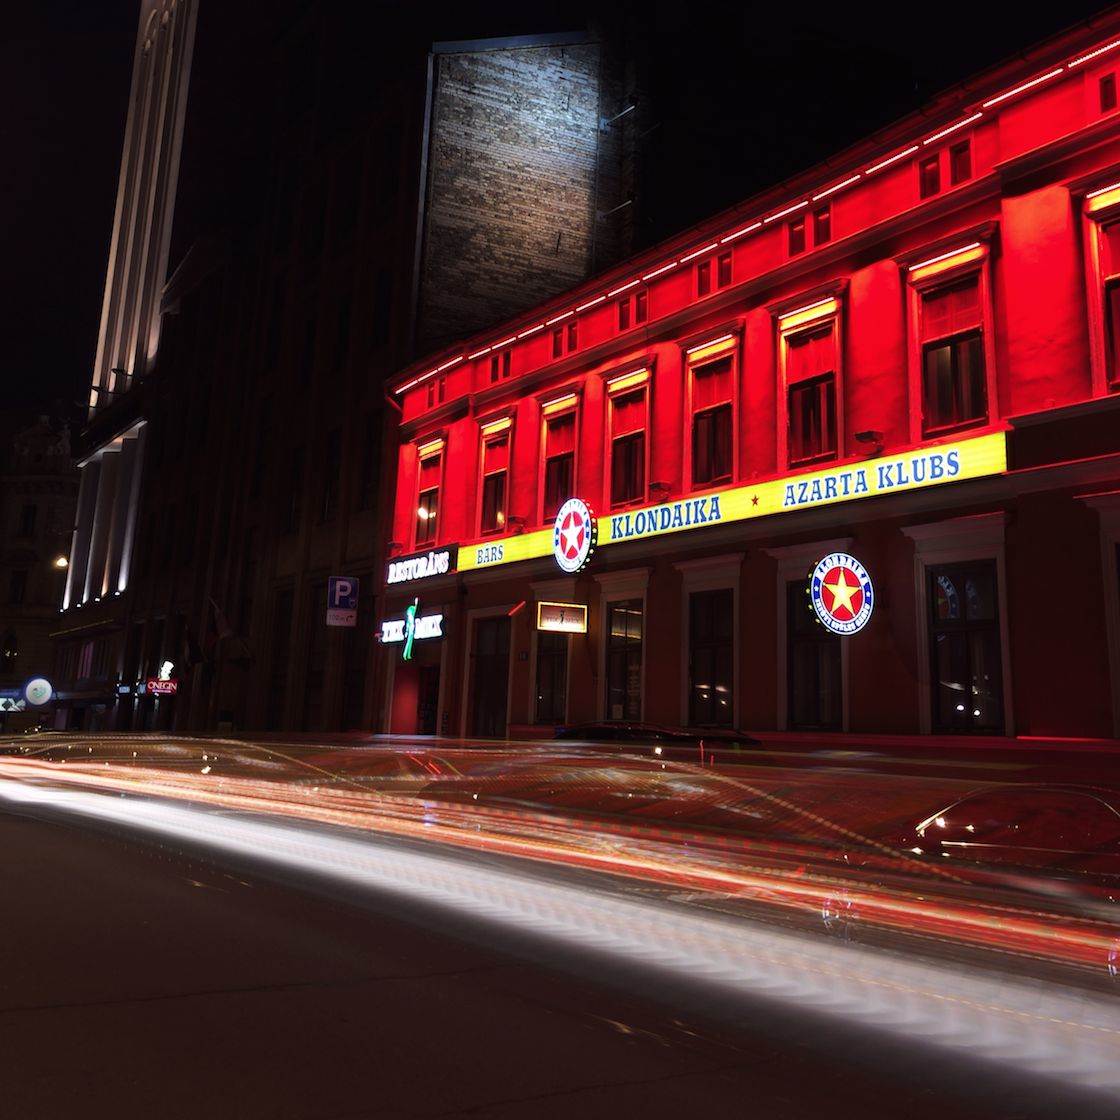
Photograph Light Trails
Besides moving water, light trails are also great for long exposure photography.
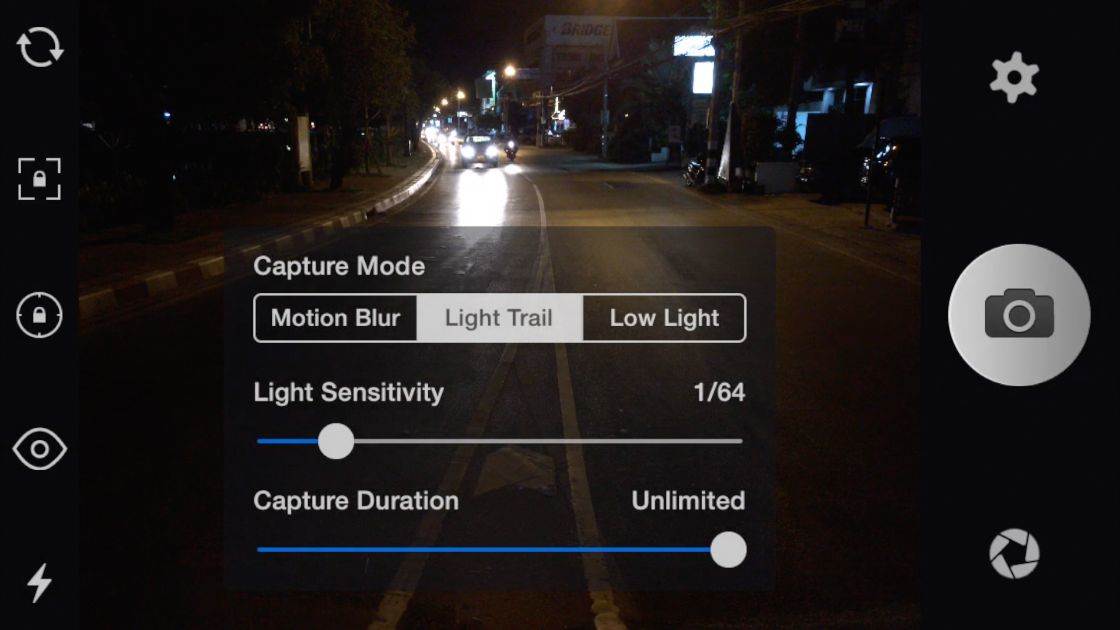
For light trails you need to select Light Trail mode in the exposure settings of Slow Shutter Cam as shown above. You then need to find the correct light sensitivity value based on how bright the lights are relative to the rest of the scene.
Finally, you have to select the right capture duration, or you can select Unlimited capture time as shown above. In that case you need to press the shutter again when you’re happy with the photo that’s developing in front of your eyes.
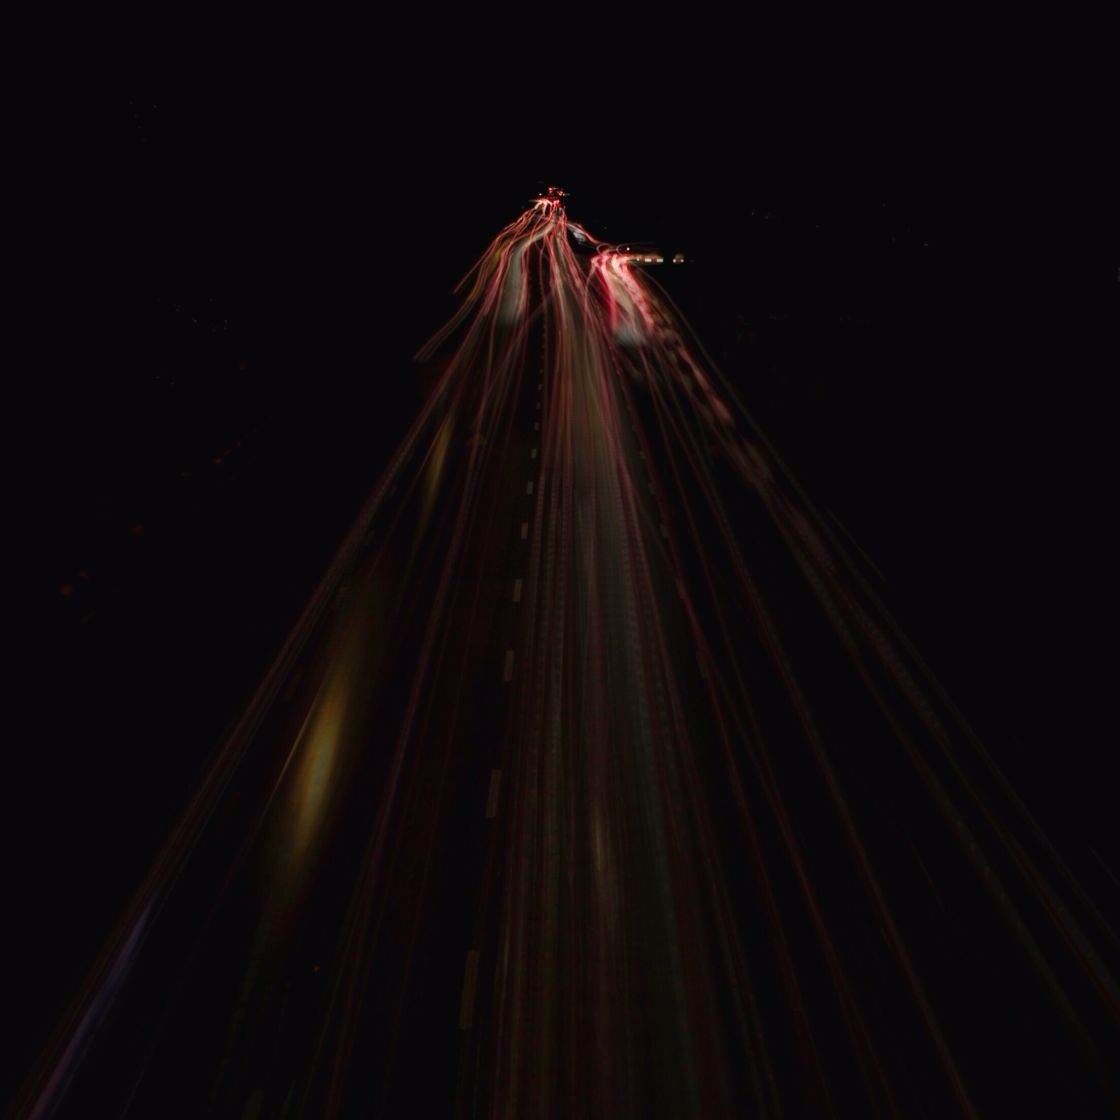
You’ll generally get more interesting light trail photos if you focus on red taillights as opposed to white headlights. If you’re going to use both in the same photo, keep in mind that headlights are significantly brighter than taillights.

Is there any good Free App which can do the same?
It’s One Dollar. That’s One. Dollar.
some people don’t have access to internet-capable payment methods, dick head.
Not all of us have 81 billion dollars
Easy for you to say,you are Bill Gates! You are. Bill. Gates! ?
And that app is now Two Dollar for me. TWO! DOUBLE!
YOU NEVER SPEND MONEY ON AN APP!!!!
FREE ONES ARE THE BEST!!!!!!!!!
If you love ads yeah, they’re top notch.
Amazing
Out of curiosity: f the iphone shutter can’t stay open for long how does video record works?
Hi Franck. Videos are made up of many individual still images, e.g. a video captured at 30fps (frames per second) records 30 still frames every second, which appears as seamless video footage when you play it back.
What does it mean that “it can’t stay open”? Why? What is the limiting factor? Obviously it can stay open for different lengths with the regular camera app, depending on if you use it in dark or bright conditions.
When shooting long exposures the photographer will shoot at low ISO and stopped down (e.g. f/8/, f/11, f/16 etc.)
For long exposure shots you are typically using a neutral density filter while adjusting a combination of shutter speed and aperture to get the desired effect.
The aperture on smartphones like the iPhone can NOT be changed. Smartphone lenses ARE NOT just super tiny version of DSLR lenses. On the iPhone you are always shooting with a f/2.2 lens.
This fixed wide open aperture limits the adjustment of the photography triad — ISO, aperture, shutter speed — to just two (ISO and shutter speed). Since we want to shoot at low ISO, the smartphone’s shortest shutter speed to avoid overexposure is way too fast to do long exposures.
Since you don’t have a neutral density filter for a smartphone to reduce light entering the sensor using long shutter speeds would mean over exposing the scene.
One can’t reasonably expect to do long exposure photography with a ƒ/2.2 aperture lens at 100 ISO.
you are a fucking parrot. Why don’t you answer the question? It’s because you don’t have a clue.
I don’t understand why the shutter can’t stay open for extended periods of time on the iPhone? What’s the difference between this camera and any other digital camera in regards to the shutter? Can’t these app developers or even Apple write in some software that would allow the shutter to actually remain open for the type of time lapse photography I’m trying to do?
One can’t reasonably expect to do long exposure photography with a ƒ/2.2 aperture lens at 100 ISO.
When shooting long exposures the photographer will shoot at low ISO and stopped down (e.g. f/8/, f/11, f/16 etc.)
For long exposure shots you are typically using a neutral density filter while adjusting a combination of shutter speed and aperture to get the desired effect.
The aperture on smartphones like the iPhone can NOT be changed. Smartphone lenses ARE NOT just super tiny version of DSLR lenses. On the iPhone you are always shooting with a f/2.2 lens.
This fixed wide open aperture limits the adjustment of the photography triad — ISO, aperture, shutter speed — to just two (ISO and shutter speed). Since we want to shoot at low ISO, the smartphone’s shortest shutter speed to avoid overexposure is way too fast to do long exposures.
Since you don’t have a neutral density filter for a smartphone to reduce light entering the sensor using long shutter speeds would mean over exposing the scene.
One can’t reasonably expect to do long exposure photography with a ƒ/2.2 aperture lens at 100 ISO.
When shooting long exposures the photographer will shoot at low ISO and stopped down (e.g. f/8/, f/11, f/16 etc.)
For long exposure shots on a DSLR you are typically using a neutral density filter while adjusting a combination of shutter speed and aperture to get the desired effect.
The goal is to slow down the shutter speed to increase the amount of time that the sensor is exposed to light.
The aperture on smartphones like the iPhone can NOT be changed. Smartphone lenses ARE NOT just super tiny version of DSLR lenses. On the iPhone you are always shooting with a ƒ/2.2 lens.
This fixed wide open aperture limits the adjustment of the photography triad — ISO, aperture, shutter speed — to just two (ISO and shutter speed). Since we want to shoot at low ISO, the smartphone’s shortest shutter speed to avoid overexposure is way too fast to do long exposures.
Since you don’t have a neutral density filter for a smartphone to reduce light entering the sensor using long shutter speeds would mean over exposing the scene.
for the tripod mounts, there are many of them which are good. I am using shoulderpod S1 (great quality), or RetiCAM Smartphone Tripod Mount, SideKick360 are good as well.
Hi, munchkin: I compared all three you mentioned and decided to get Shoulderpod. Thanks for the recommendation. By the way, I use and recommend high quality iPhone lenses by Moment Lens (momentlens.co) tele and wide, macro is available this month.
Are there any apps that can work for low light photography where you can keep a low ISO and maybe even lock in a higher aperture? Or does the minimum shutter speed prevent long exposures that allow more total light to be gathered?
The aperture on smartphone can NOT be changed.
How do you address wind messing up the part you don’t want blurred, such as the leaves on trees around a waterfall?
Unfortunately there’s nothing you can do about this problem – anything that moves will appear blurred. So a still day is better than a windy day for long exposure photography 🙂
I was considering taking a regular shot of the scene and then a long exposure shot. Then I could take the waterfall, for example, and past it into the first shot or visa versa. I see great waterfall shots and the surrounding items look still. There must be a trick other than waiting for a time with no wind, no birds, and no insects flying around.
That did cross my mind after posting my reply – you could definitely try it 🙂
A lot of tripods have hooks or a way to add weights to the bottom of the center column. Even if not you can bring weightlifting weights that have the convenient hole in them and attach them. Sand bags would be another way. The heavier the mount the more stable in general. That and using the environment around you to find natural wind blocks (move your car for example if that’s an option), use a tree, rock, etc as natural block).
Try “Smooth Photo” mode on Real Camera
In order for the aforementioned objects in the night sky the shutter must be opened for an extended time that the faint light from nebulae or galaxies to be captured. So I take it due to the nature of the app using many still shots put together that you cannot take true time exposures that would capture nebula or galaxies in the night sky???? I don’t have a digital camera to take these kind of shots as it was recently stolen. Just wondering if anyone has had any success with this sort of thing with this app???
Hi! I was just wondering if this app (Slow Shutter Cam) would be good for taking photos of Northern Lights?
Yes I would think it would be good for that situation. There’s also an app called Northern Lights Photo Taker that you might want to check out: https://itunes.apple.com/us/app/northern-lights-photo-taker/id979540312?mt=8
Hi, it doesn’t mention anything in the info on the App Store, but you could contact them using the following link to find out for sure: http://www.cogitap.com/slowshutter/support.htm
it’s 99 cents. Buy it and see.
I just can’t work out how you avoid over exposure? As soon as I point my iphone at the scene which is river under bridge after the sun has set, the auto iso seems to kick in and just over lights it? I even put my sunglasses over the lens as a ND filter but still the ios cranked up and I ended up with a screen full of noise.Some of yours are in the day time so damned if I know your trick. I got the slow shutter cam. Help
Trish- that’s me too. I’ve tried some other apps but I know I had suboptimal subjects. I guess trying with different shutter speeds and the other settings may get us there since it’s possible I’m overlooking some step along the way
The link to the tripod mentioned in the article shows it has been discontinued. Is there another recommended tripod and head? Also, does the Glif work with a ‘quick release’ camera mount? I know you can take the iphone out, but with the iphone in the Glif, is there a quick on and off to any tripods?
Hi Beth. Here’s a similar tripod: http://www.amazon.com/gp/product/B00OTW532U/ref=as_li_tl?ie=UTF8&camp=1789&creative=390957&creativeASIN=B00OTW532U&linkCode=as2&tag=i054e-20&linkId=6HE355URNLYOZMR7
I believe the Glif has to be screw-mounted to the tripod mount, so it’s not a quick release from the tripod.
Thanks for suggestion, Jonathan. 🙂
Indeed, very heavy tripods can be a problem.
Do you think you can take the aurora borealis with this?
I will be trying to photograph the Northern Lights in a few weeks. Are there any recommendations on which settings to use for this app?
$1.99-sold! Thanks so much for the review! I will now seek opportunities to try it out . . . always up for something new ; )
I’m sure you’ll get some great long exposure shots with this app! 🙂
I have the iphone 7 plus and cant get the screen shown under “Select The Best Exposure Setting” screen to show up. I want to get to the capture mode screen. Any suggestions?
Free apps come with Advertisements. I like those. I’m looking forwards to having abbs like a god and rebuilding the world in the shape of a farm.
Fun Fact, if you have an Apple Watch then you can also take pictures in the Slow Shutter Cam app using that for stability if you want an alternative to the earpods trick.
Thank you
iPhone is always good for photography.
can someone tell me what app has a 32 seconds shutter speed? pls