Afterlight 2 is a full-featured photo editing app with plenty of creative options. With the Afterlight app, you can enhance your photos with adjustment tools and filters. You can create unique edits with textures, light leaks and double-exposure tools. You can even add text, artwork and frames to your images. Read on to discover how to use the Afterlight photo editor to create stunning iPhone photos.
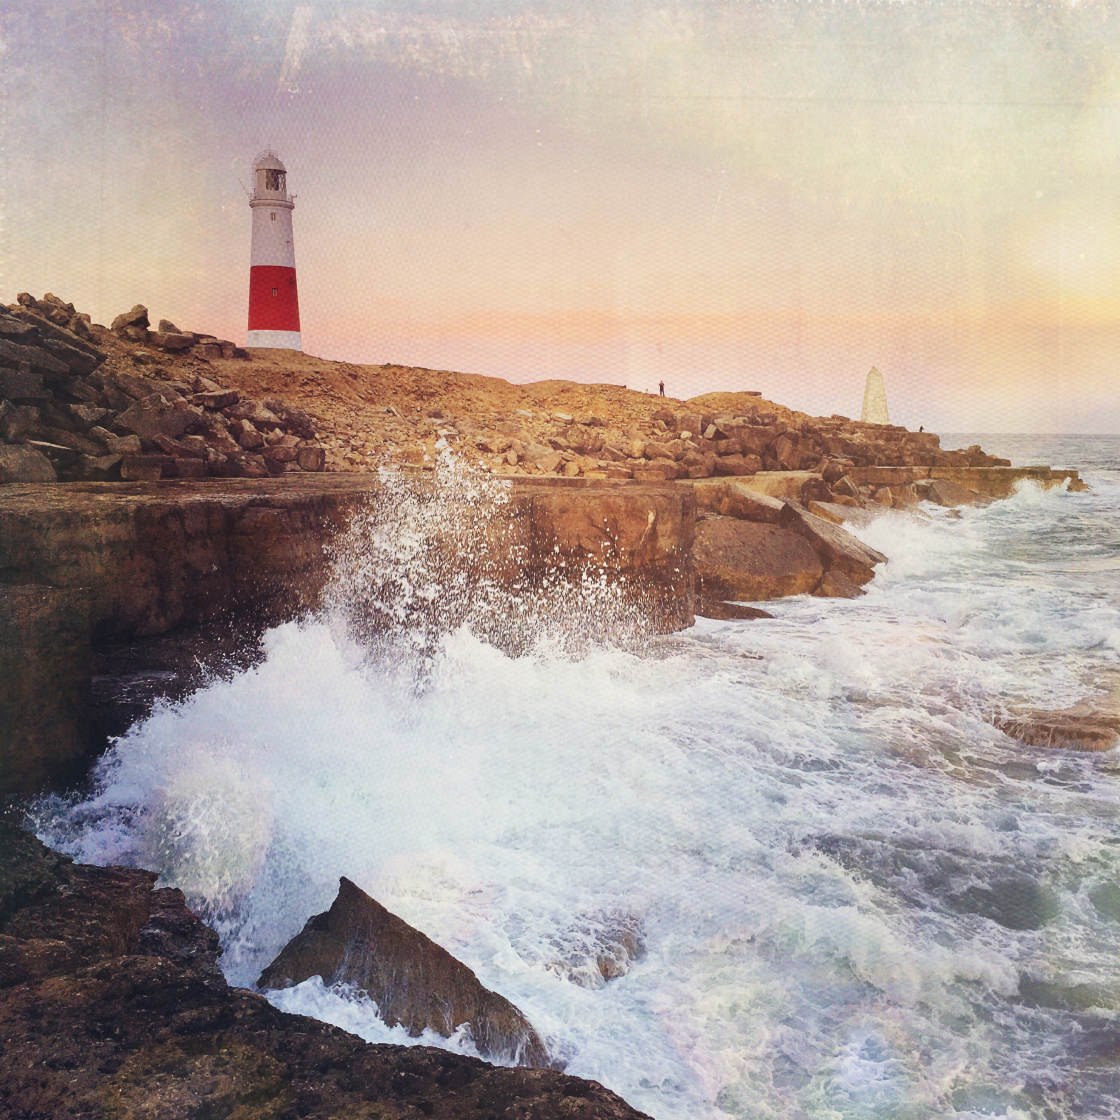
Table Of Contents: Afterlight App Photo Editing
Click any title link below to go straight to that section of the article:
1. Open A Photo To Edit
1.1 Open An Image
1.2 Take A Photo With The Afterlight Camera
3. Crop & Transform
3.1 Crop Tool
3.2 Rotate Tool
3.3 Flip Tools
3.4 Straighten Tool
3.5 Skew Tools
4. Adjustment Tools
4.1 Adjustment Tool Icons
4.2 Selective Adjustment Tools
4.3 Color Overlay Tool
4.4 Gradient Tool
4.5 Curves Tool
5. Afterlight Filters
5.1 Apply A Filter
5.2 Customize A Filter
5.3 Download Extra Filters
5.4 Create A Custom “Fusion” Filter
5.5 Choose A Filter To Enhance Mood
6. Creative Effects
6.1 Dusty Textures
6.2 Light Effects
6.3 Color Shift
6.4 Chroma
6.5 Double Exposure
7. Text & Artwork
7.1 Add Text
7.2 Add Artwork
You can download Afterlight 2 for $2.99 from the App Store. This price includes every tool the app has to offer. There are no in-app purchases or hidden subscription fees.
1. Open A Photo To Edit
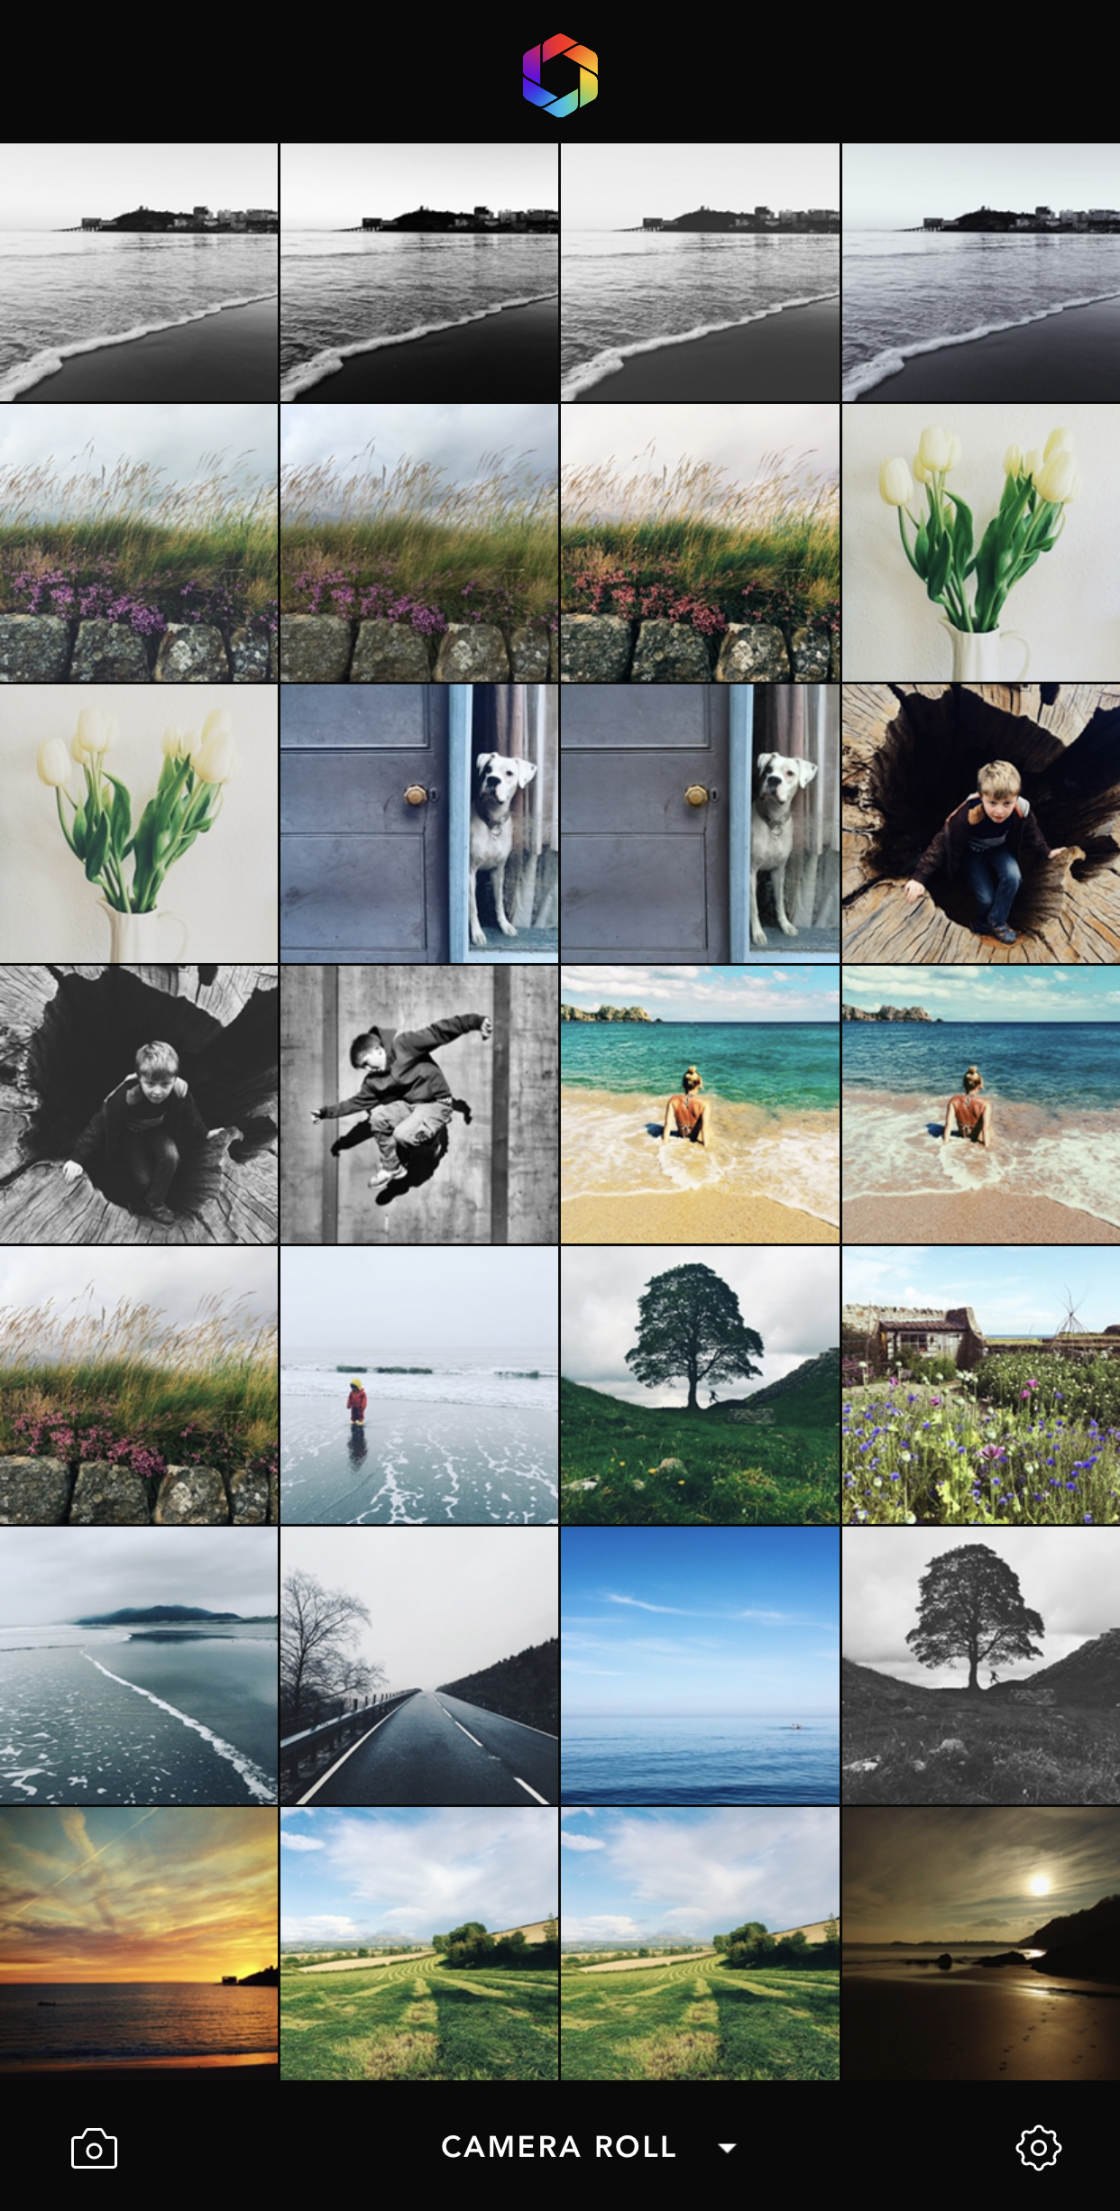
When you open the Afterlight 2 app, you’ll see the following screen. By default, Afterlight opens your Camera Roll so that you can select a photo for editing.
1.1. Open An Image
If you’d like to open a photo from a different album on your iPhone, tap Camera Roll at the bottom of the screen. You can then select the album you want to open.
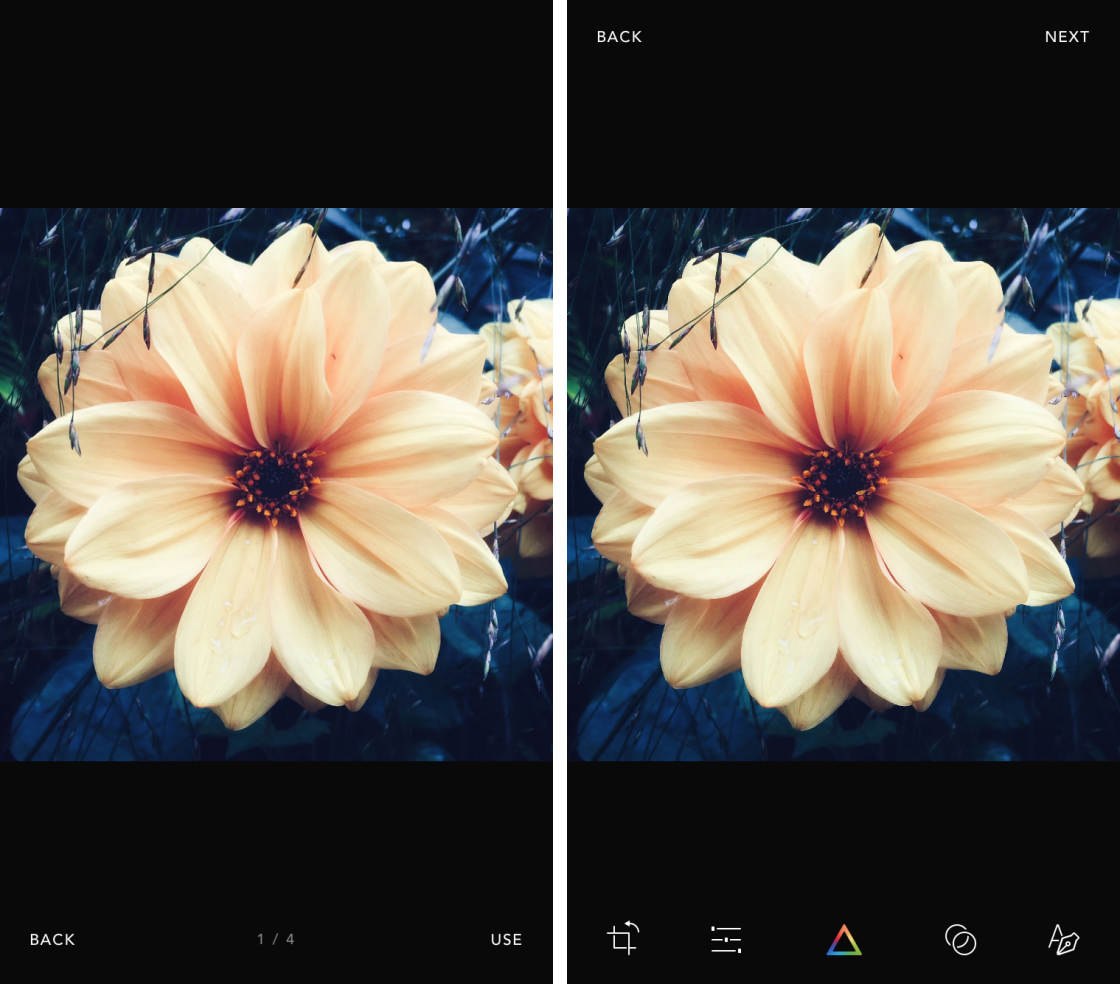
When you’ve found the photo you want to edit, tap on it, then tap Use. Your image will open up in the Afterlight photo editor. If you want to go back to the app’s home screen to open a different image, tap Back.
1.2 Take A Photo With The Afterlight Camera
Afterlight 2 also has a built-in camera app. If you want to take a picture, tap the Camera icon at the bottom left of the app’s home screen.
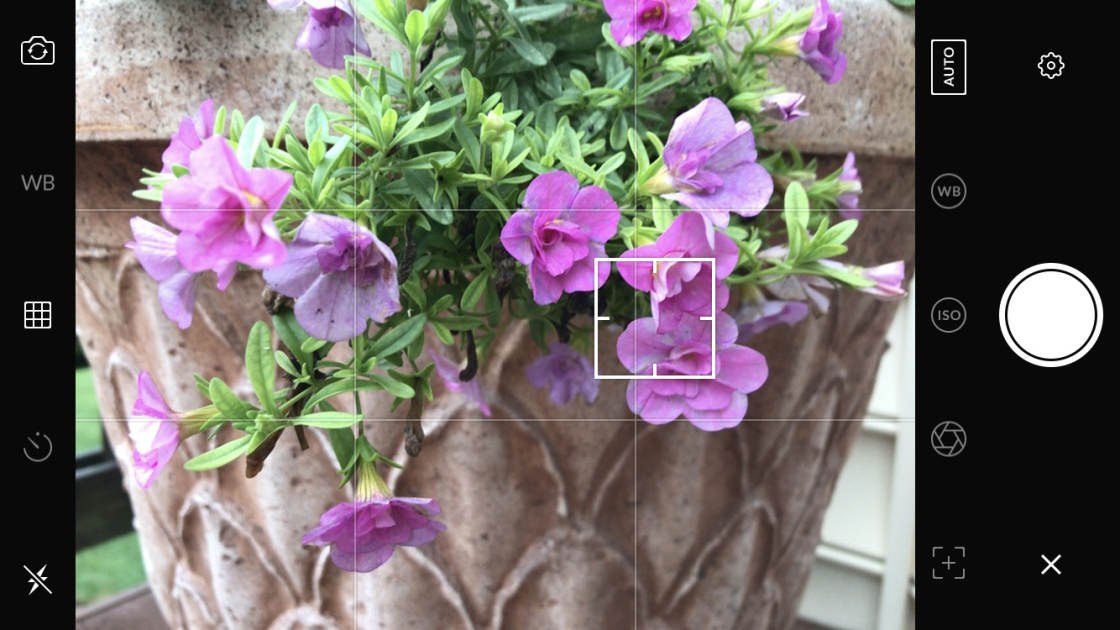
The camera has manual settings like white balance, ISO and shutter speed. It also has a self-timer, and a grid for getting your horizons straight.
Once you’ve opened or taken a photo, you can start using the Afterlight photo editing tools. Keep reading to learn how to use the Afterlight app to perform basic, advanced and creative edits.
2. Afterlight Editing Tools
The Afterlight photo editor has five icons at the bottom of the screen. These give you access to a range of basic and advanced editing tools.
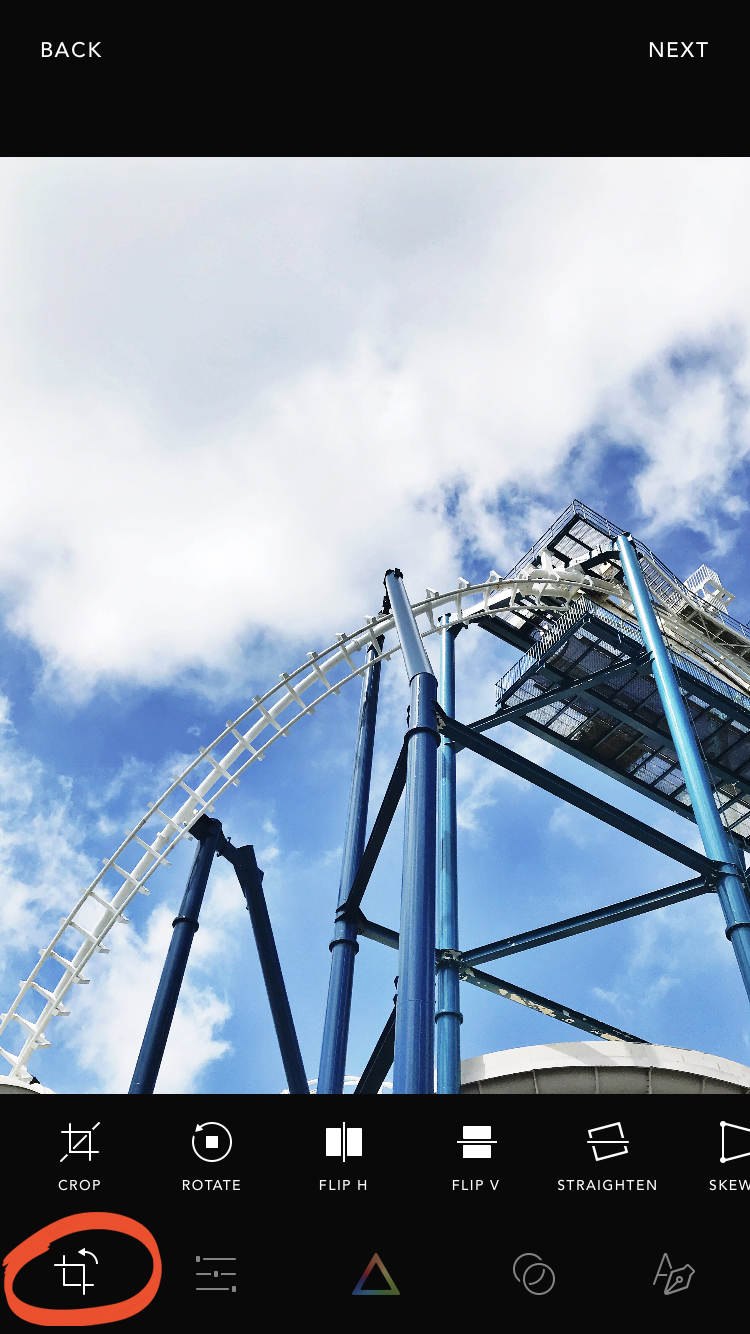
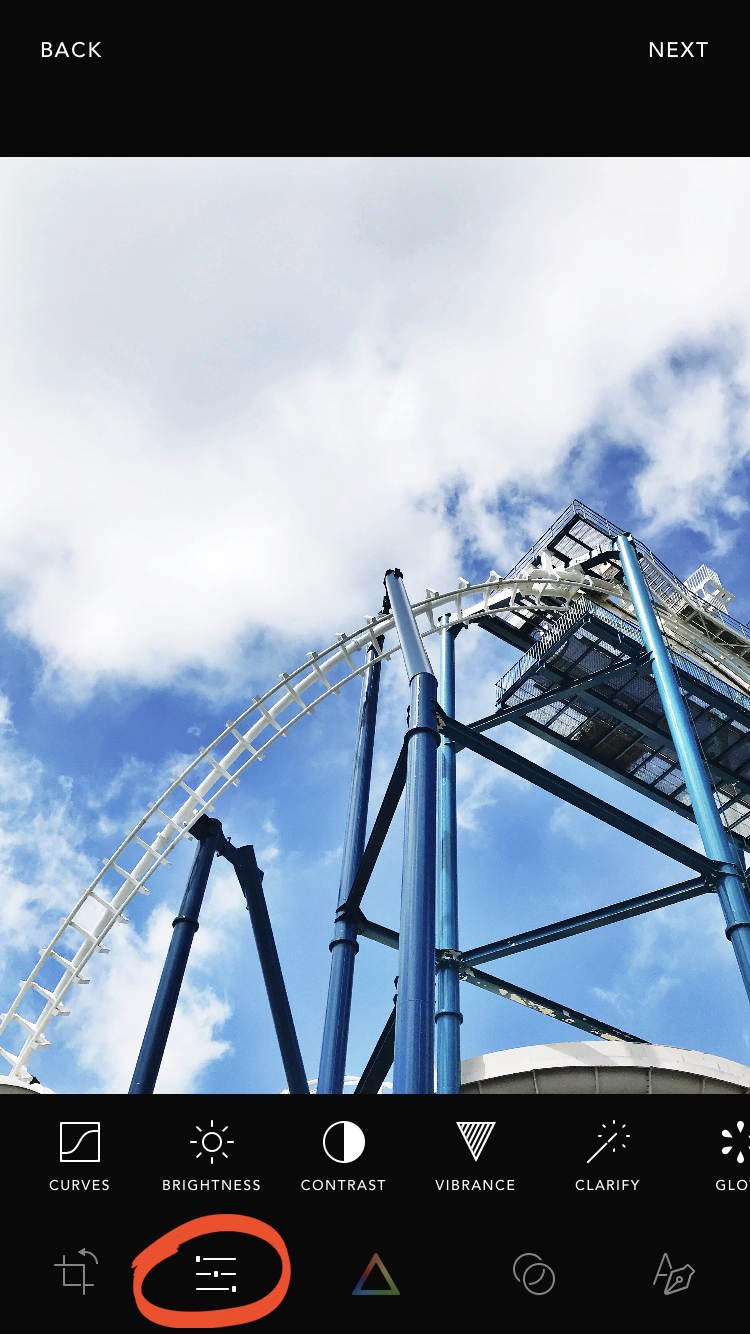
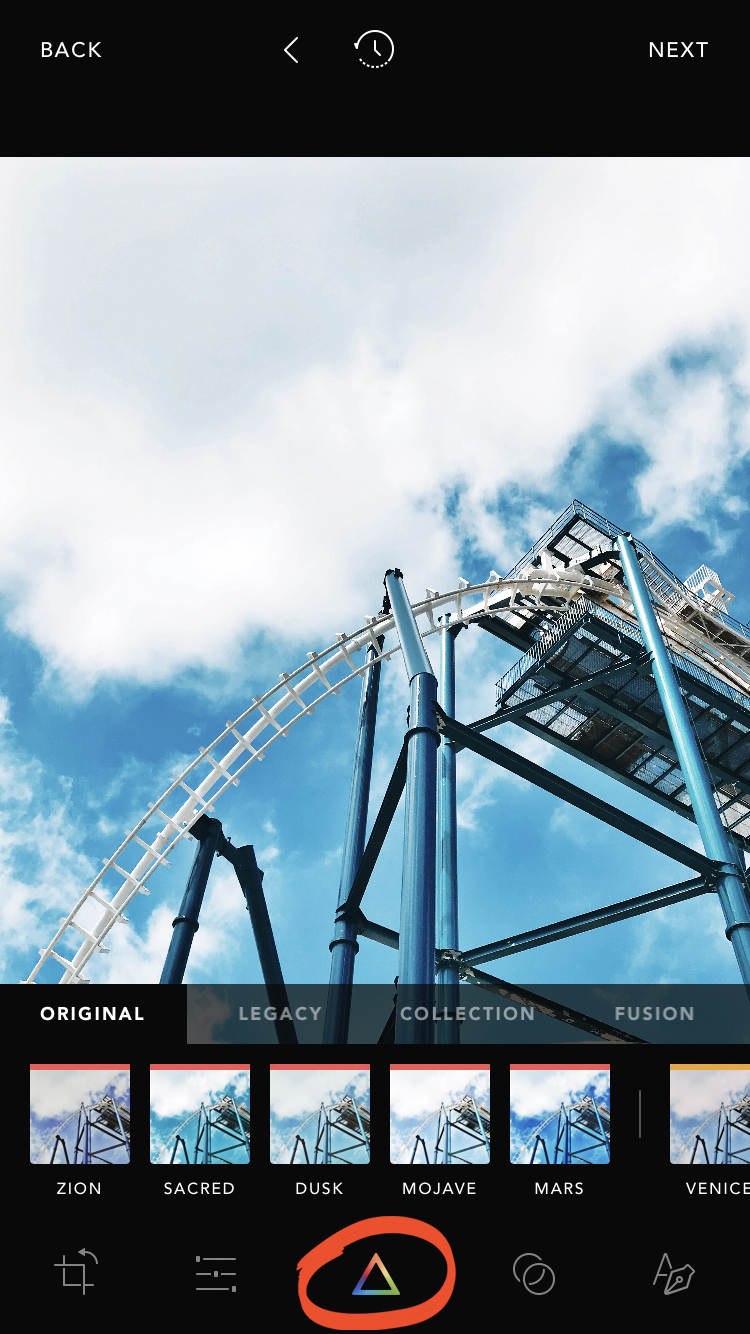
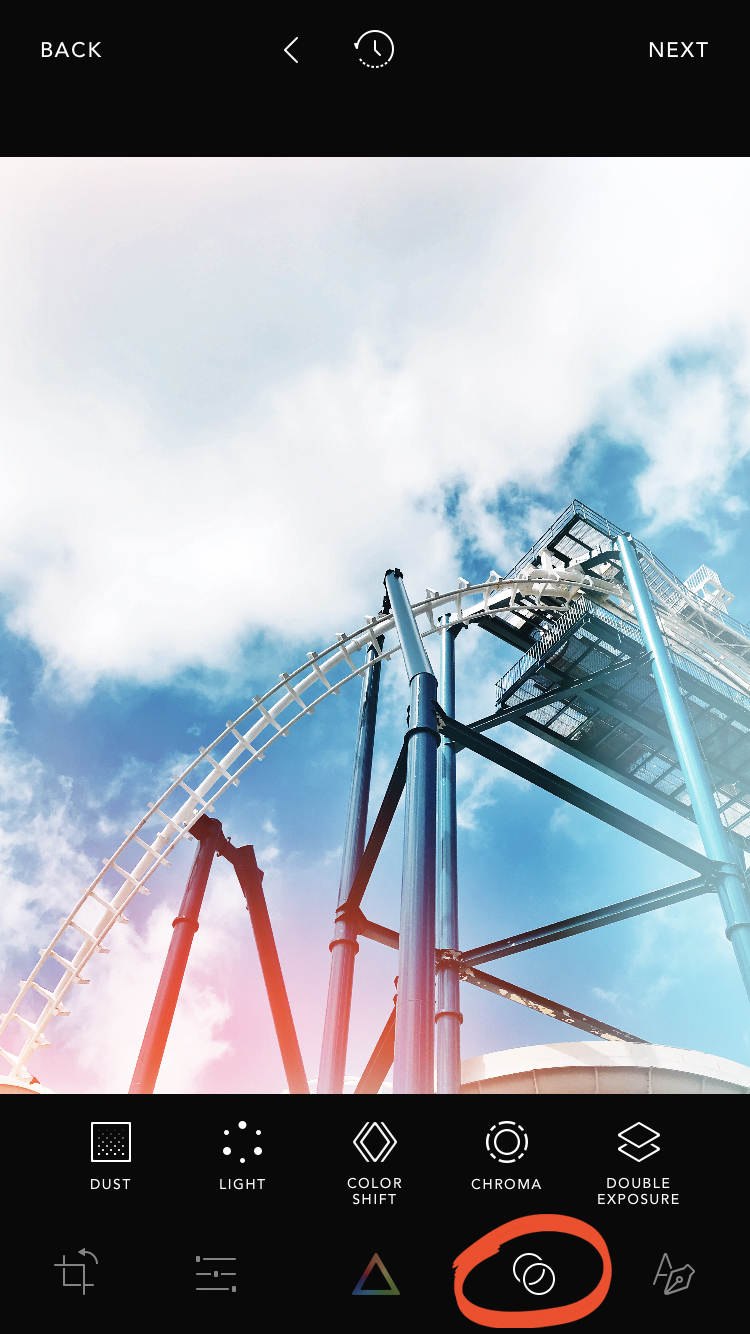
From left to right these icons are: Crop & Transform, Adjustment Tools, Filters, Creative Effects, and Text & Artwork.
Crop & Transform: These tools let you crop, rotate, straighten, flip, or skew a photo.
Adjustment Tools: Use these tools to tweak exposure, color and sharpness. Some of these tools allow you to apply selective edits to certain parts of your image.
Filters: Change the look and feel of your photo with Afterlight filters. You can customize filters, and even create your own unique filters.
Creative Effects: Get creative by adding dust and light leak overlays, or various color effects. You can even blend two images into a unique double exposure.
Text & Artwork: Add text, graphics, or beautiful botanical artwork to your photos.

In the rest of this tutorial, you’ll learn how to use these tools to edit and enhance your iPhone photos.
3. Crop & Transform
This category of tools lets you crop, rotate, flip, straighten and skew your image. Let’s explore these options to see how they can improve your iPhone photos.
Tap the Crop & Transform icon at the bottom left of the screen. The tools appear in a row beneath your photo. Swipe across the screen to see more icons.

3.1 Crop Tool
The Crop tool lets you cut away the edges of your photo. Use this tool to remove distractions from the edge of the frame. You can also crop to improve composition or change the aspect ratio of an image.
Tap the Crop tool. Select the aspect ratio you want to use, e.g. Original, Square, 4:3, 7:5, etc. Select Free to crop the image without any particular aspect ratio.
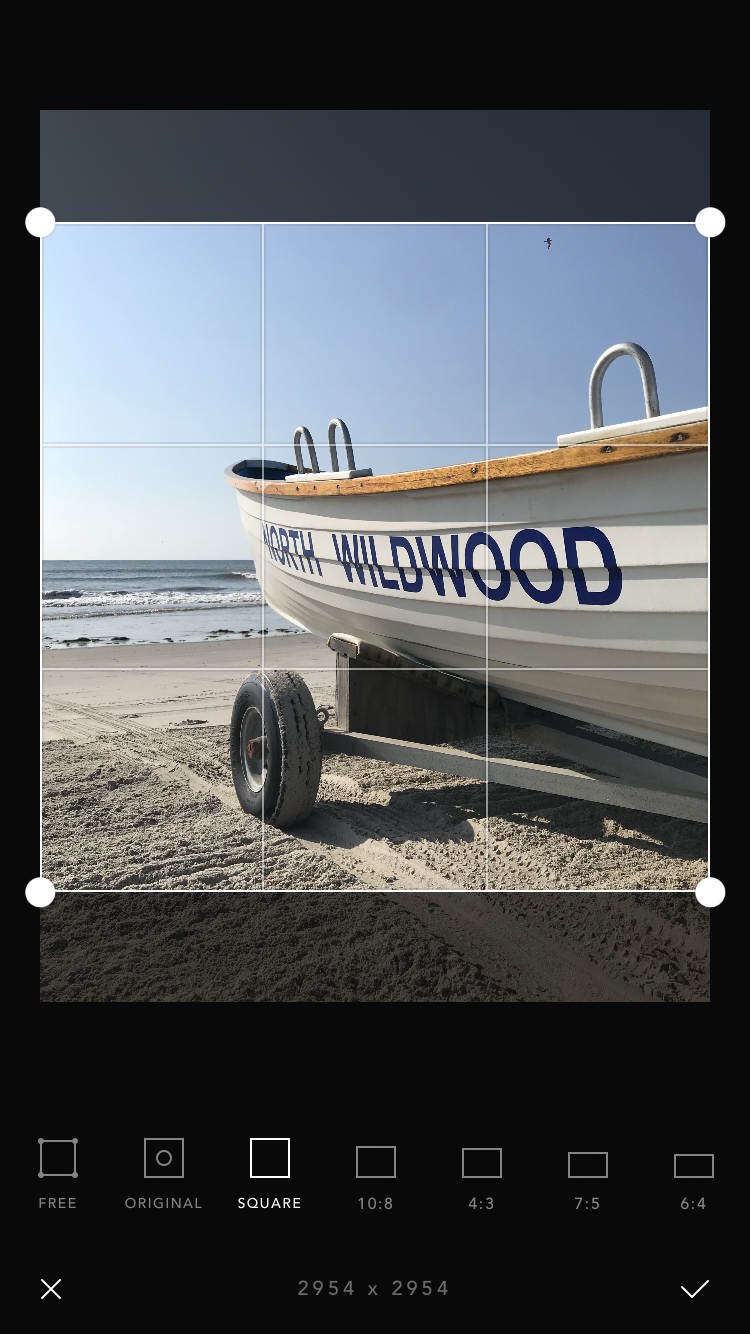
To crop your image, drag the corner handles to a new position. Tap the checkmark when you’re done.
3.2 Rotate Tool
The Rotate tool rotates your photo by 90 degrees each time you tap it. Use this tool to change the orientation of a photo from horizontal to vertical, and vice versa.
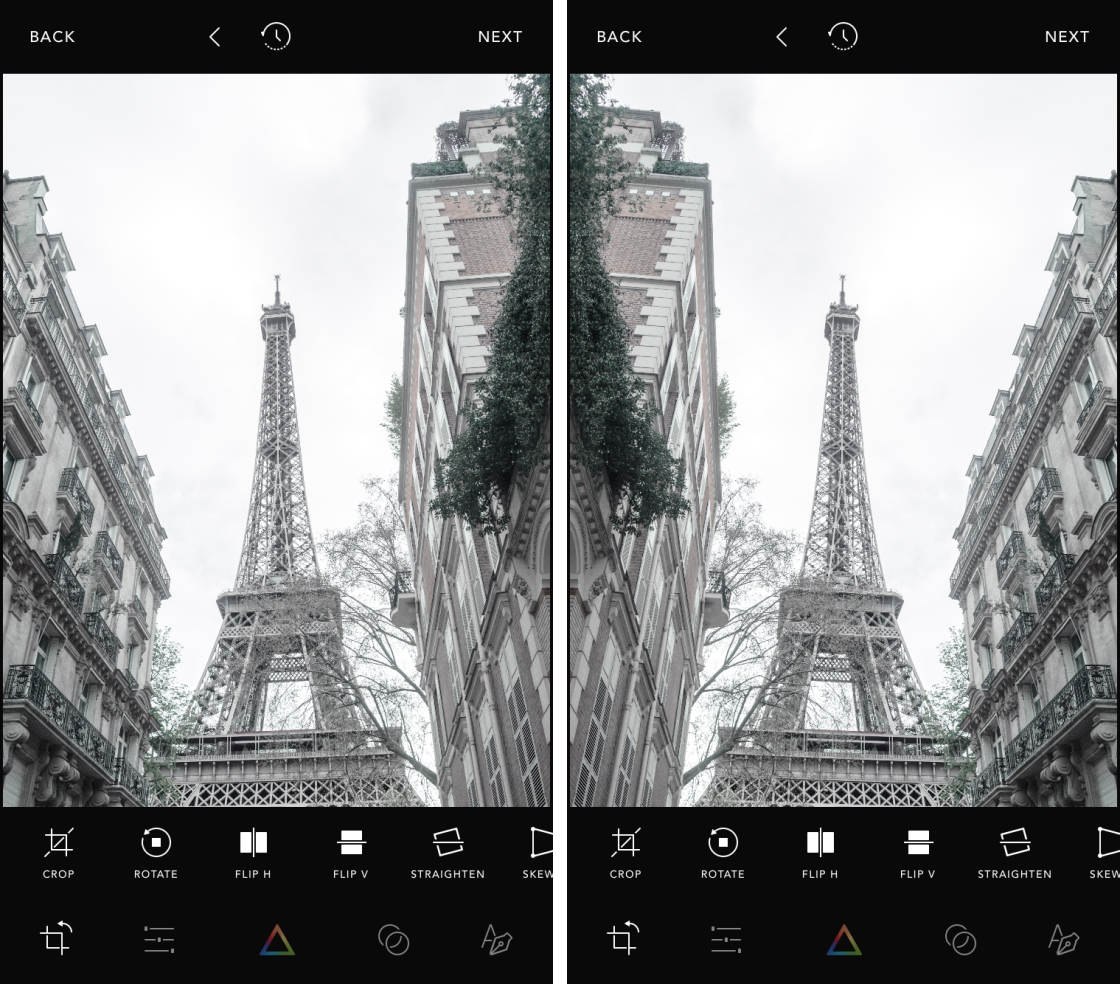
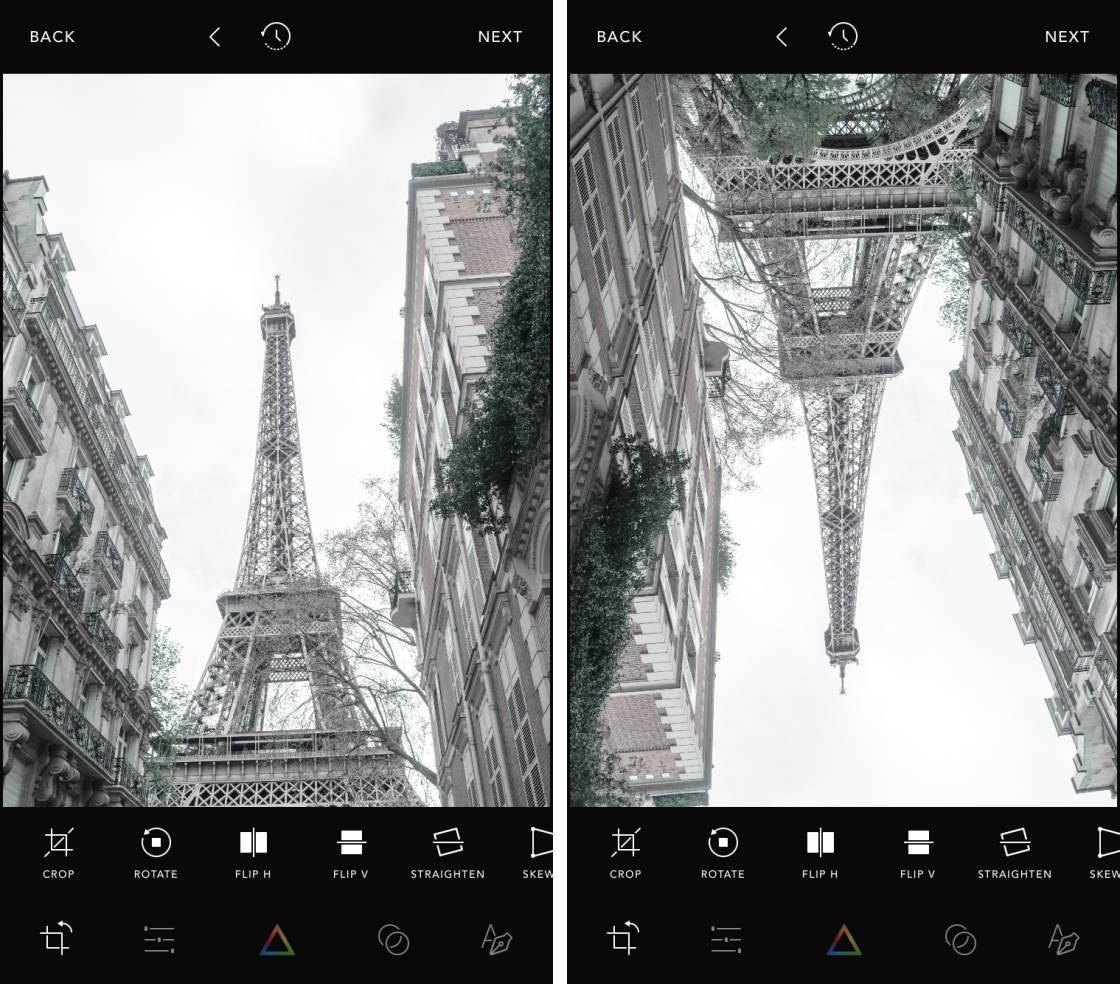
3.3 Flip Tools
The Flip H and Flip V tools let you flip your photo horizontally or vertically. This creates a mirror image of your picture. Below is an example of using the Flip H tool to flip the photo horizontally.
And here’s an example of using the Flip V tool to flip the image vertically.
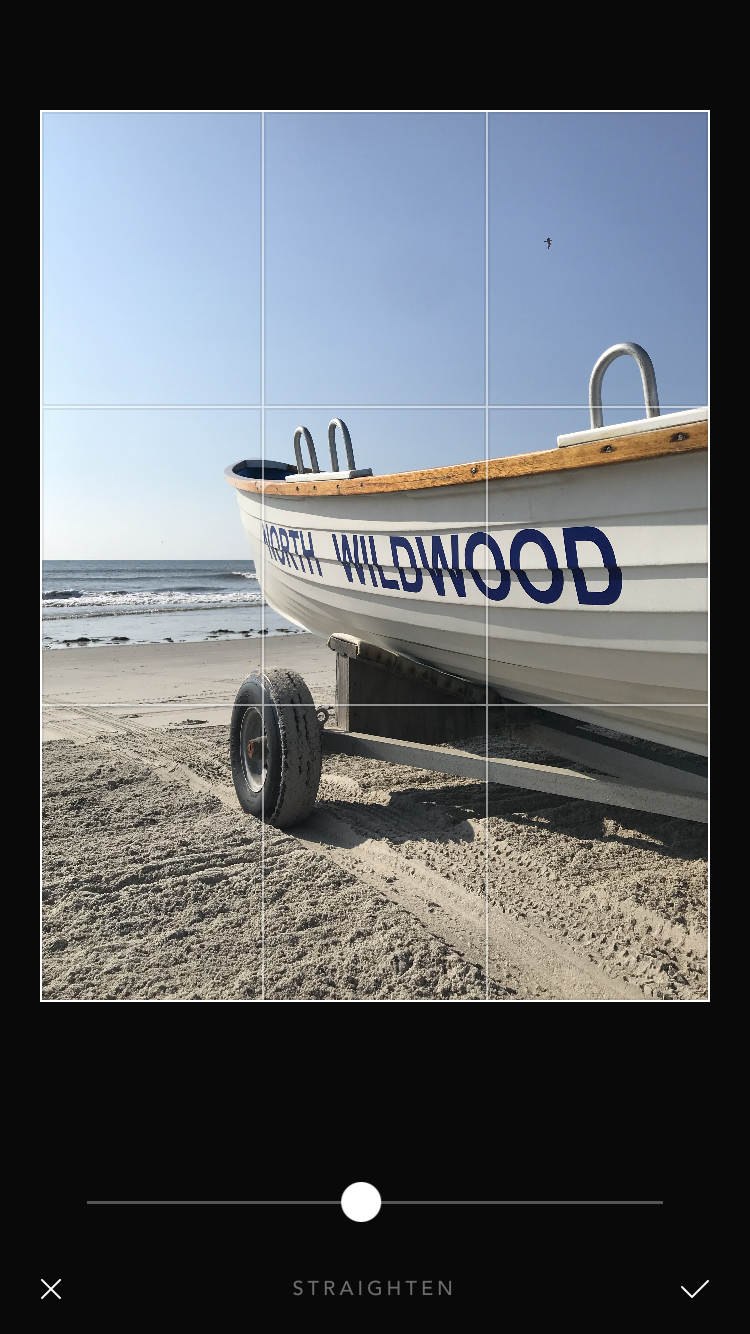
3.4 Straighten Tool
The Straighten tool is perfect for leveling the horizon in your landscape photos. You can also use it to ensure lines are straight in architecture photos. Drag the slider left or right to tilt the photo. Use the grid to help you get the lines straight.
3.5 Skew Tools
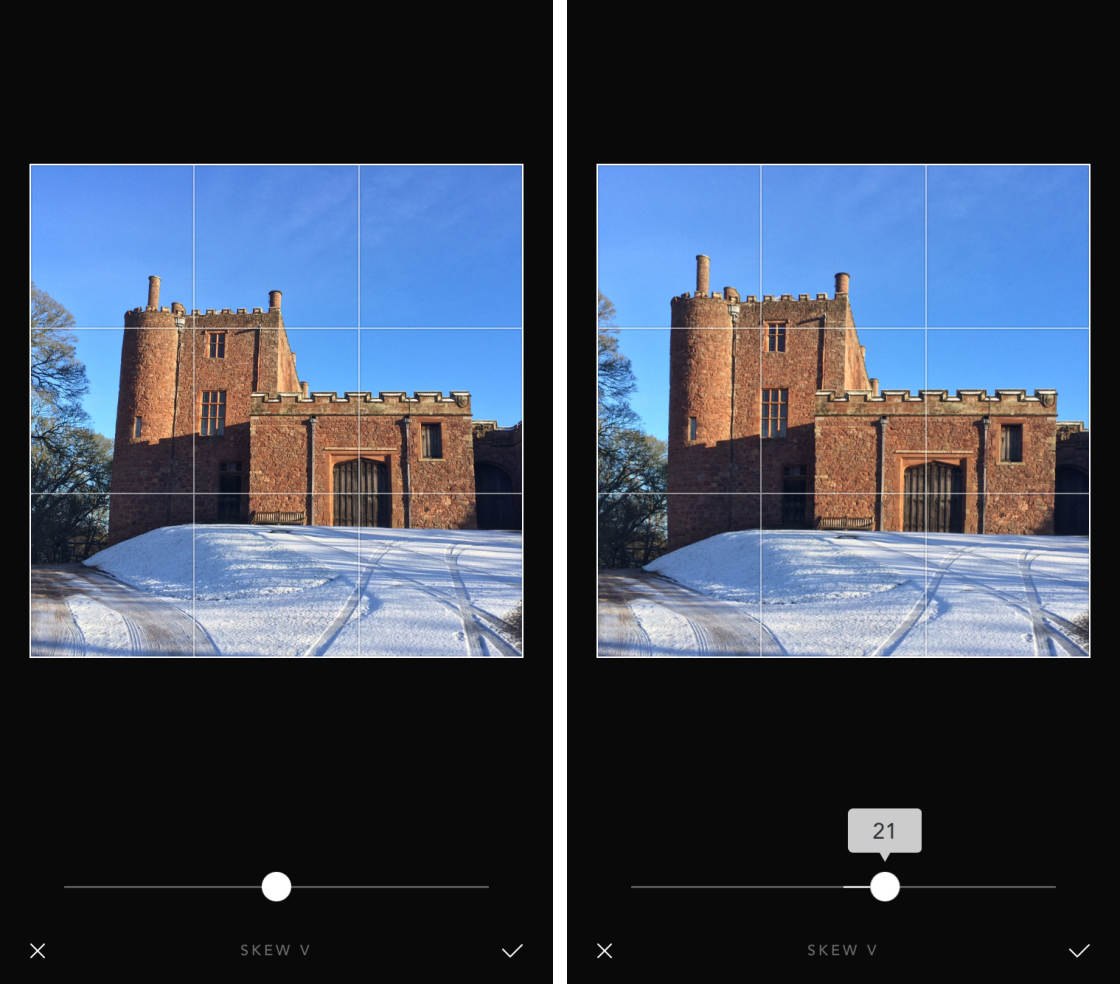
The Skew H and Skew V tools apply a horizontal or vertical slant to your photo. The Skew V tool is useful for correcting perspective problems in photos of buildings.
4. Adjustment Tools
The adjustment tools in Afterlight 2 let you fine-tune exposure, color and sharpness. Use these tools to enhance your photos and make them stand out. You can make subtle changes or major edits with these settings.
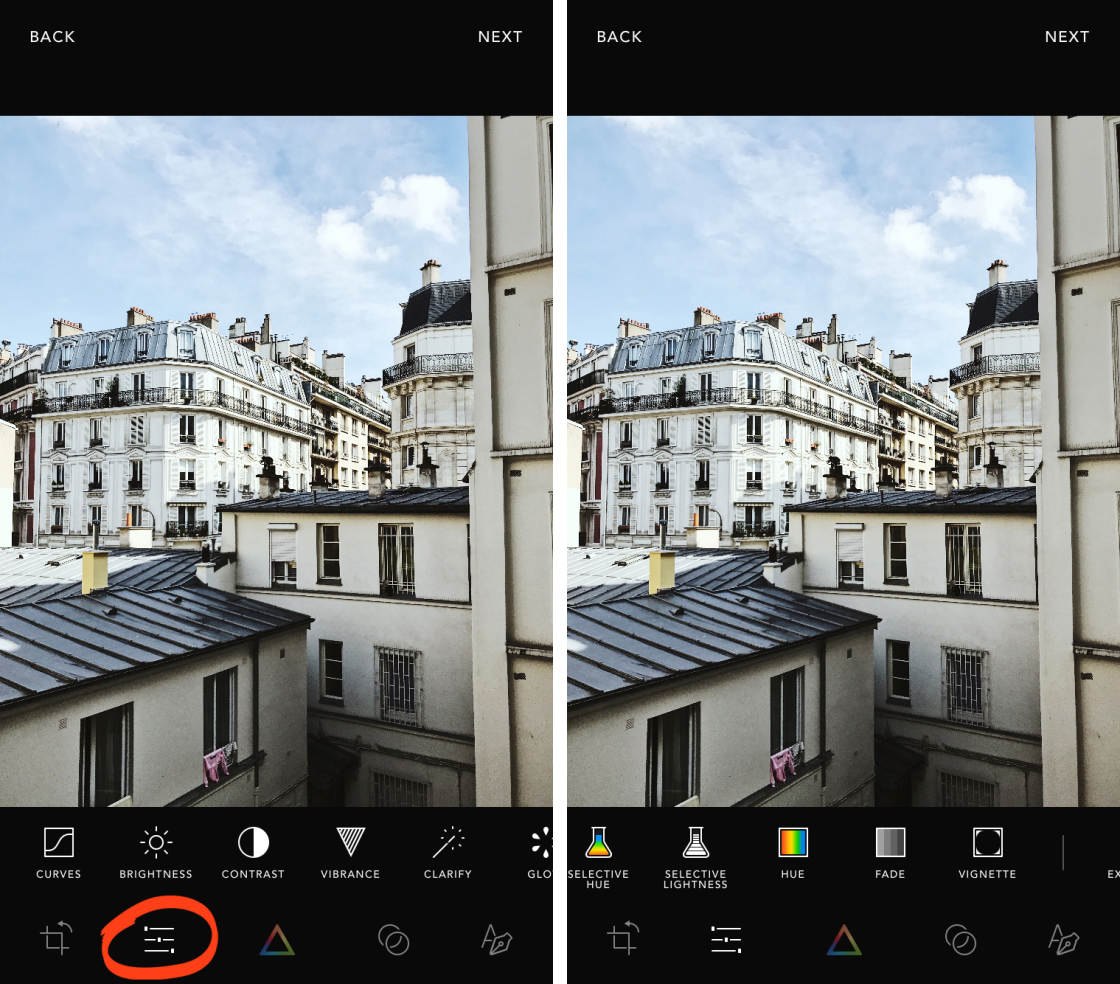
Tap the Adjustment Tools icon at the bottom of the screen. The tools appear in a row beneath your photo. Swipe across the screen to see more icons.
4.1 Adjustment Tool Icons
From left to right, the adjustment tool icons are:
- Curves: Control color, brightness and contrast all with a single tool.
- Brightness: Brighten your image without washing out the shadows. Or darken it without making highlights appear dull.
- Contrast: Increase or decrease the contrast between light and dark areas.
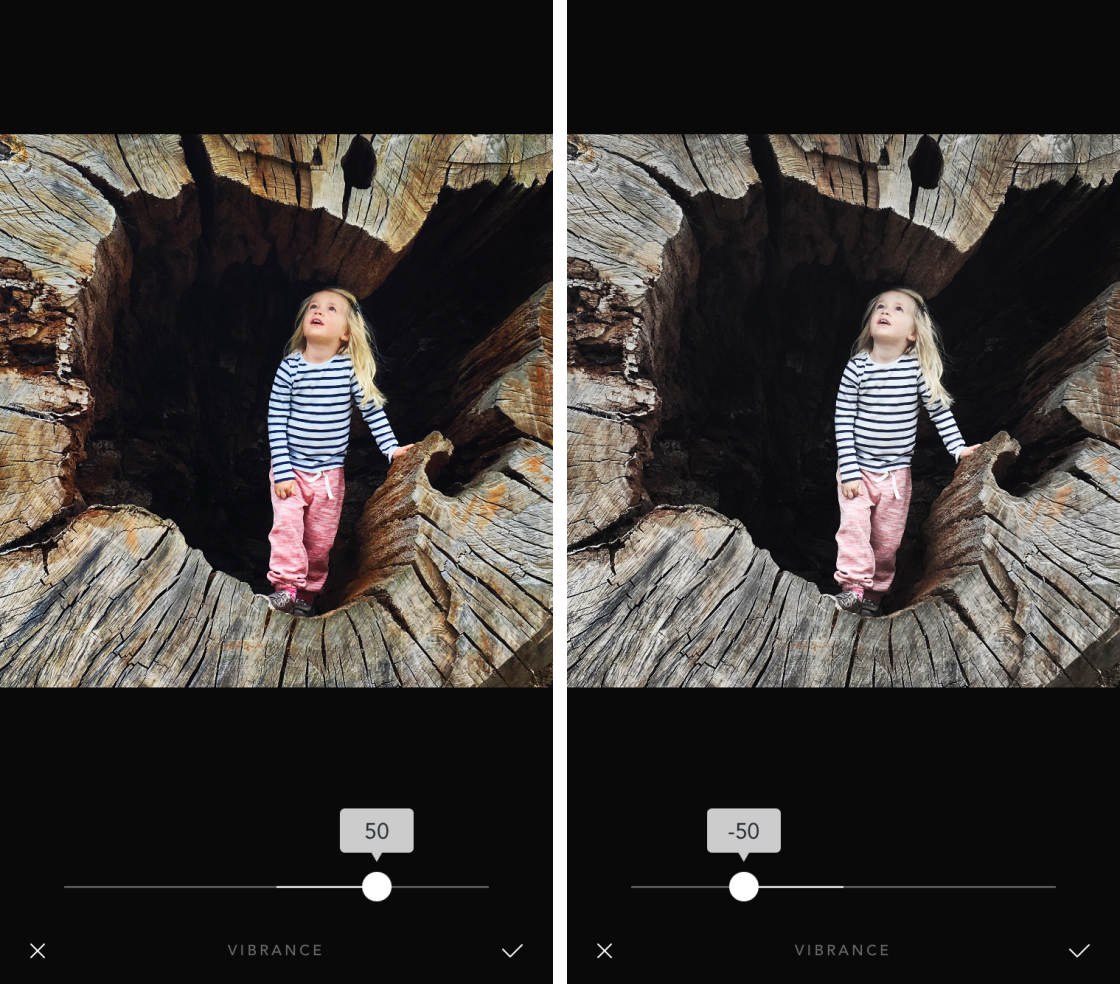
- Vibrance: Make the colors more or less vibrant.
- Clarify: Bring out detail in your image.
- Glow: Add a soft glow to your photo.
- Grain: Add grain to create an old fashioned film or vintage look.
- Color Overlay: Add a subtle color filter to change the photo’s color tone.
- Gradient: Blend a gradient of two or more colors over your image.
- Selective Saturation: Control the intensity of specific colors in your photo.
- Selective Hue: Change the shade of specific colors in your image.
- Selective Lightness: Adjust the brightness of specific colors in your photo.
- Hue: Change the colors in your image to different color hues.
- Fade: Fade the colors in your photo.
- Vignette: Add a soft white or black vignette around the edges of your image.
- Exposure: Brighten or darken the entire image.
- Saturation: Increase or decrease the intensity of colors throughout the image.
- Temperature: Make the colors warmer (more orange) or cooler (more blue).
- Tint: Add a green or purple color tint to your photo.
- Sharpening: Sharpen the fine detail in your image.
- Highlights: Adjust the brightness of the highlights (light areas).
- Shadows: Adjust the brightness of the shadows (dark areas).
- Highlight Tone: Add a red, green or blue color tint to the highlights in your photo.
- Mid Tone: Add a red, green or blue color tint to the mid-tones (tones of medium brightness).
- Shadow Tone: Add a red, green or blue color tint to the shadows.
You control most of the adjustment tools with a slider. Drag the slider right to increase the setting, or left to decrease it. Tap the checkmark when you’re happy with your edit. Or tap the X to cancel.
4.2 Selective Adjustment Tools
Some of the Afterlight photo editing tools contain several sliders. The Selective Saturation, Selective Hue and Selective Lightness tools have eight color sliders.
These tools give you ultimate control over the individual colors in your photos.
In the photo below, I used the Selective Saturation tool to adjust certain colors in the image.
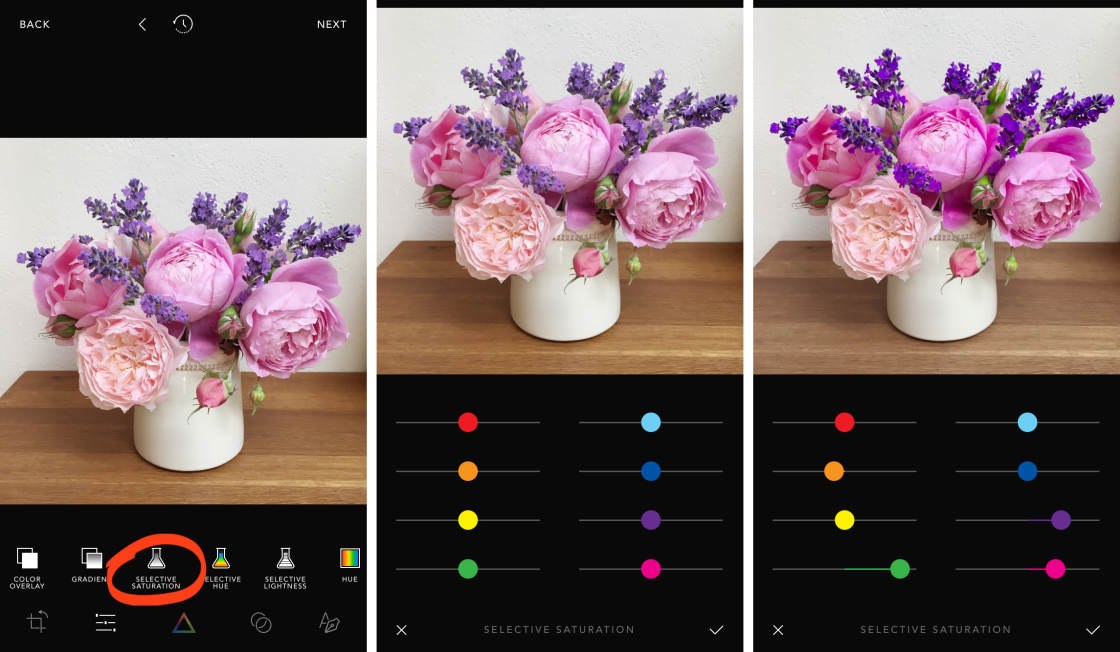
I increased the saturation of the pinks, purples and greens, making the flowers more vibrant. I decreased the saturation of the orange tones, which toned down the color of the table.
4.3 Color Overlay Tool
The Color Overlay tool is perfect for adding warm or cool color tones to your photo. It also has a range of green and purple overlays.
Different colors will create very different moods in your photo. So be sure to experiment and find one that works with your image.
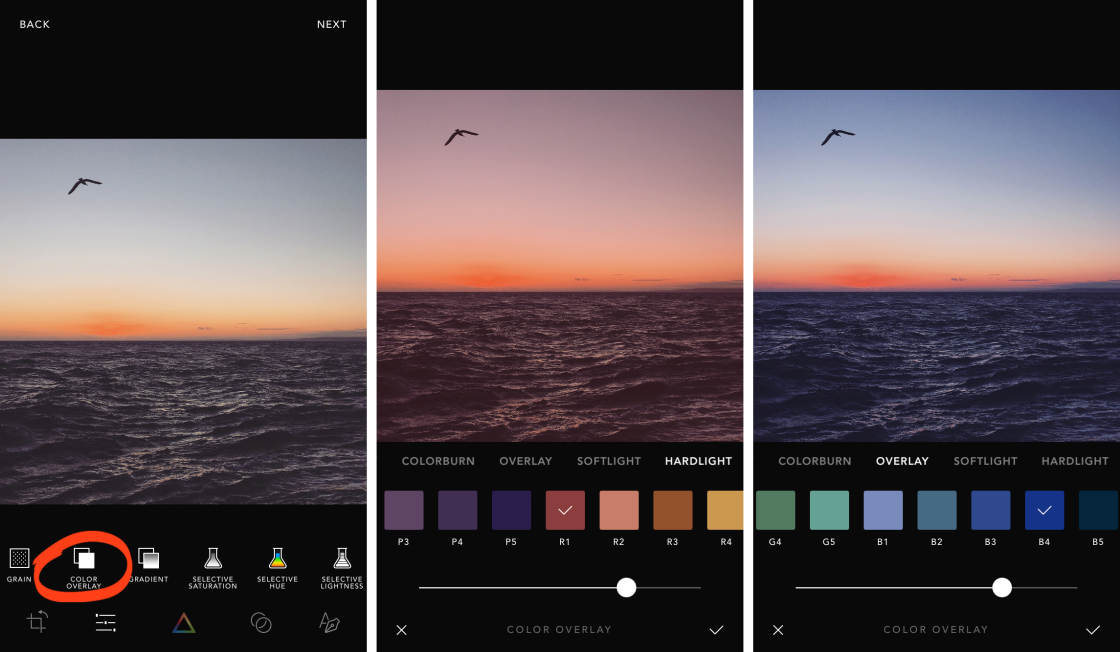
The example above shows how you can warm up or cool down the colors with different colored overlays. When you’ve chosen a color, use the slider at the bottom to control its intensity.
You can also experiment with different blending modes. Tap the options beneath the photo, e.g. Soft Light, Hard Light, Overlay, etc. Blending mode controls how the color blends with the original colors in your image.
4.4 Gradient Tool
The Gradient tool is similar to the Color Overlay tool. But instead of a single color, a gradient has two or more colors that gradually blend into each other.
The photo below has a blue and orange gradient applied. You can tap the arrow on your chosen gradient icon to rotate the colors of the gradient.
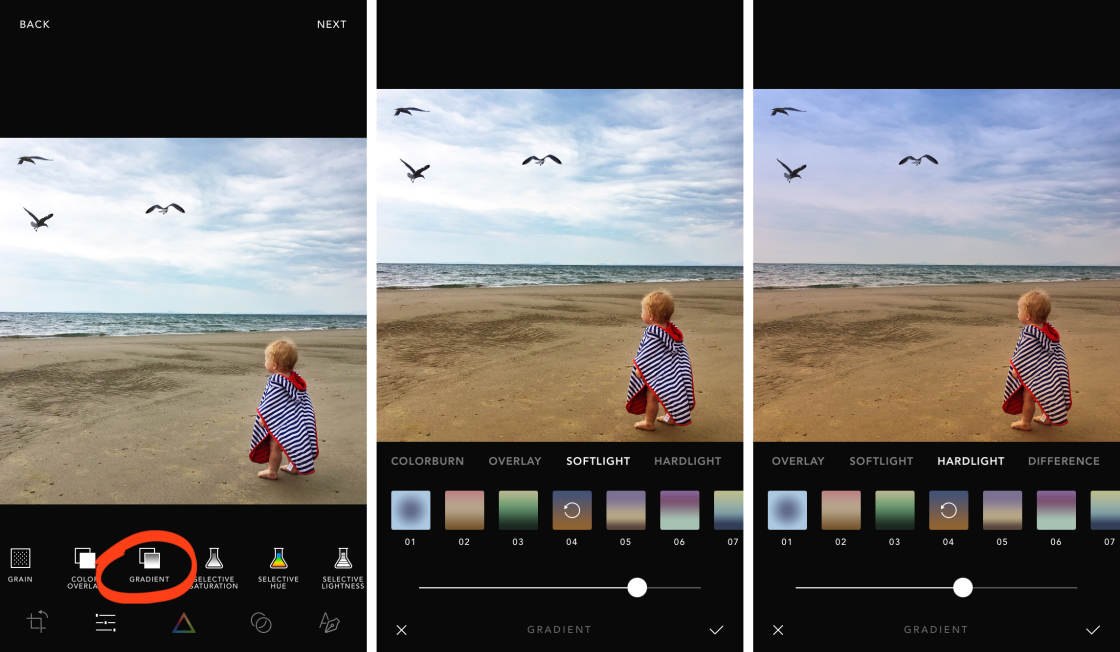
In this example, the blue was at the top to make the sky appear more blue. And the orange was at the bottom to give the sand a warmer color tone.
You can adjust the strength of the gradient using the the slider. And you can use blending modes to change how the gradient blends with your image. In the examples above, the Soft Light and Hard Light blending modes produce different results.
4.5 Curves Tool
The Curves tool is the most complex editing tool in Afterlight 2. At first, it can be confusing and intimidating. But once you master it, you’ll have full control over the brightness, contrast and colors in your image.
When you open the Curves tool, you’ll see a diagonal line. There are four options on the left: RGB, Red, Green and Blue.
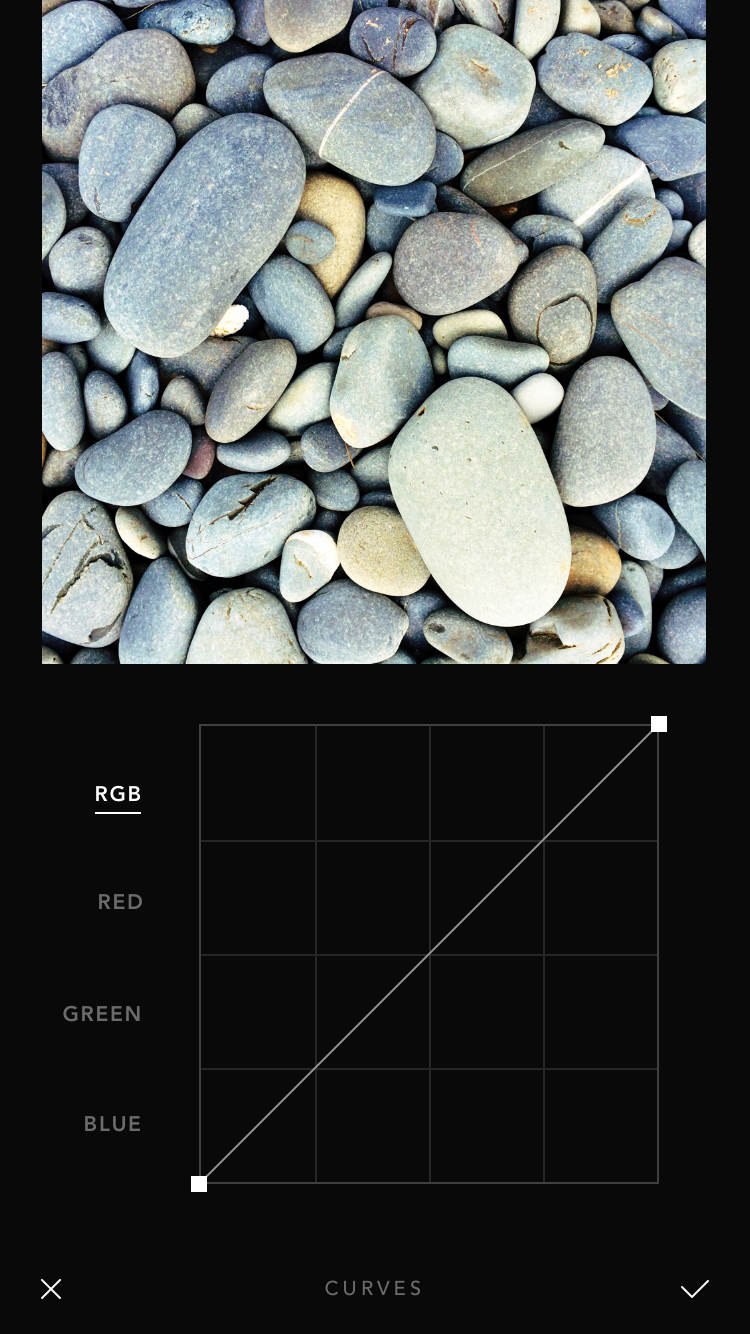
To control the intensity of a particular color in your image, select that color on the left. In the screenshot below, I selected Blue so that I could make the blue tones stronger.
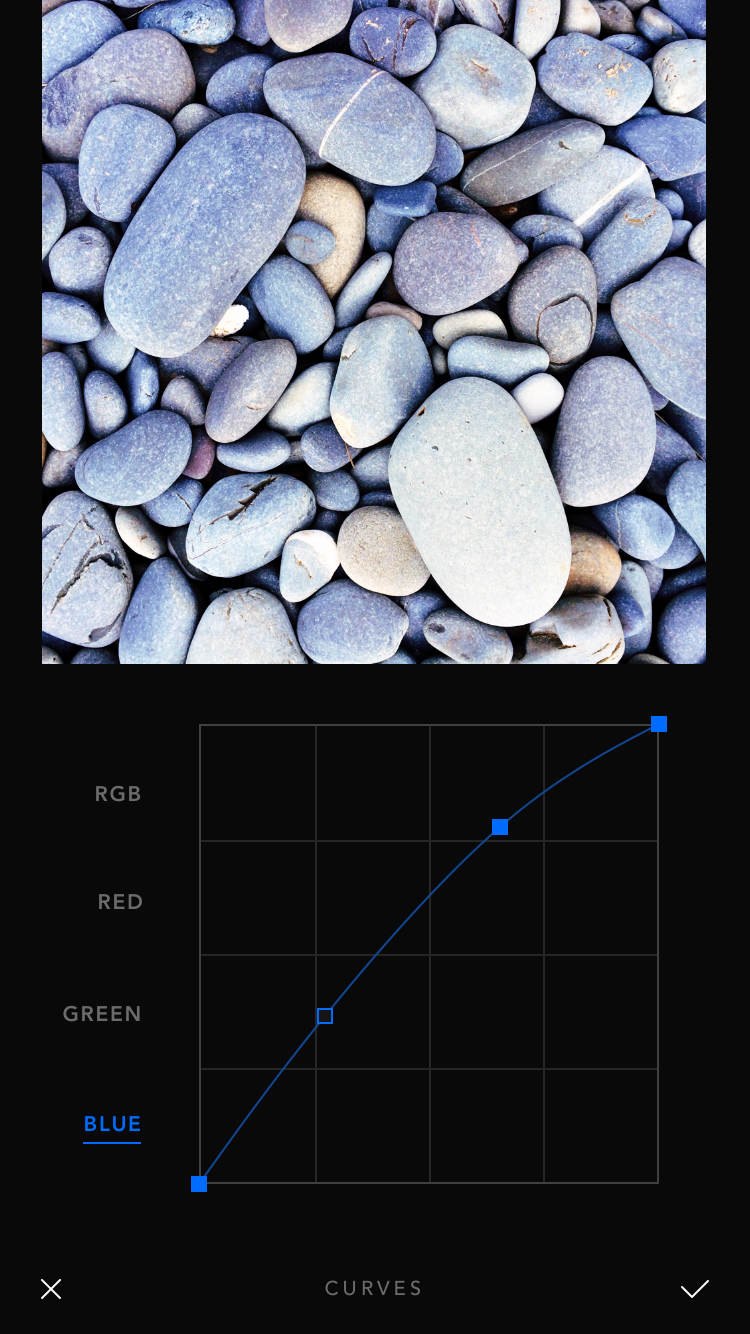
You can then drag different points on the diagonal line. This lets you control the color intensity in the shadows, mid-tones and highlights. To adjust the color of the dark tones, drag the left-hand area of the diagonal line. To adjust the color of the bright tones, drag the right-hand area of the line. To adjust the color of the medium tones, drag somewhere around the middle.
The diagonal line will end up as a curve when you’ve made adjustments. The more curved the line, the more intense your edits will be. In general, it’s best to make subtle adjustments with the curves tool.
To adjust overall brightness and contrast with the Curves tool, select the RGB option.
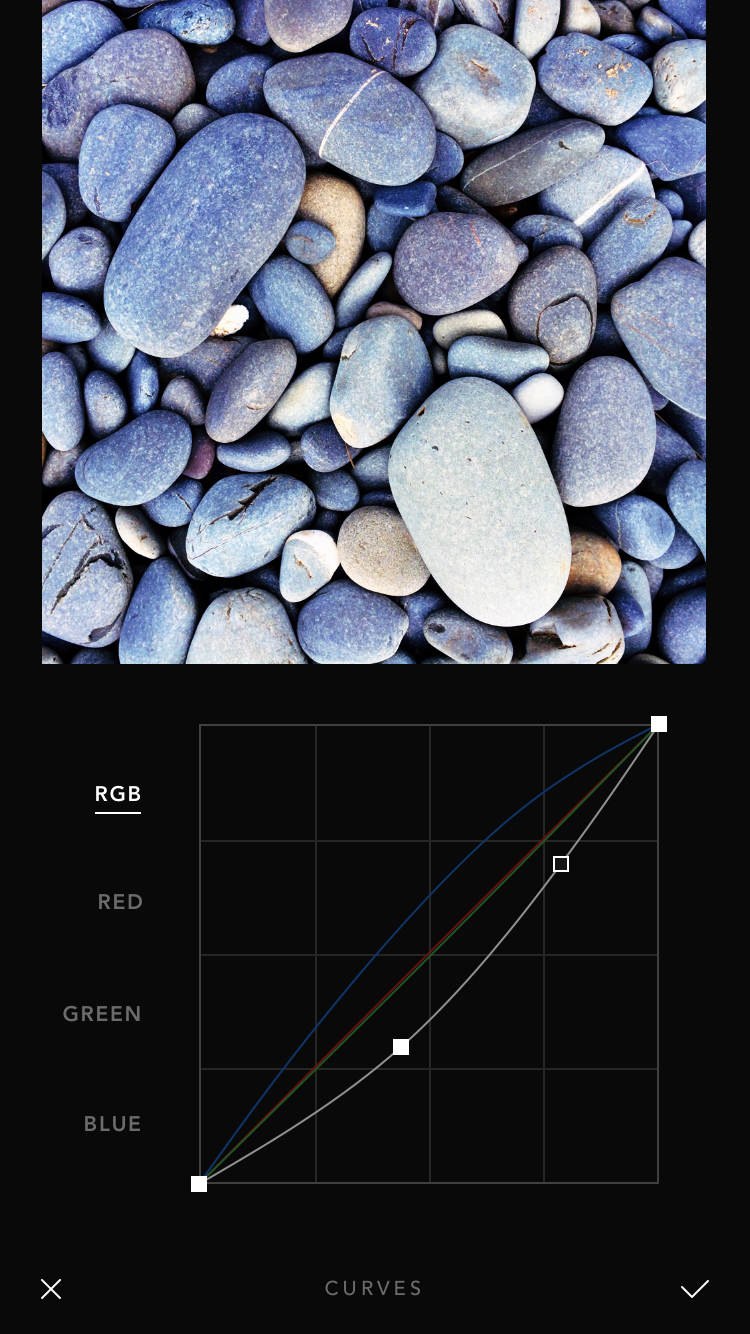
Drag the left part of the line down to make shadows darker, or up to make them brighter. To adjust the brightness of the highlights, drag the right part of the line up or down. To adjust mid-tones, drag the middle of the line.
5. Afterlight Filters
Afterlight 2 is one of the best photo filter apps available. Filters allow you to change the look and feel of your photo by applying a preset overlay. Each filter applies a different set of photo adjustments. These include brightness, contrast, color, and clarity.
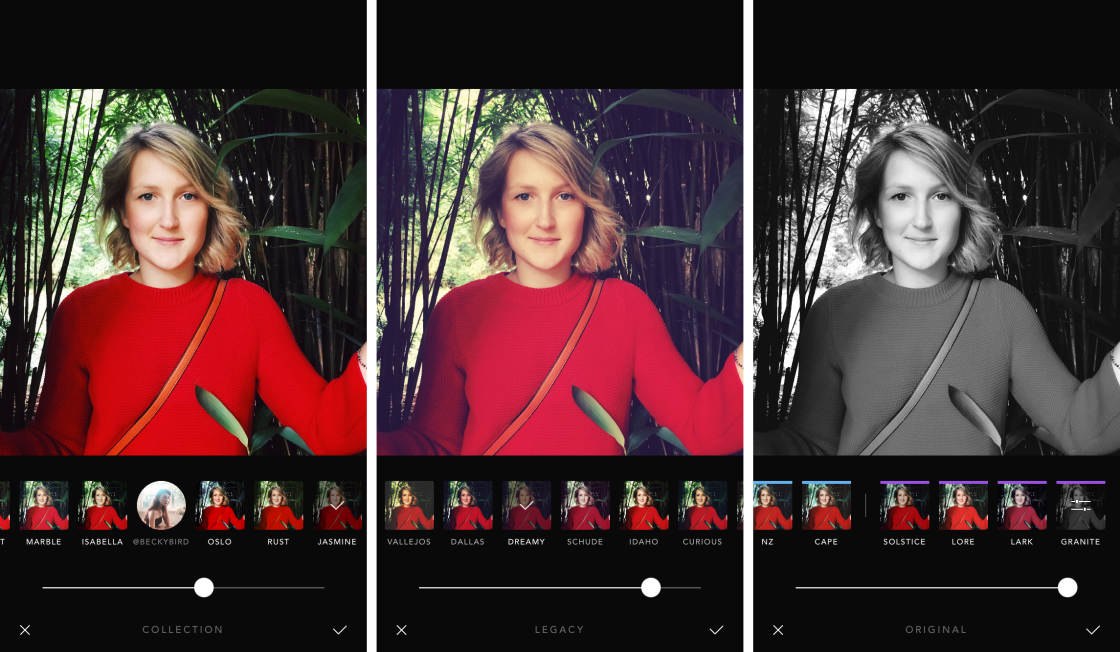
You apply a filter with a single tap. So they’re perfect for quick edits. You can use them on their own, or in conjunction with the manual adjustment tools.
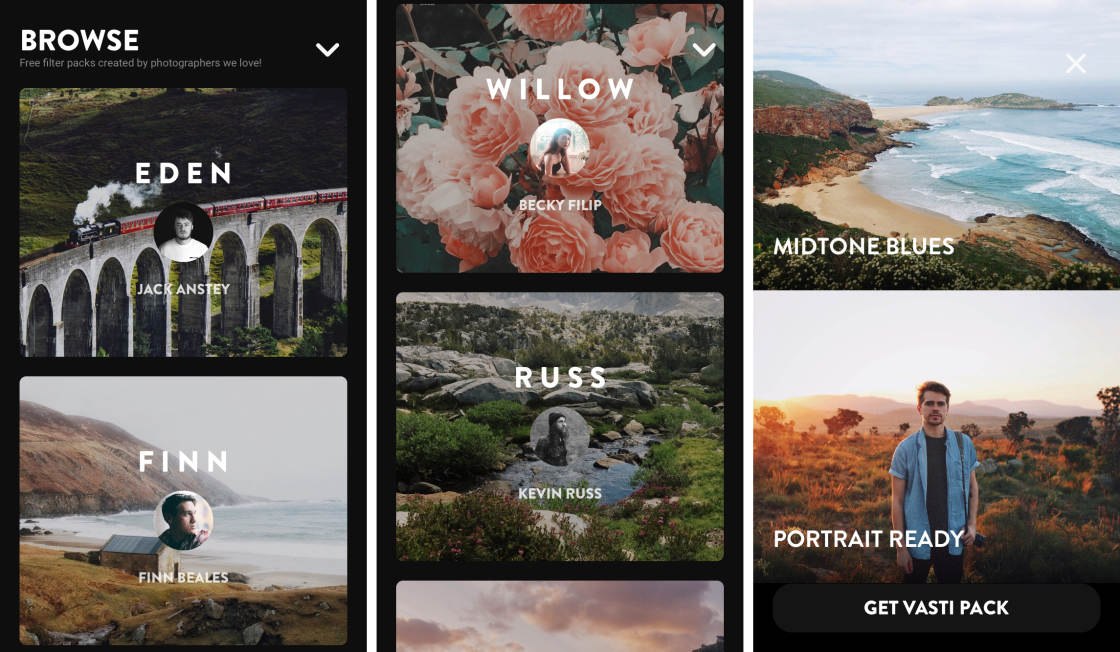
The filter packs in Afterlight 2 are created by well-known mobile photographers. Each pack contains a set of filters designed to evoke a specific mood. All filters are included in the initial download price of the app. There are no extra in-app purchases, and the app is regularly updated with new free filters.
5.1 Apply A Filter
To access the Afterlight filters, tap the Filters icon (colored triangle) at the bottom of the screen. The filters will appear beneath your photo.
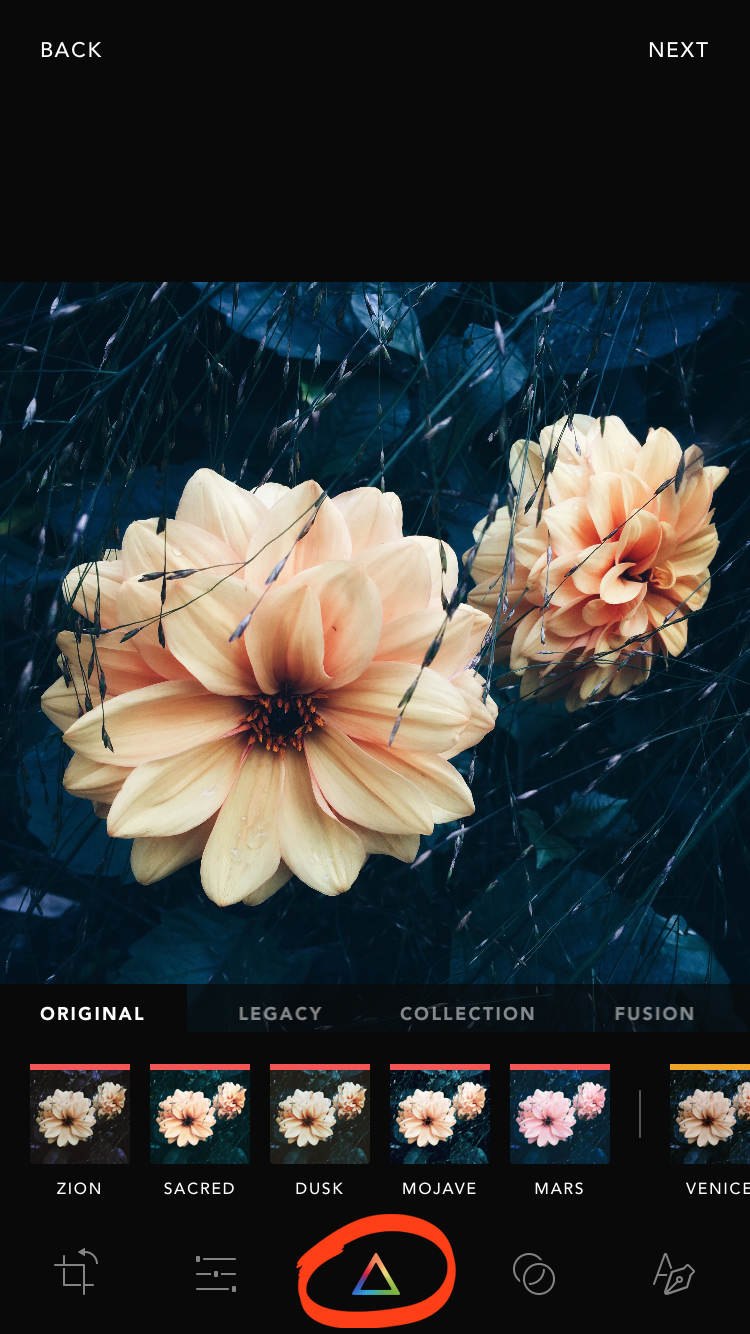
The Afterlight filters are organized into different categories: Original, Legacy and Collection. Tap on these categories to access different sets of filters.
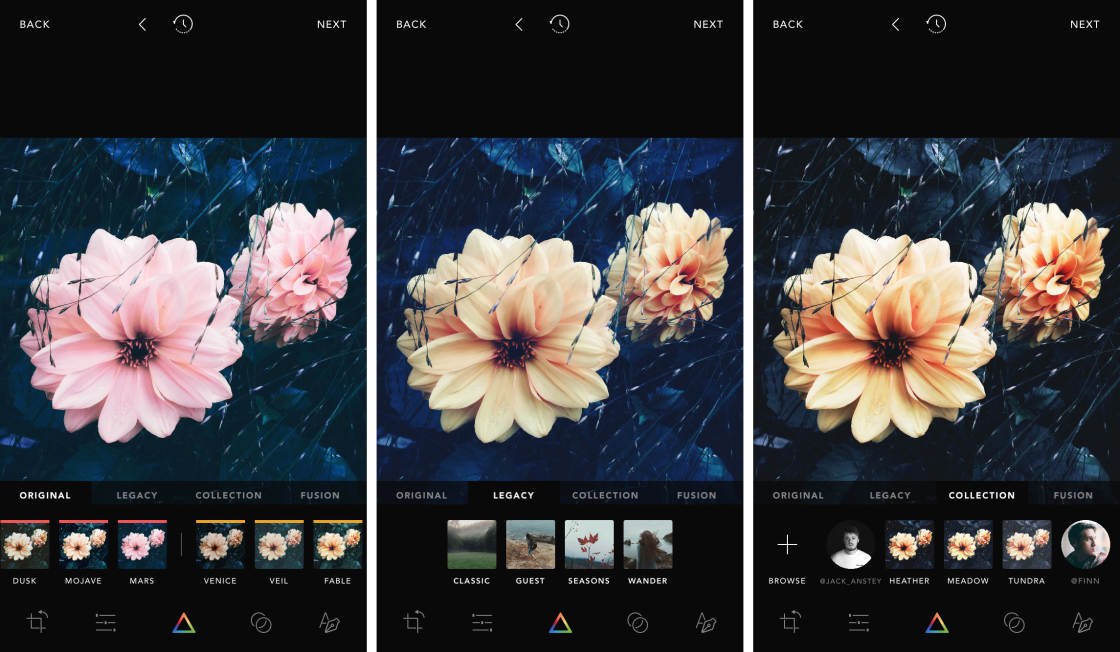
Tap any filter icon to apply it to your photo. The Afterlight filters are quite subtle, so they’re unlikely to overpower your photo. But if the filter effect is too strong, you can reduce its intensity using the slider at the bottom of the screen. Tap the checkmark when you’re happy with the result.
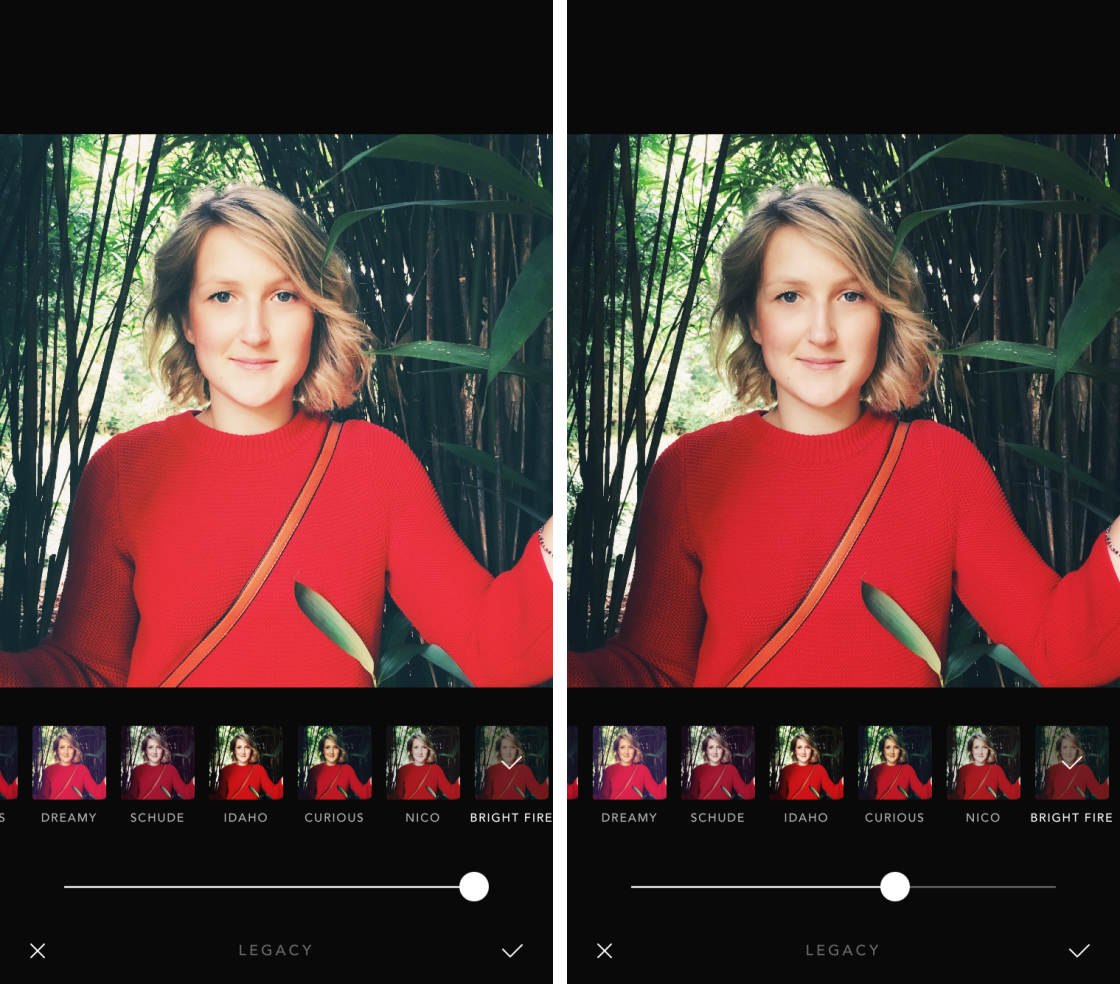
The Afterlight app lets you apply multiple filters to your image. This is perfect for creating your own unique style. Once you’ve applied a filter and tapped the checkmark, you can repeat the process to apply another filter. Do this until you’re happy with the final look.
5.2 Customize A Filter
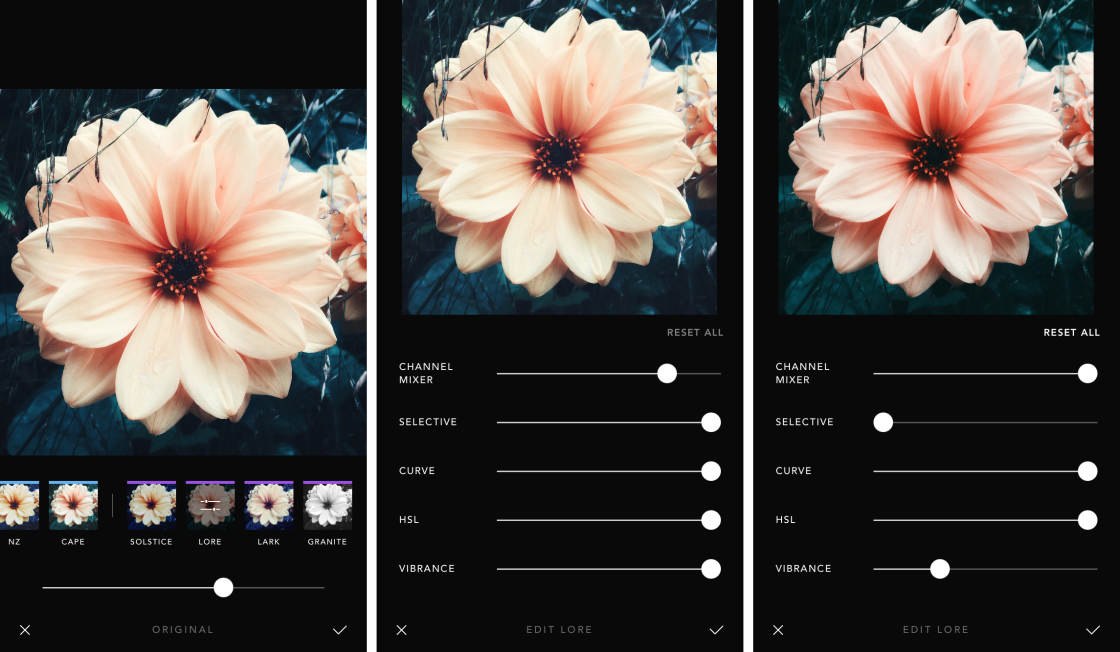
Filters in the Original category can be customized using a range of editing tools. After applying a filter, you’ll notice two small sliders on the filter icon that you used. Tap the filter icon with sliders to access the editing tools. Adjust the sliders for each setting to see how you can change the filter.
5.3 Download Extra Filters
To download more filters, open the Collection category, then tap the [+] icon. Scroll down through the available filter packs.
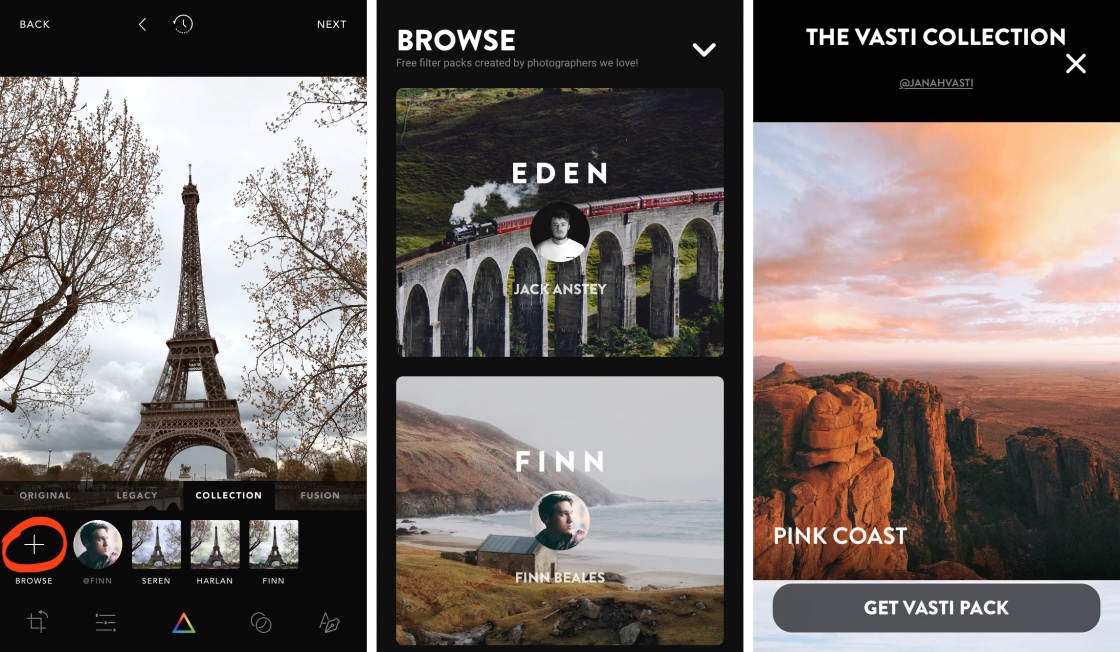
Tap a filter pack to view a sample of the filters available. Tap Get Pack to download the filters to your app.
5.4 Create A Custom “Fusion” Filter
Have you noticed the Fusion option to the right of the filter categories? This lets you create your own unique filters based on your edits. To create your own filter, tap Fusion, then tap the [+] icon.
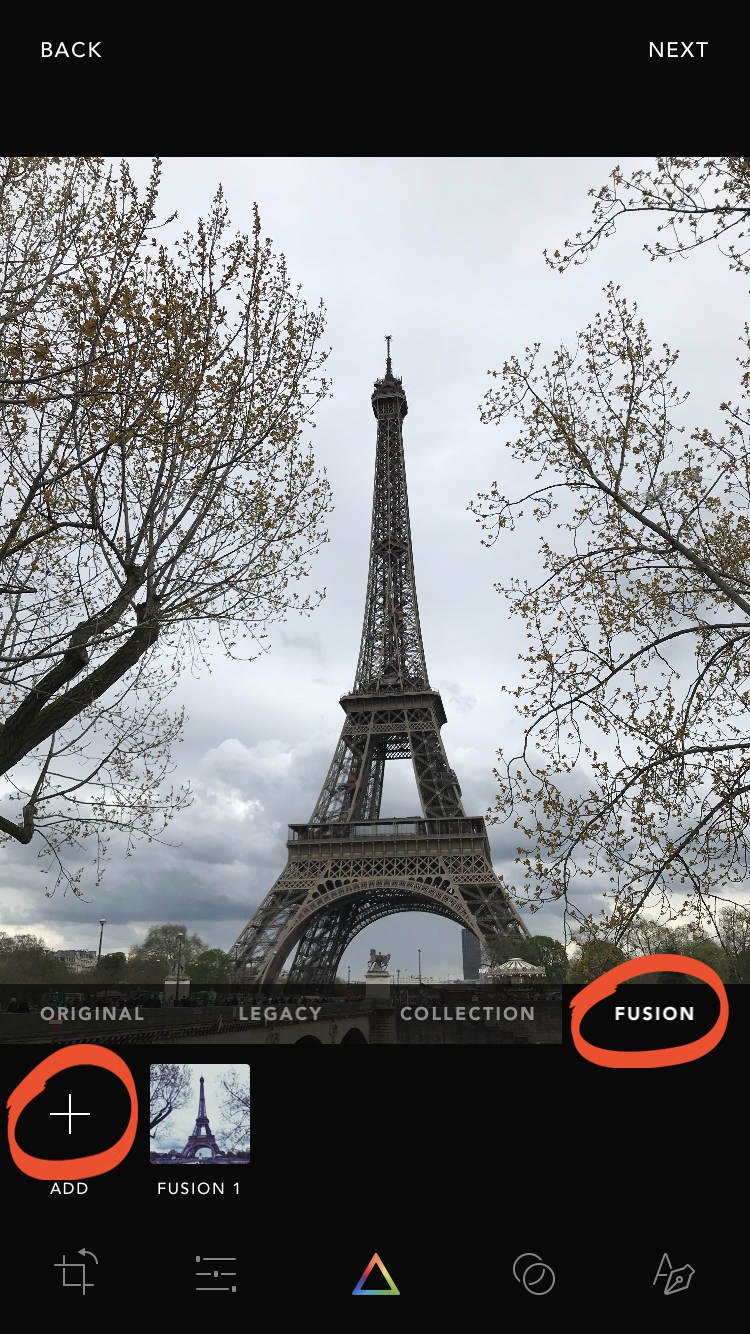
Afterlight will now start recording the editing actions that you make. At the bottom of the screen are two icons. The sliders icon lets you access the adjustment tools. The triangle icon takes you to the filters. Edit your photo using any combination of adjustments and filters.
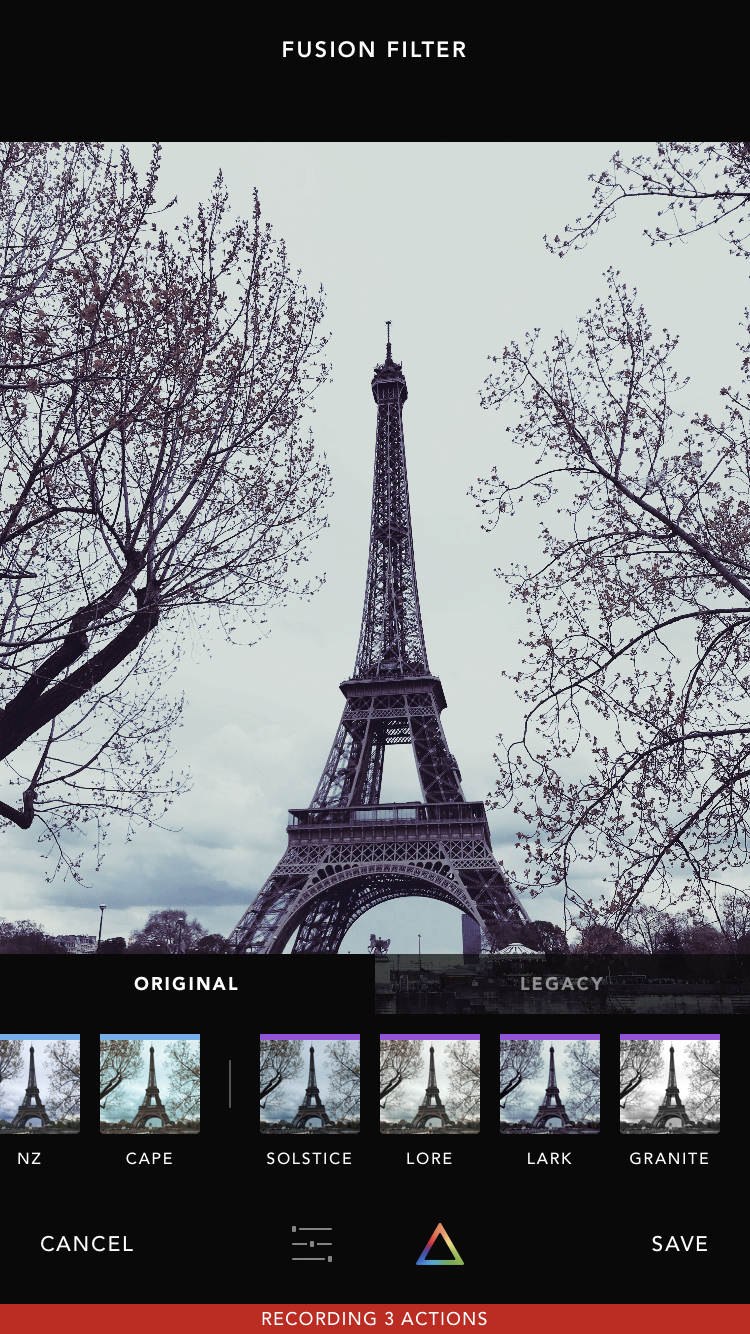
At the bottom of the screen, you’ll see how many edits you’ve applied. When you’ve finished editing, tap Save at the bottom right.
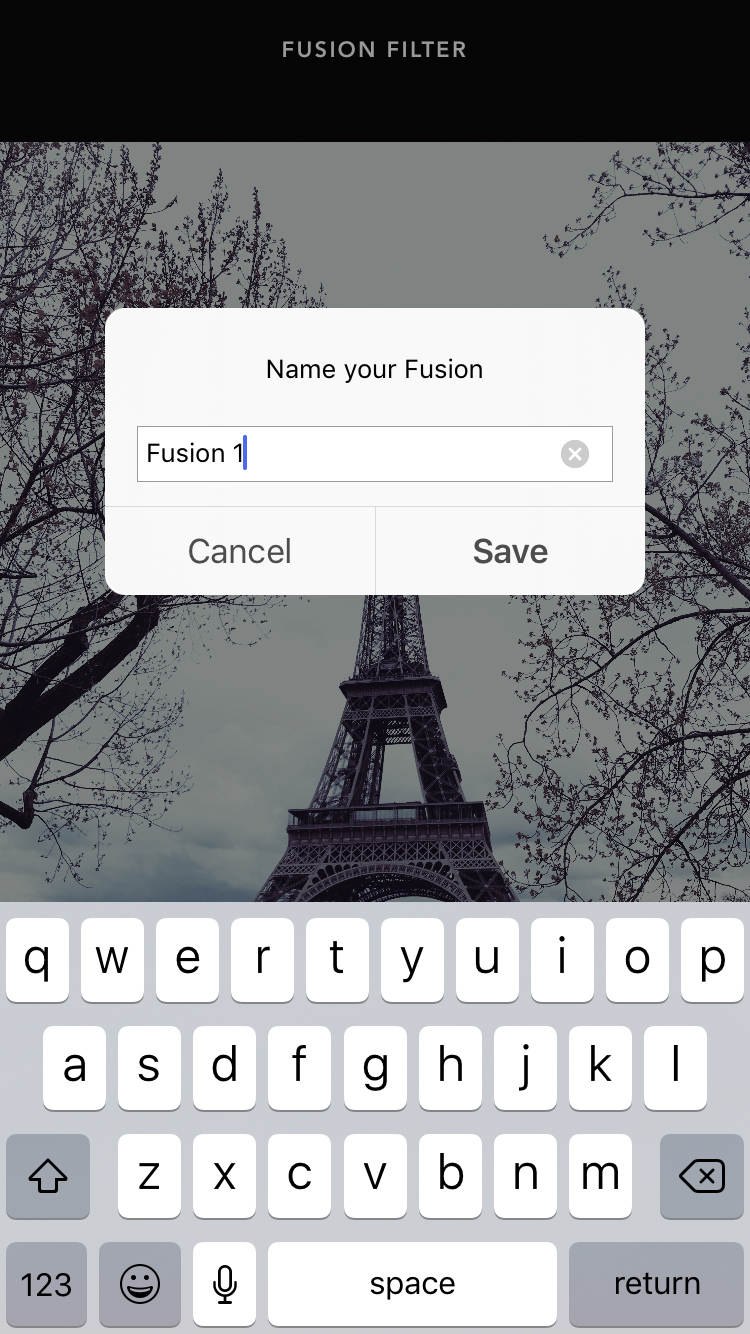
Next, you need to save your unique fusion. This allows you to use it again on other photos. Type a name for your filter, then tap Save.
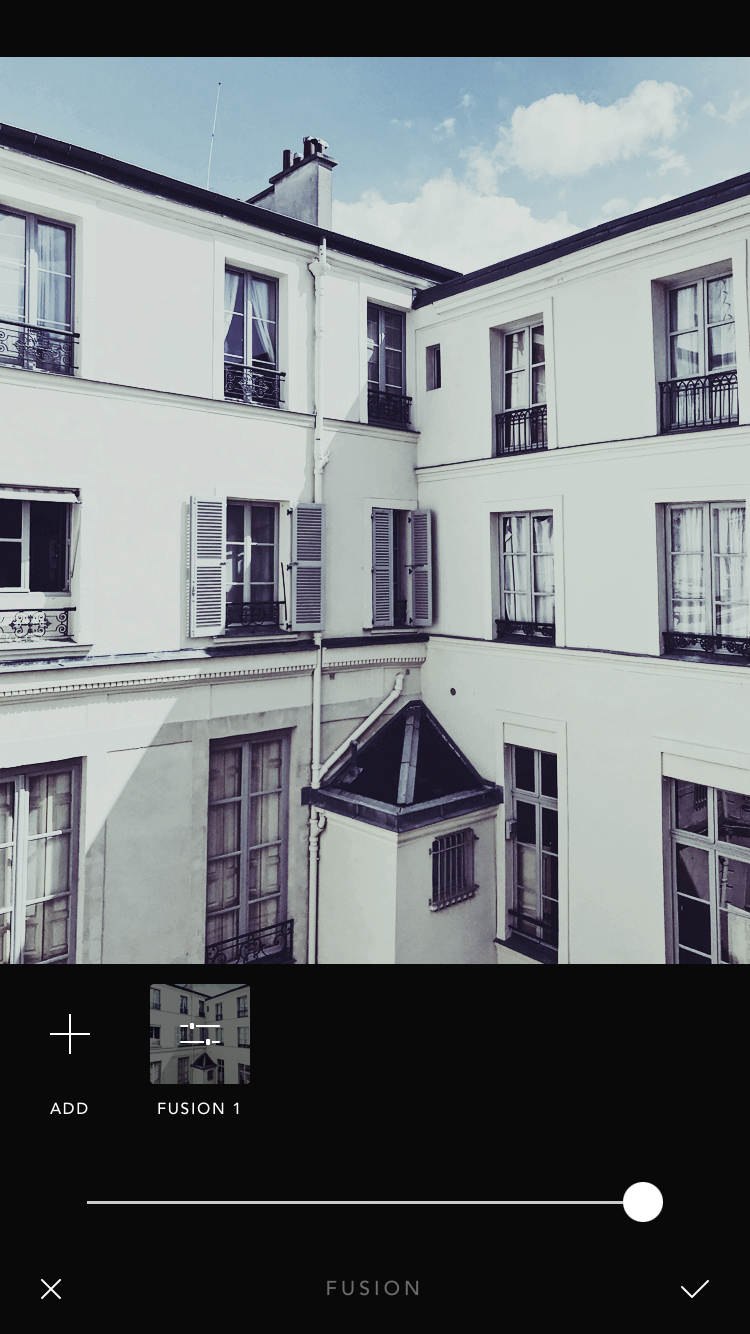
Whenever you want to apply that same combination of edits to an image, tap the Filters icon and select Fusion. Tap on your fusion filter to apply it to your photo.
5.5 Choose A Filter To Enhance Mood
When using filters, keep in mind how different kinds of filters will affect the mood of your image.
Warm filters with orange tones tend to make images seem more welcoming. Filters with blue tones can make an image seem cold, with a sense of loneliness or even sadness.
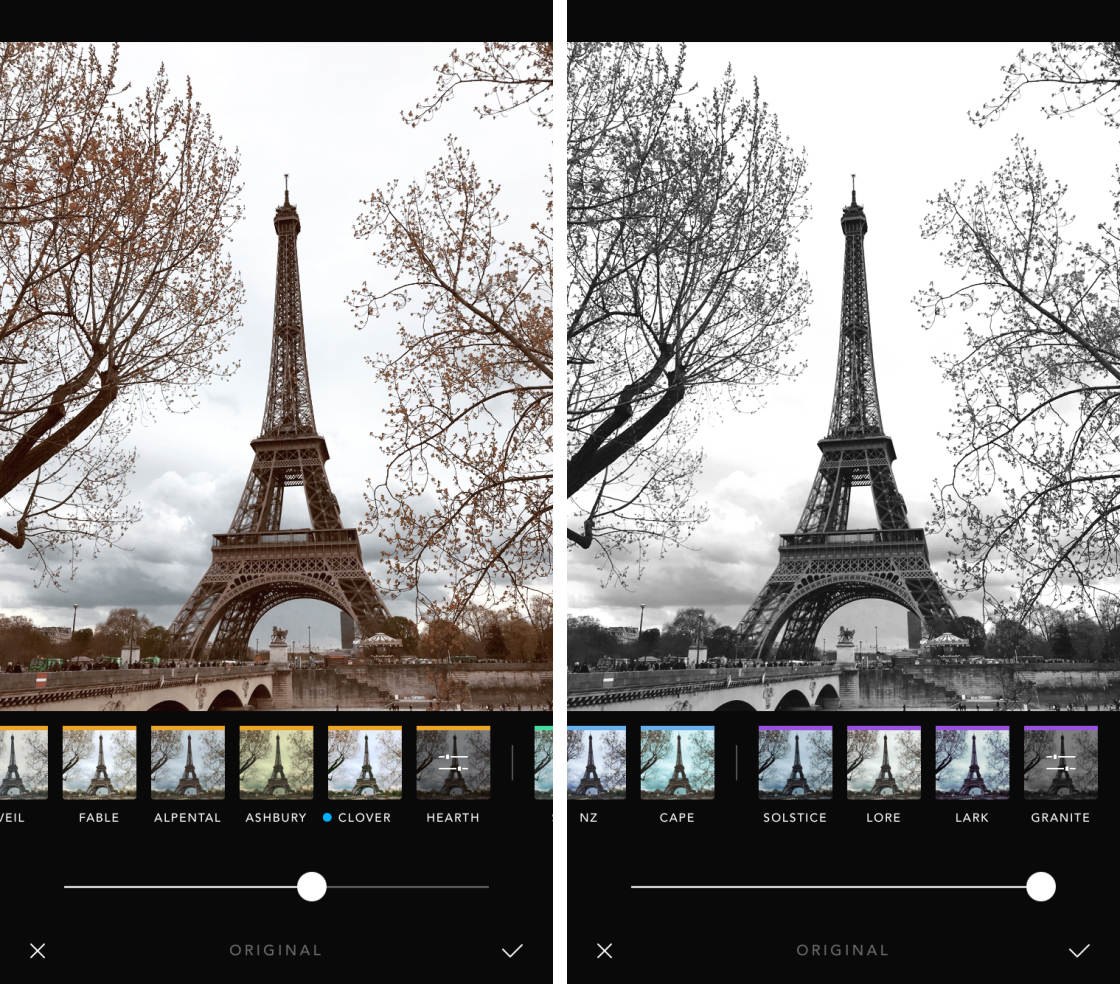
Yellow-toned and faded filters can add a vintage look to your photos. Black and white filters are great for creating a classic, timeless feel.
6. Creative Effects
Afterlight 2 has a range of creative effects that you can apply to your photos. These include dusty textures, light leaks, abstract color shifts, chroma blur effects, and double exposure.
You won’t want to apply these effects to every photo you edit. But when used in the right way, they can add extra visual interest or change the mood of your image.
To access the Afterlight Effects, tap the Effects icon (overlapping circles) at the bottom of the screen.
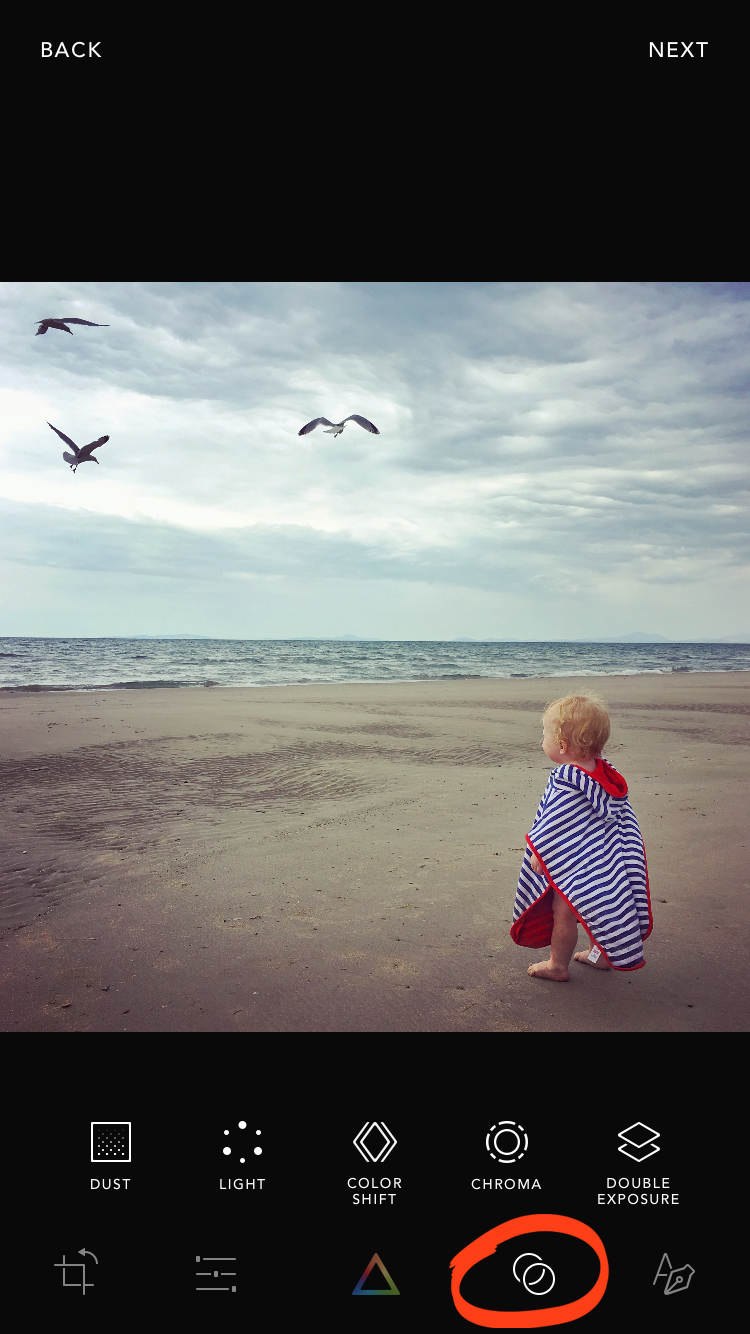
The five categories of effects are: Dust, Light, Color Shift, Chroma and Double Exposure.
6.1 Dusty Textures
The dusty film textures add an aged, vintage look to your photos.
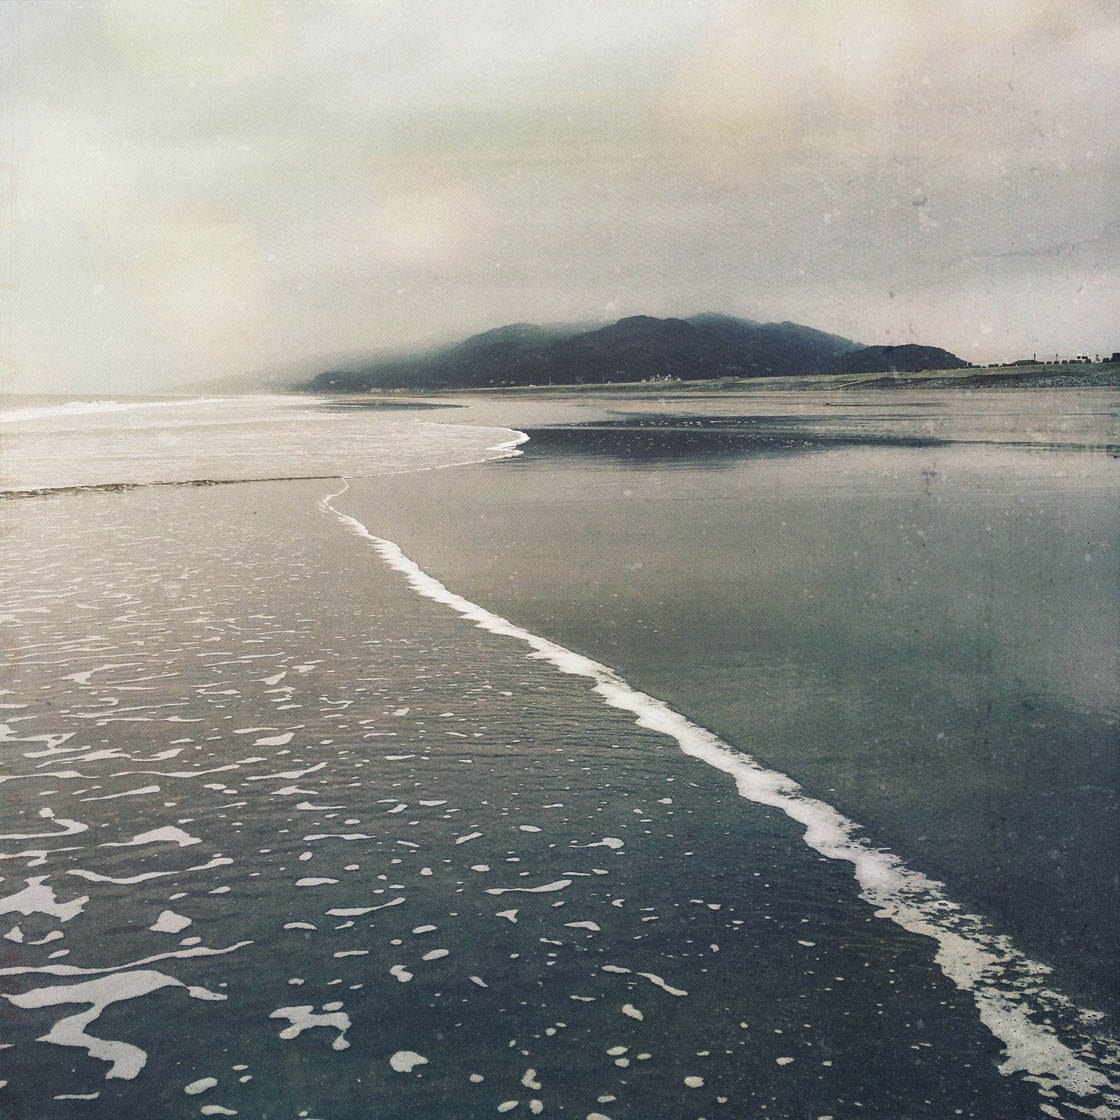
Tap the Dust icon to access the range of dust overlays. Select a dust effect to apply it to your photo. Drag the slider right for white dust, or left for black dust. The further you drag the slider, the stronger the effect will be.
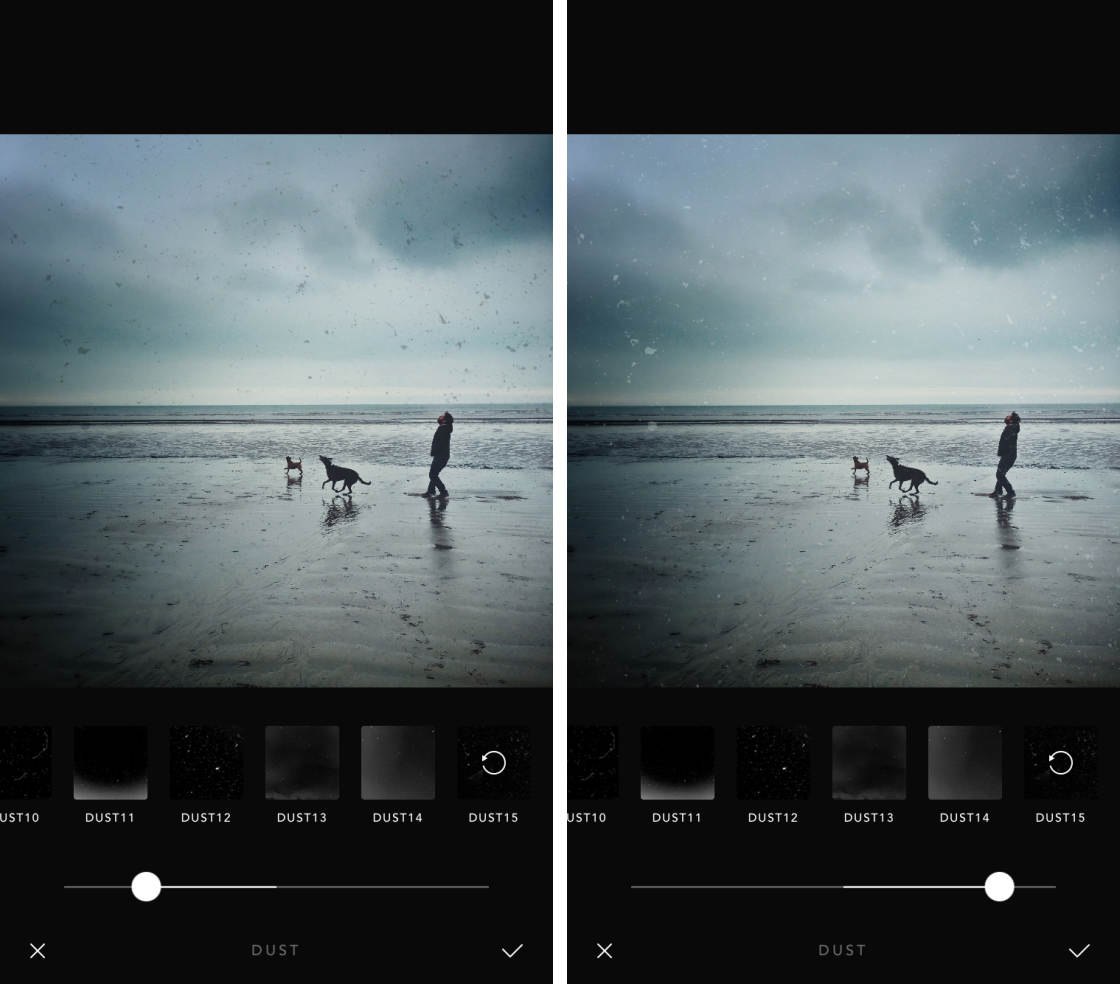
You can rotate the dust overlay 90 degrees at a time by tapping the arrow on your chosen dust icon.
6.2 Light Effects
The Light option lets you add light leaks. These can make it look like you shot your photo with a film camera. There are also rainbow prism effects and other light overlays.
Tap Light, then swipe across to view the range of light effects. Select a light effect to apply it to your photo. Drag the slider left to reduce the intensity of the light.
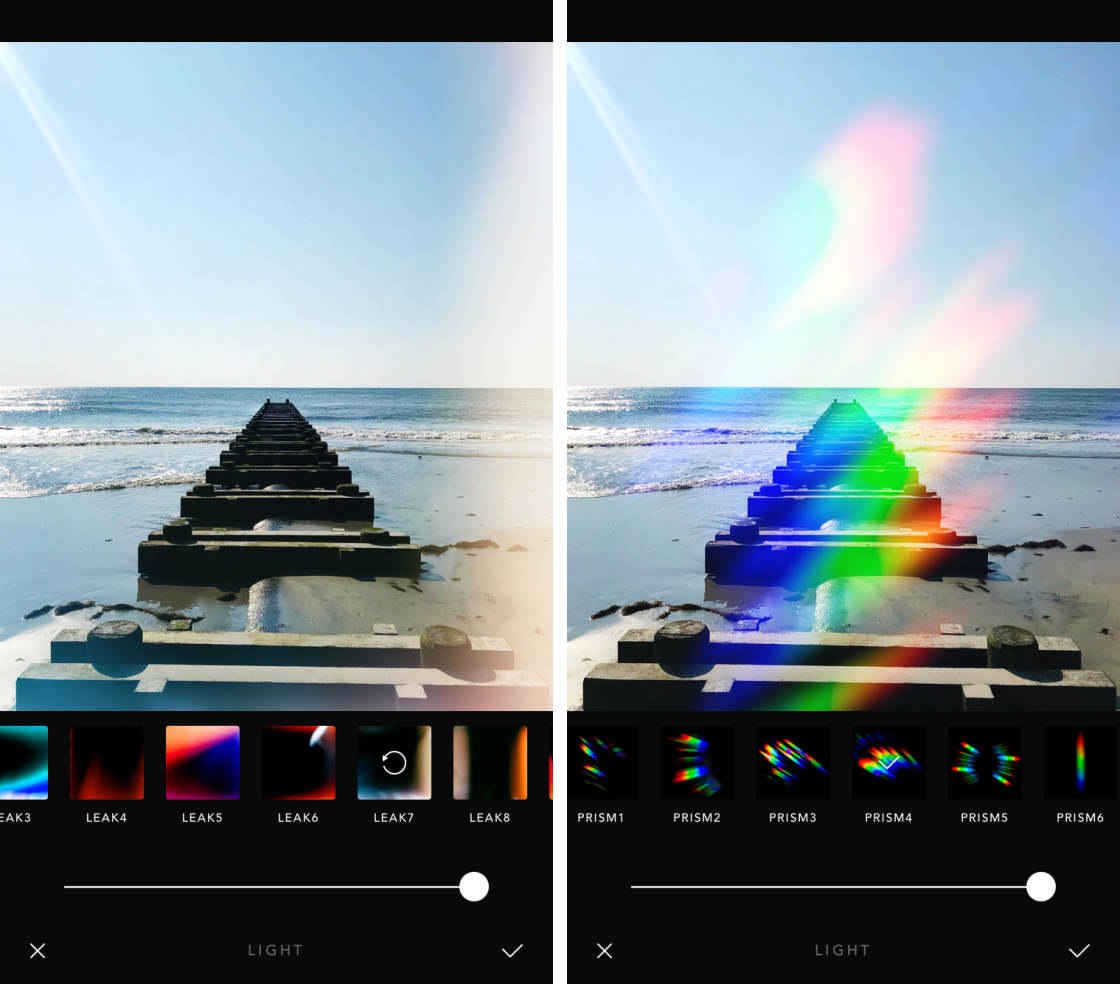
You can rotate the light leaks by tapping the arrow on your chosen leak effect. You can also resize and move the light overlays by pinching or dragging across the screen.
6.3 Color Shift
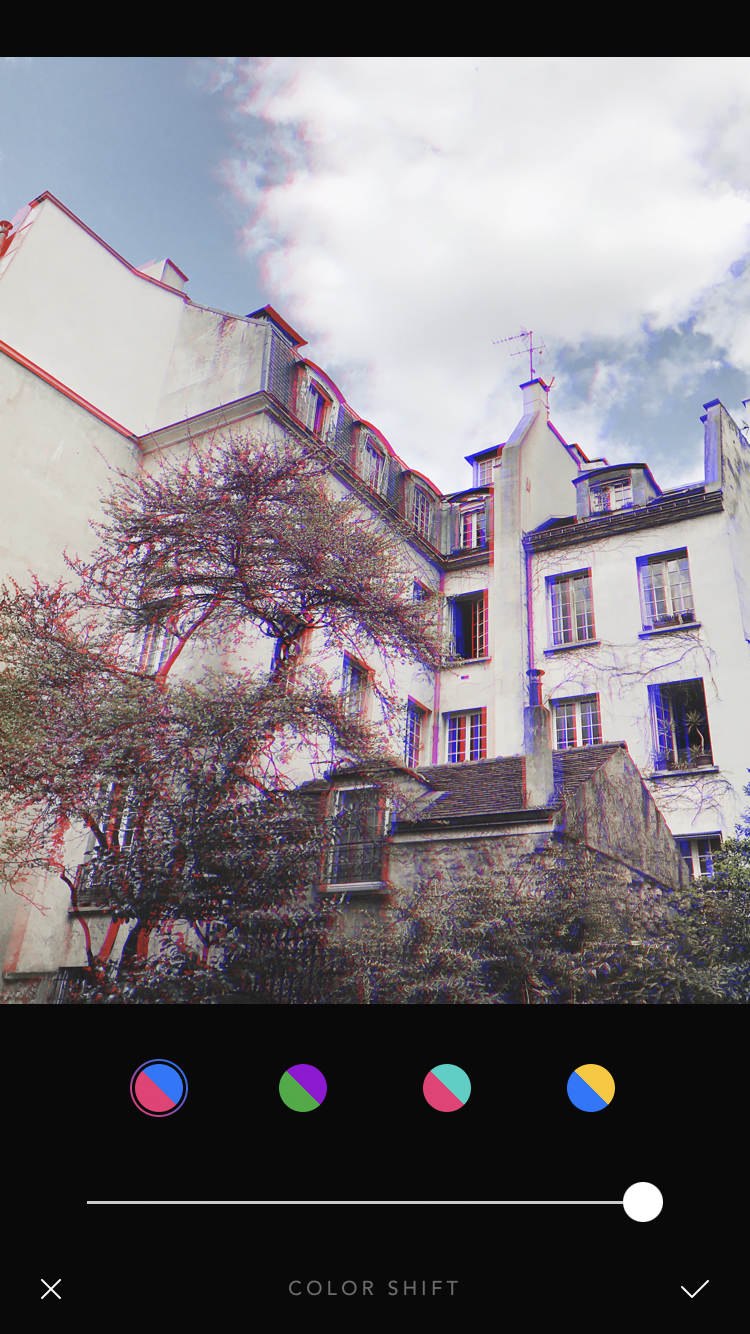
The Color Shift option separates and offsets the red, green, and blue color channels. This creates a glitchy abstract effect.
Tap Color Shift, then choose one of the color options. Use the slider to control the amount of color shift and separation.
6.4 Chroma
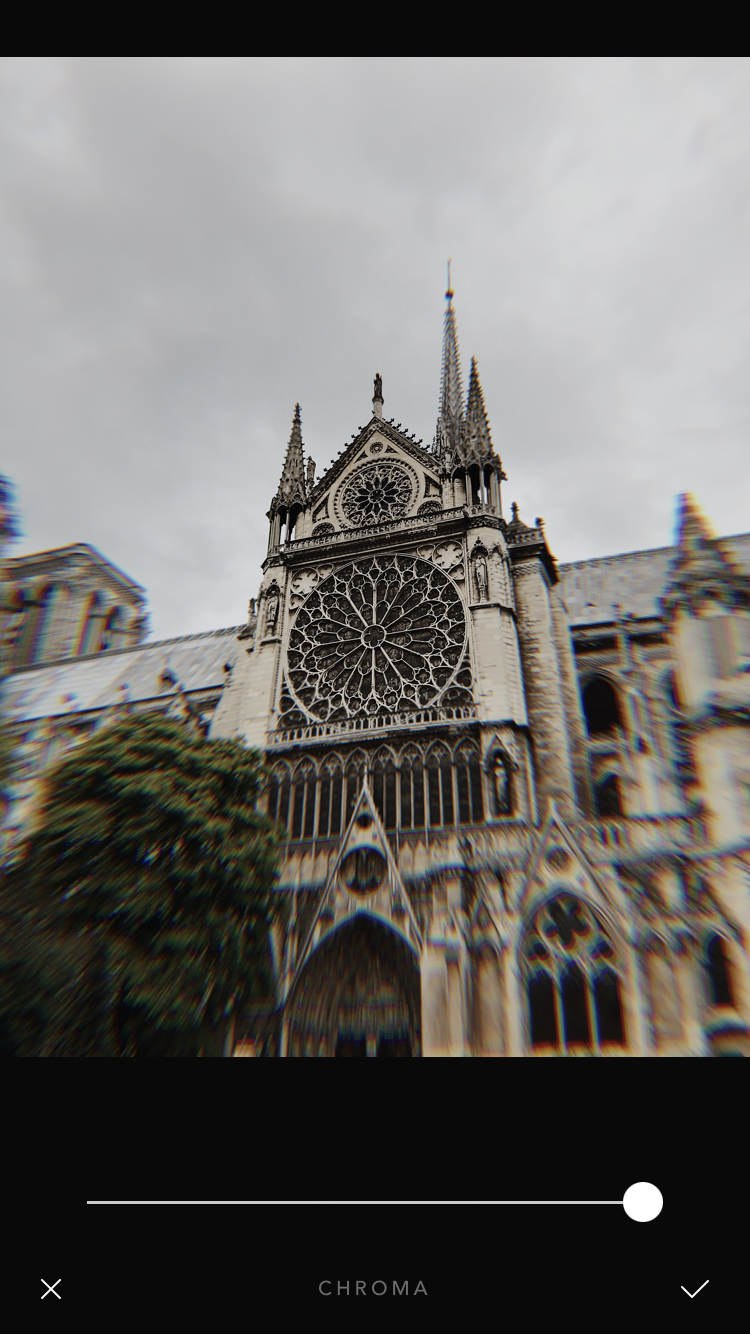
The Chroma effect distorts and blurs the edges of your photo. Tap Chroma, then drag the slider to the right to increase the effect.
6.5 Double Exposure
The Afterlight app has a Double Exposure tool for blending two photos together. Creating double exposures is a fun and interesting way to produce unique images.
Start by opening your first photo, then tap the Double Exposure tool. Now select your second image. Tap Use, then move, rotate and resize the image if necessary. Tap Apply to create the double exposure.
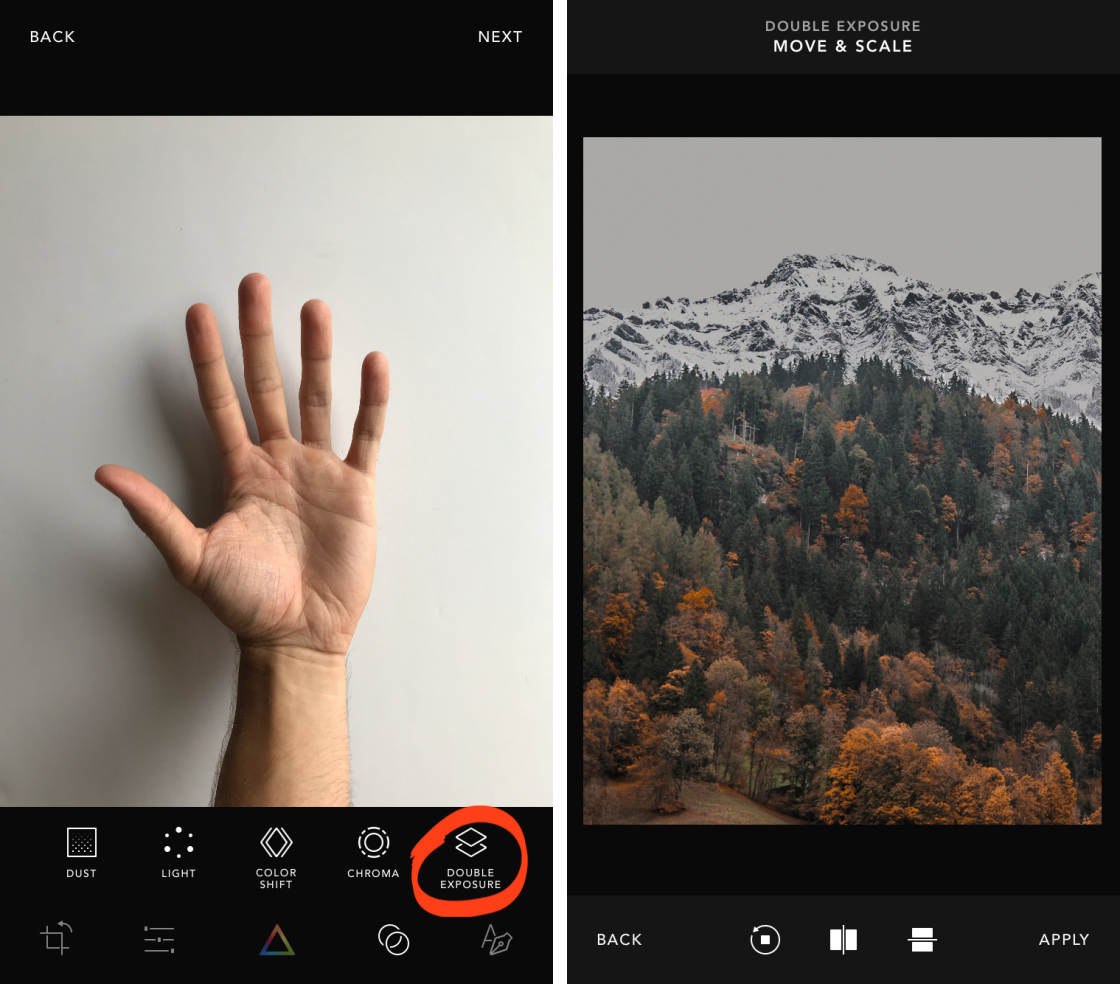
You’ll see a range of blending modes, e.g. Screen, Lighten, Darken, etc. beneath your photo. There’s also a slider at the bottom of the screen.
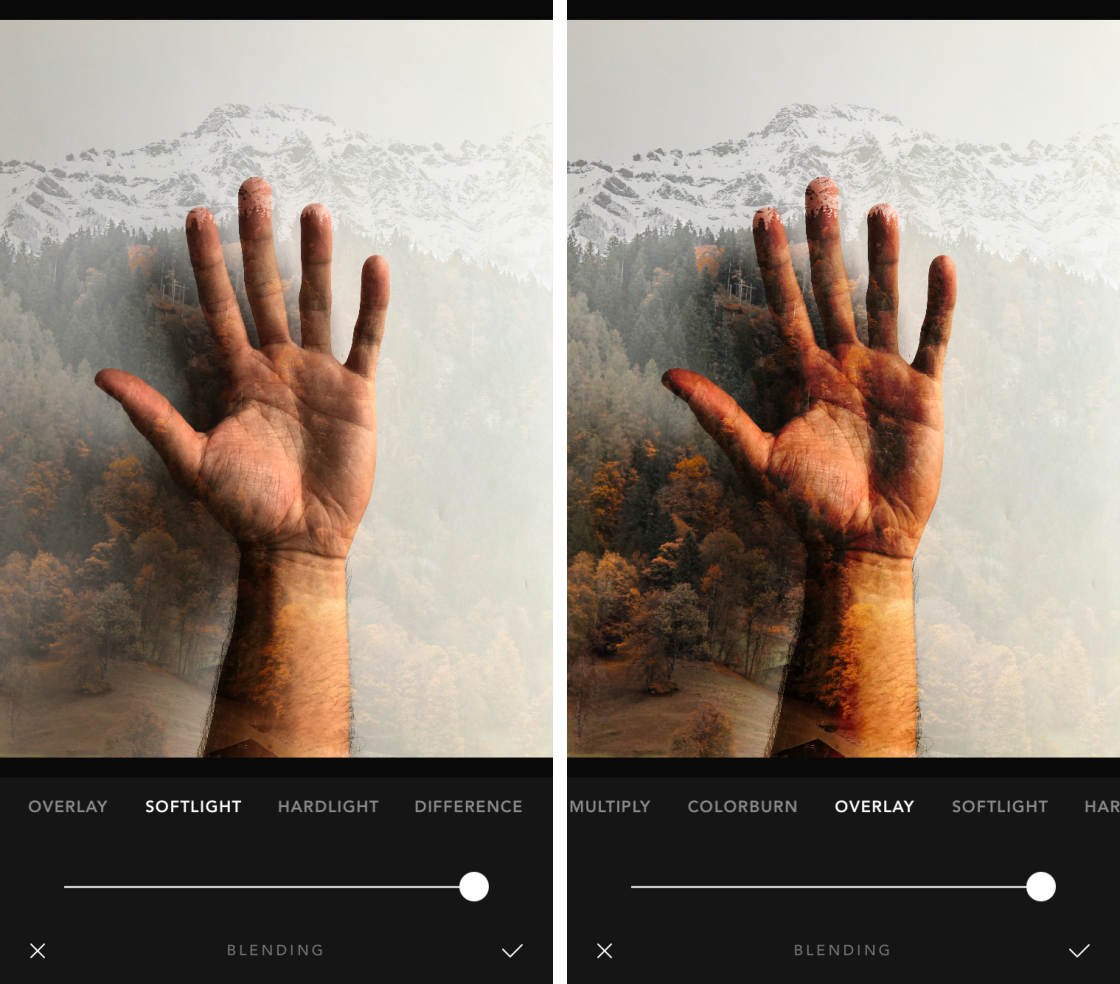
Experiment with blending modes to see how they blend the images in different ways. Use the slider to adjust the intensity of the blend. When you’re happy with the result, tap the checkmark to complete the process.
These creative tools are a great way to add fun or unique elements to your images. You can use a single effect, or add a combination of effects to see how they look together.
7. Text & Artwork
Afterlight 2 lets you customize your images by adding text and graphics. You can add your own text, or use the preset quotes and stickers. Graphics include animals, shapes and beautiful botanical artwork.
To access the Text and Artwork tools, tap the Pen icon at the bottom right of the screen.
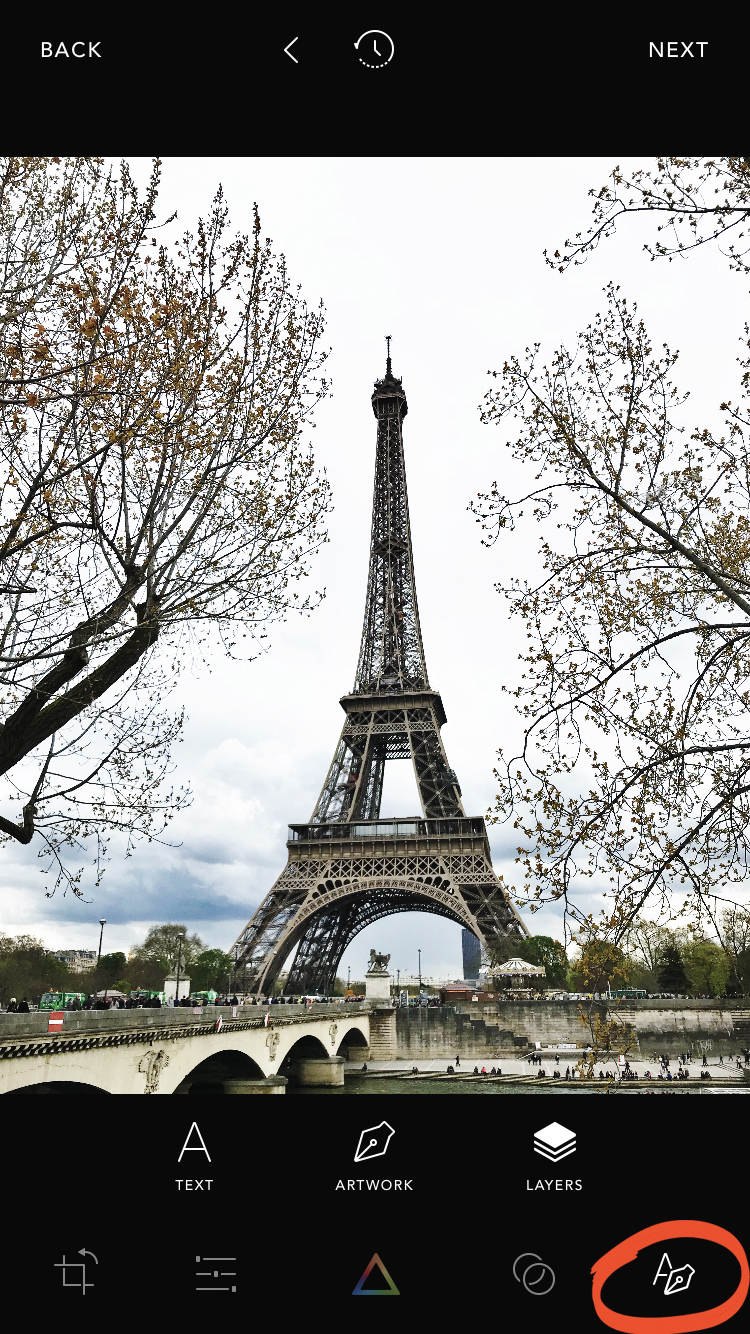
7.1 Add Text
To add your own text, tap Text. Type your text, then tap Enter. You can now format the text using the icons at the bottom of the screen. From left to right, these icons are: Font, Text Alignment, Color, Shadow and Eraser.
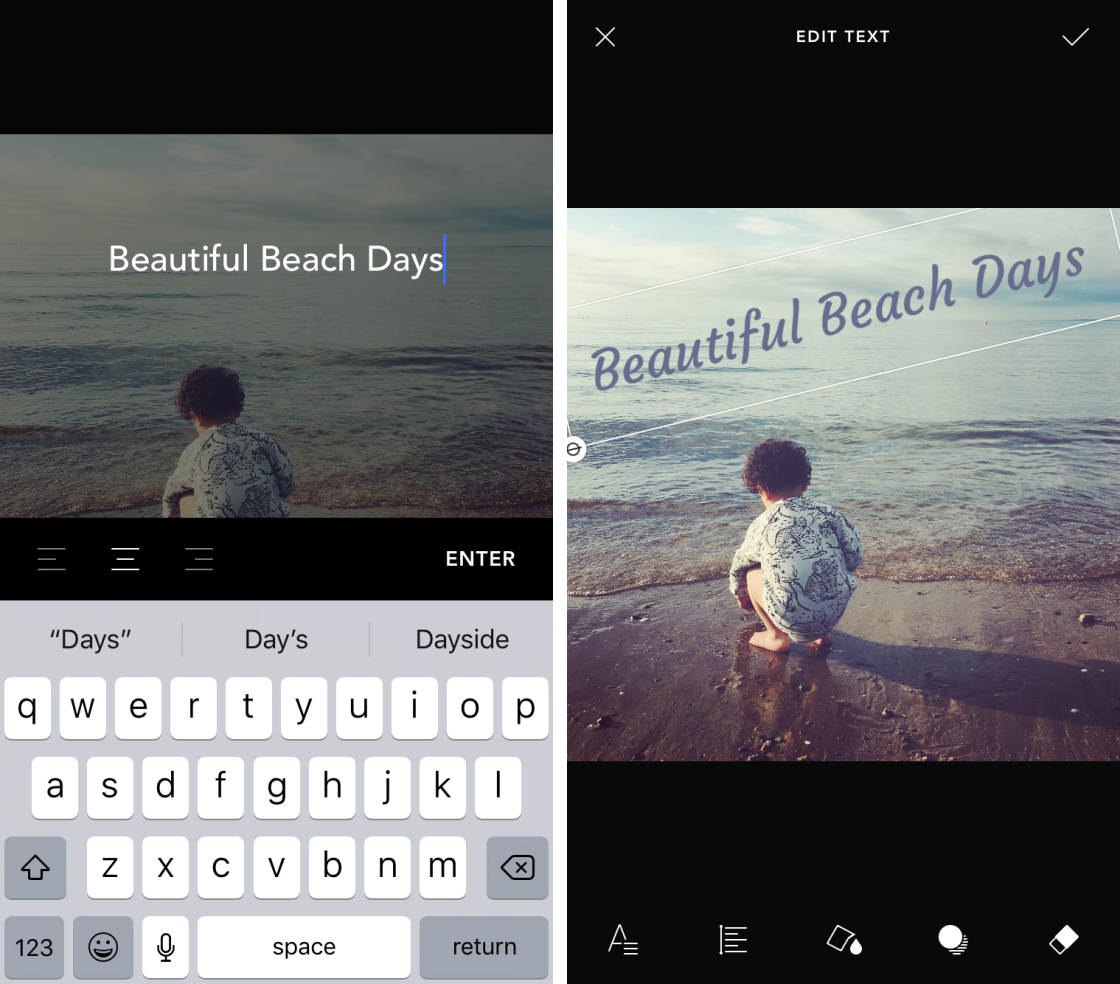
When you’re done formatting your text, tap the checkmark at the top of the screen.
7.2 Add Artwork
To add one of Afterlight’s graphics, tap Artwork. Here you can choose between Quotes, Stickers and Botanicals.
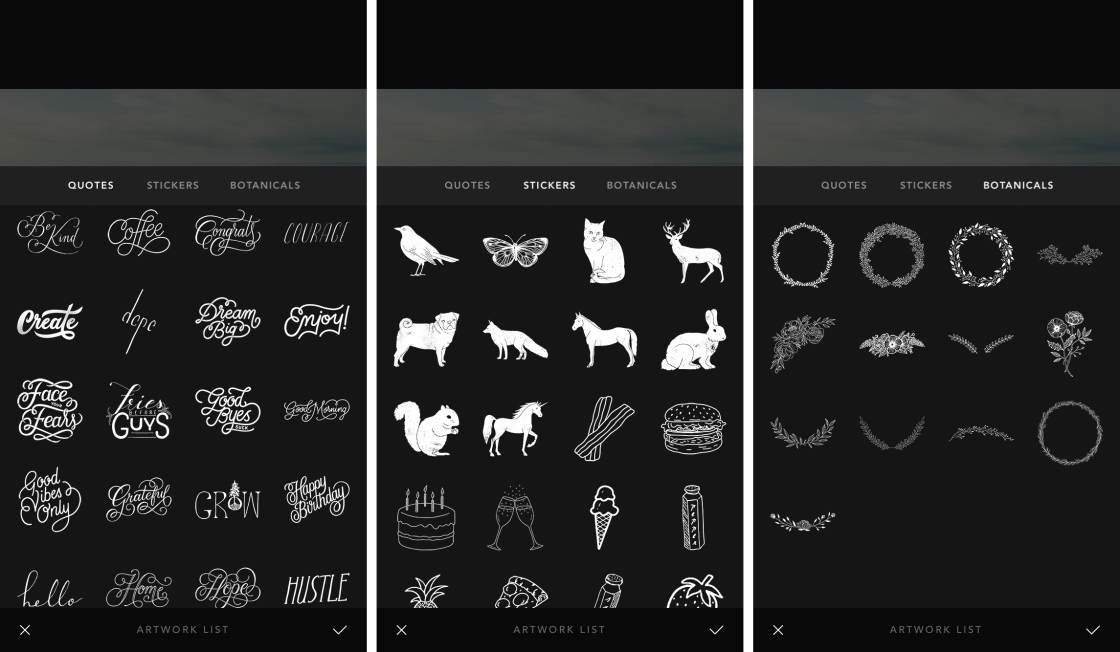
Quotes are preset, stylized phrases and words. Stickers include text and graphics that you can add to your image. Botanicals has a range of beautiful floral and foliage overlays.
Select the artwork you want to use, then tap the checkmark at the bottom of the screen. You can now format the artwork using the Color and Shadow tools at the bottom of the screen. Use your fingers to move, resize or rotate the graphic.
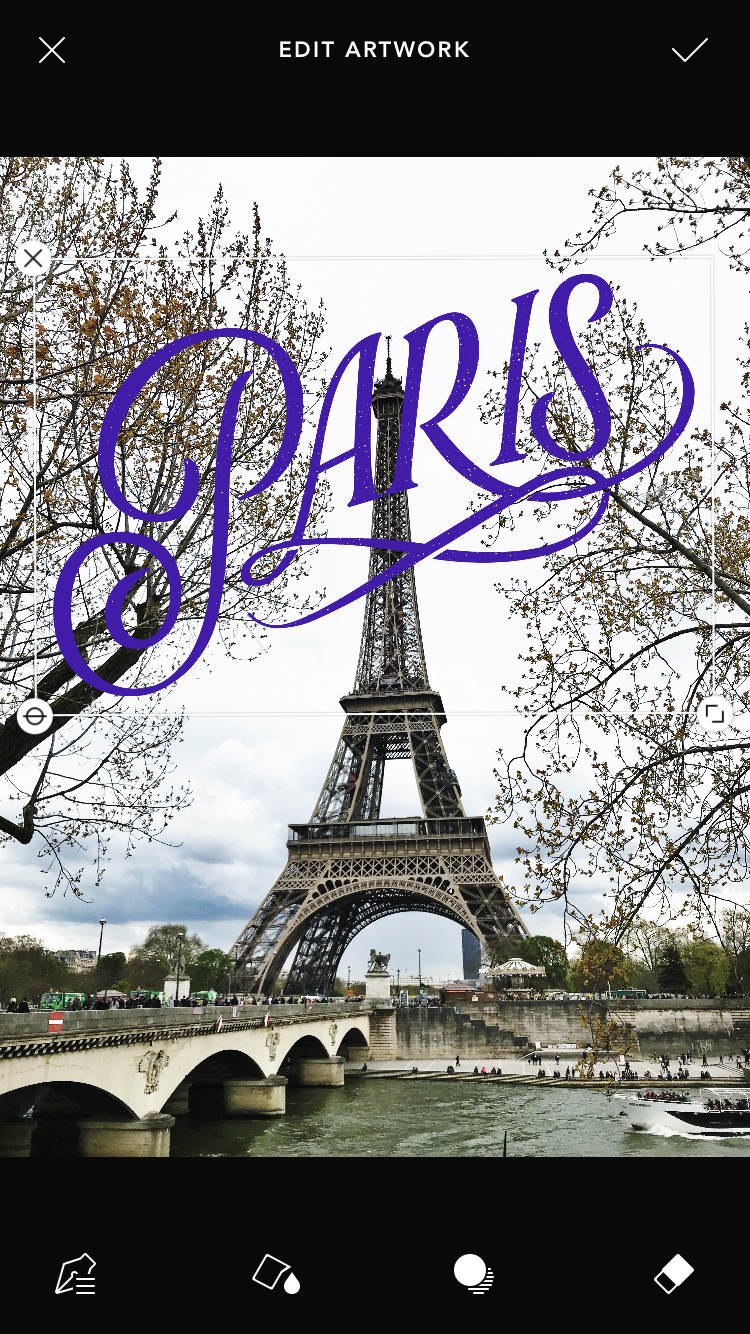
If you’ve added several pieces of text or artwork to your image, you can tap the Layers icon to view each element. Here you can drag the layers to change the stacking order. Or swipe left to delete a layer.

8. Frames
At this point, you’ve finished editing your image. When you’re happy with your edit, tap Next at the top right of the screen.
Here you have the option to add a frame or border around your photo. Frames can finish off a picture, and allow you to present it in a unique way.

If you want to add a frame, tap Frame Options.
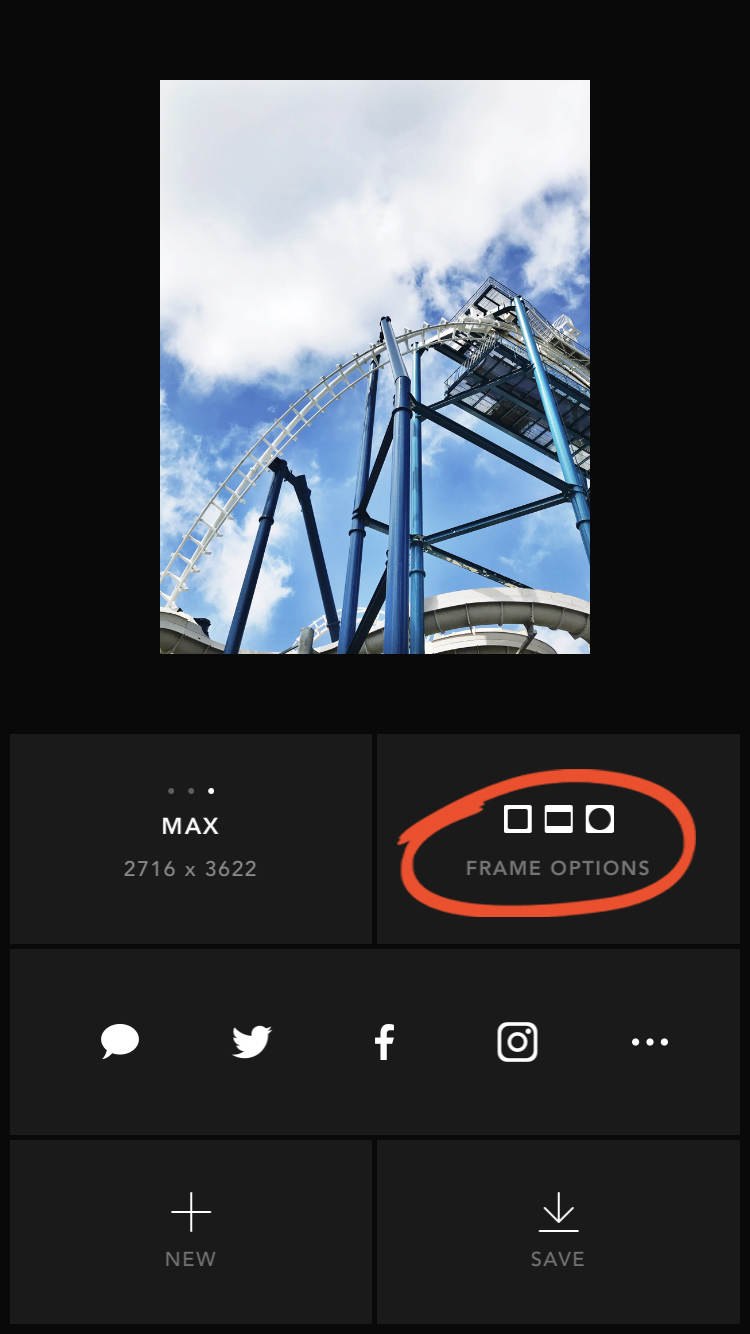
Tap the different frame options beneath your image to see what they look like. Some frames allow you to change the size using the slider. You can also change the frame color at the bottom of the screen.
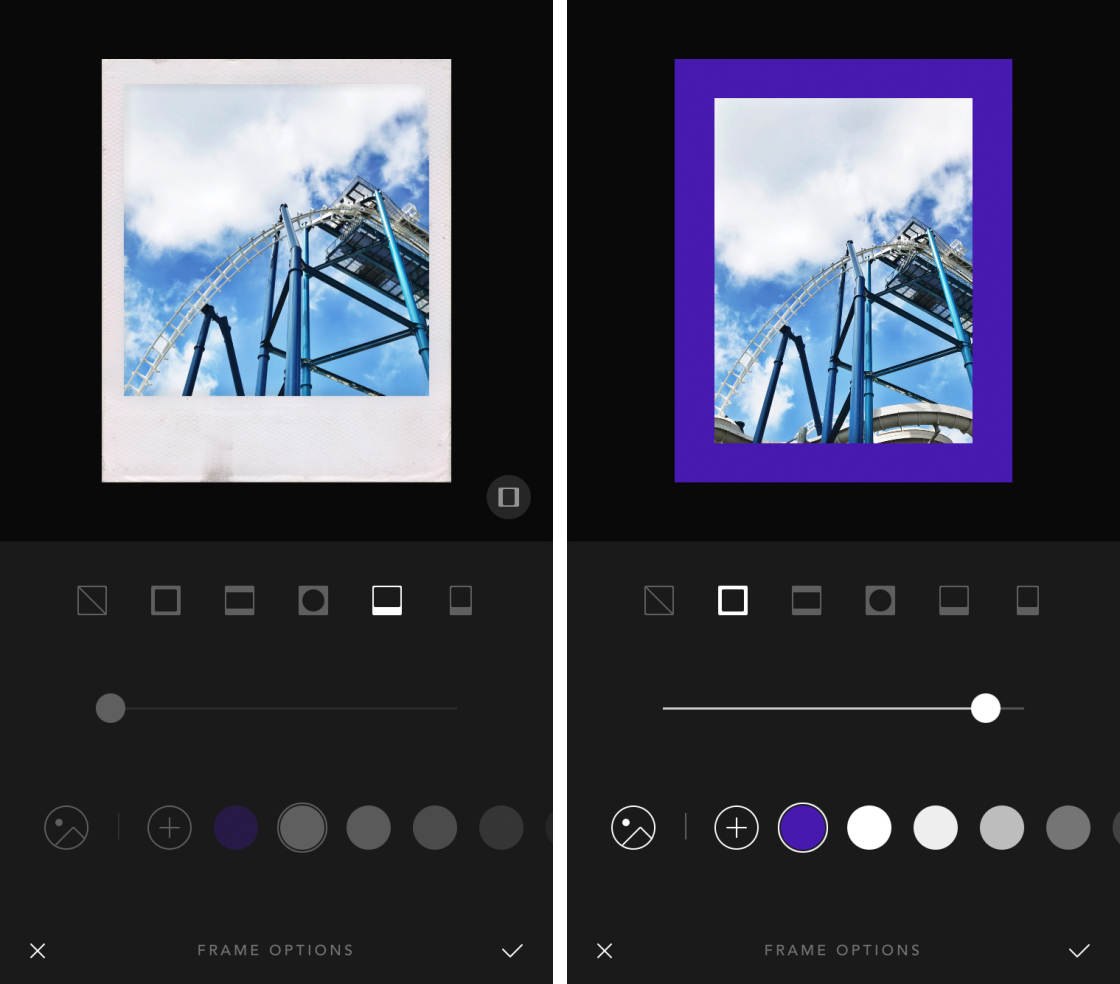
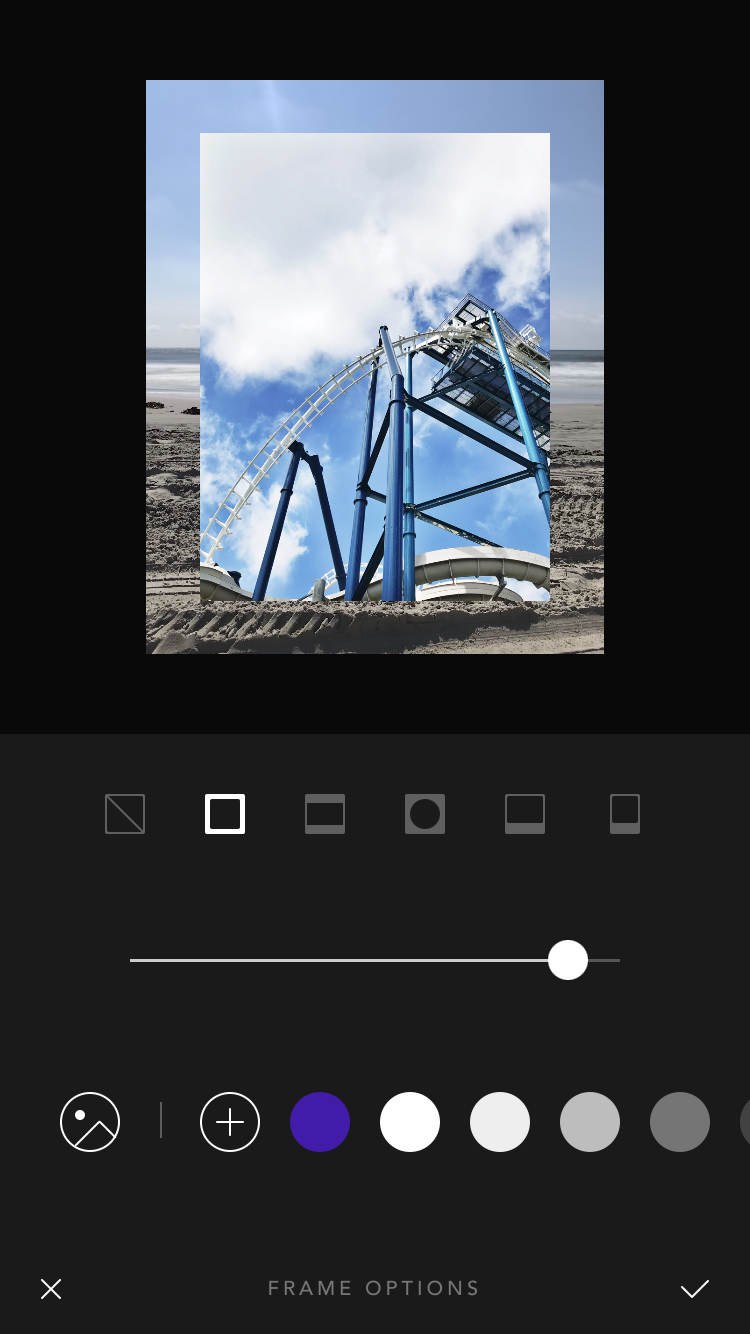
The Mountain icon lets you use one of your own photos as the background of the frame. When you’ve selected a photo, use the slider to adjust the frame size.
9. Save Your Edited Photo
When you’ve finished editing your photo, make sure you save it to your photo library. If you’ve just added a frame, you’ll already be on the right screen for saving. If you’re currently in the main Afterlight editing screen, tap Next at the top right.
First, ensure the size of your photo is set to Max. This ensures you save the highest quality picture. Tap Save at the bottom right to save your edited image. It will save to your iPhone’s built-in Photos app.

When you’ve saved your photo, tap New at the bottom left of the screen to begin editing another photo!

Leave a Reply
You must be logged in to post a comment.